Azure AD
The following steps describe how to configure SAML SSO in Azure Active Directory (AD). For more information, see https://docs.microsoft.com/en-us/azure/active-directory/hybrid/how-to-connect-sso
Download the SSO settings for your iManage environment
Before you begin, download the settings in XML format for your iManage environment. These settings are used to configure Azure for your iManage environment.
In iManage Control Center, navigate to Network & Security > Authentication & SSO, then select Download XML.
Figure: Download XML option in iManage Control Center

Configure SSO in Azure
Complete the following steps in Microsoft Azure to configure single sign-on for iManage users:
After signing into Azure, navigate to Azure Active Directory.
In Enterprise Applications, select New Application.
Select Create your own application. The Create your own application panel appears on the right side of the screen.
In What's the name of your app?, enter a name—for example, iManage.
Select Integrate any other application you don't find in the gallery (Non-gallery).
Select Create at the bottom of the panel.
In the left navigation panel, select Single sign-on.
Select SAML.
Select Upload metadata file.
Figure: Upload metadata file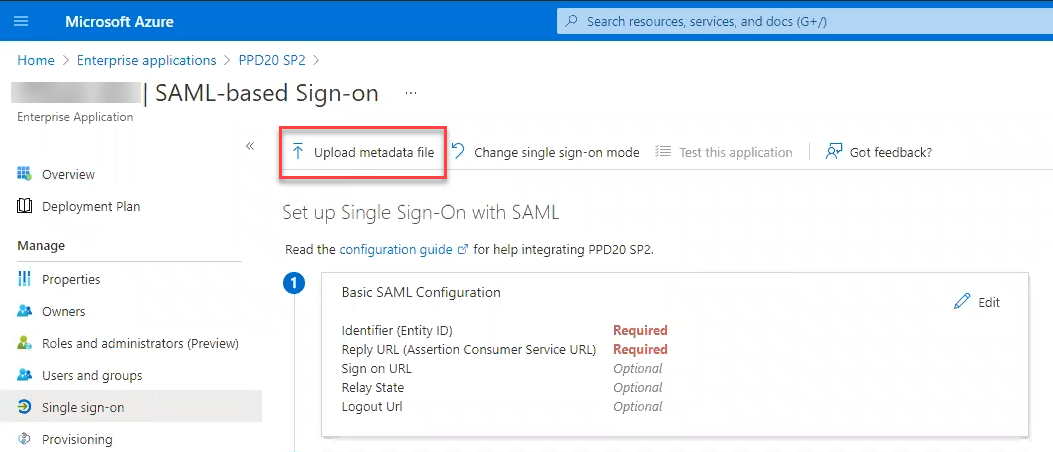
Select the XML file you downloaded from iManage Control Center.
Select Open, and then select Add.
The Basic SAML Configuration panel appears.
The metadata file you uploaded automatically populates the information from iManage in the panel.
In the Basic SAML Configuration panel, select Save.
In the User Attributes and Claims section, select Edit.
To edit the values, in Unique User identifier (Name ID), select ... . The Manage claim page appears.
In Source attribute, ensure the value matches the user ID value in iManage.
The most common option is: user.onpremisessamaccountname. This should be used if you have your user IDs in iManage configured as the first initial of first name and full last name. For example, Barbara Cummings would be bcummings.
For a description of all options available, see the following Microsoft documentation: Claims mapping policy type.Select Save.
Configure Azure to sign both the certificate assertion and response:
In SAML Signing Certificate, select Edit. The SAML Signing Certificate panel appears.
In Signing Option, select Sign SAML response and assertion.
By default, this is set to sign the assertion only, and not the response. Failure to set this properly will cause a SAML Login error "invalid response" error for users attempting to sign in.Select Save.
Assign Users
In the left navigation panel, select Users and groups.
Select +Add user/group.
To open the Users panel, under Users, select None Selected. Search for, and add each user or group that needs to authenticate with iManage, then click Select.
When you have completed adding all the users, select Assign.
Download and import settings to iManage Control Center
In the left navigation panel, select Single Sign-on.
Download the Federated Metadata XML file. In the SAML Signing Certificate section, locate Federation Metadata XML, and select Download.
Figure: Download Federated Metadata XML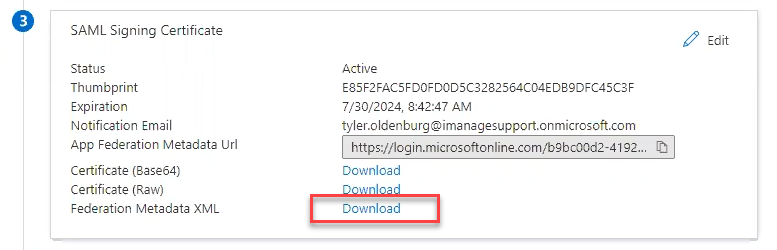
Import the Federated Metadata XML file into iManage Control Center by returning to iManage Control Center and completing the steps in Authentication & SSO.
Troubleshooting SAML SSO with Azure AD
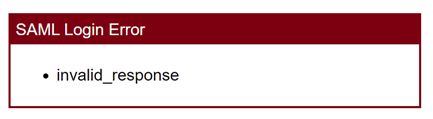
If users receive the following error when attempting to sign in:
Figure: SAML Login Error
Confirm that the Name ID claim Source Attribute is configured properly in Azure, as described in step 13 above.
Figure: Unique User Identifier (Name ID) value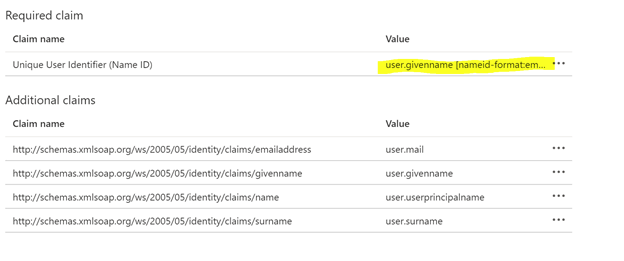
The Name ID value must match the User ID format in iManage in order for Azure to properly match the users in Azure with the users in iManage.Confirm that Azure is configured to sign both the SAML response and assertion as described in step 15 above.