File Types
The iManage Work system can open, read, and modify many types of documents. This includes popular file types, such as Microsoft Word documents docx, Excel spreadsheets xlsx, along with less common document types, and even custom document types, such as a format proprietary to the organization.
To associate a document type to an application that can read it, two resources work together: File types, and file handlers.
File types define lists of types of documents based on their application extension. That is the documents suffix such as Microsoft Word documents of .docx, or Adobe Acrobat documents of .pdf.
File handlers define lists of applications that can open specified file types. This ties an application, such as Microsoft Word to a file type such as .docx.
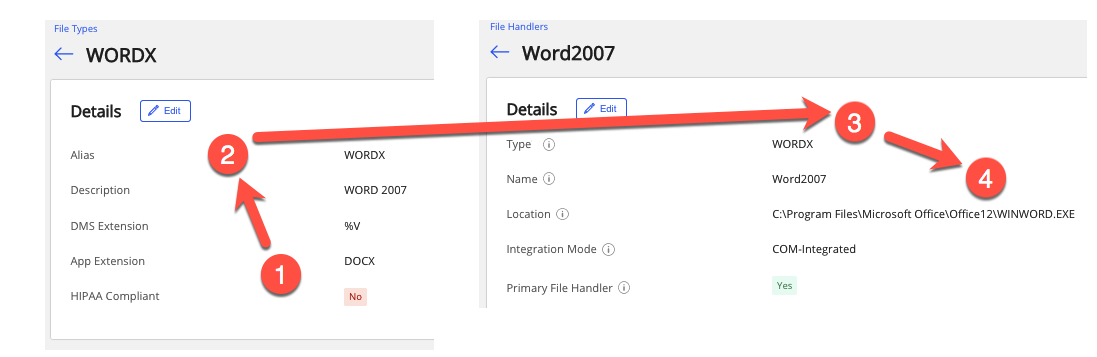
As an example, the following defines a Word .docx document to the application Microsoft Word. The display shows the association of a file type to its corresponding file handler for a Word document .docx.
In the files type resource, the App Extension, DOCX, in step 1, is assigned the Alias of WORDX, in step 2.
The file handler resource completes the assignment by making the association of the type, WORDX, in step 3, to be the same as the alias from file type, step 2. The application is specified in the Location, in step 4.
The two resources allow the application to open the document type. For example, after the file type and file handler is defined, selecting a .docx document within iManage Work displays that document in the preview window. This system does not apply to editing documents with iManage Work For Windows. In that case, when the document is checked out, the editing occurs on the user's Microsoft Windows computer and according to Windows' governance of document handling.
More than one file type may be assigned to be opened by Microsoft Word. Each file type requires two separate entries. For example, a document type of .doc may be assigned an alias of Word2007. A text file of document type .txt may be assigned an alias of TEXT. In each case, a separate file handler is required. File types can also be associated to more than one application. For example, a txt file may be associated with both Microsoft Word, and Windows' Notepad.exe. However, one of those file handlers must be marked as the primary application. For more information about how to map document types to the same application, see Mapping multiple file types to an application.
On the File Types page, you see a table that displays information about all file types along with their metadata values. Here, you can perform the following:
Search for the required file type using the Search field.
Filter by HIPAA Compliant or App Extension fields.
Add a file type using the Add a File Type feature.
Edit a particular file type's metadata values using the Edit feature.
Enable or disable HIPAA compliance for single or multiple filetypes using the HIPAA Compliant feature.
Delete single or multiple file types using the Delete feature.
View details of a file type using the View feature.
Searching for file types
On the ribbon bar, you see the following Search option that you can use to search by Alias and Description.
Figure: Search field
![]()
Filtering file types
|
Option |
Sub-option |
Description |
|
HIPAA Compliant |
|
Choose yes to list the file types that have the value set to Yes and vice versa. |
|
App Extension |
NA |
Enter the App extension name or any keyword that matches the App extension name, and click Apply. The filtered values get displayed on the screen. For example, to filter all occurrences of the.DOC extension, enter this keyword in the App Extension field and select Apply. All App Extension names starting with .DOC extension are listed. |
Adding a file type
Select +Add File Type. The Add File Types dialog box appears.
Enter the following information and select Save. A new file type gets added to the Library.
Table: File type metadata
|
Field |
Description |
|
Alias |
Specifies the name by which documents of this type are identified. This name must match the Type value from a file handler.
|
|
Description |
Specifies the description of the file type. |
|
DMS Extension |
Specifies the filename extension that iManage uses to store a document of this type. The default value is %V. If %V is entered as the DMS extension, iManage uses the document’s version number as the file name extension. For example, if the document number is 157, document version is 2, iManage stores the file as 157.2. For more information, see Default Document Types in iManage Work Server Administration Guide. The DMS Extension may not be required depending on the iManage Work environment. For more information, see your iManage Work system administrator. |
|
App Extension |
Specifies the extension that iManage should add to the filename for the document when it is exported, checked-out, emailed or downloaded. iManage recommends setting the App Extension for a file type to that recognized by the document's assigned application. For example, use DOCX for a Word document. You can use the same extension for multiple file types. |
|
HIPAA Complaint |
Specifies to encrypt document of this file type. If set to Yes, the document will be encrypted. If set to No, the document will not be encrypted. However, see below for additional information. This is the default value.
|

Editing a file type
This option is available on the:
ribbon bar (select file types to see this option on the ribbon bar)
kebab menu (click on the
 icon adjacent to each file type)
context menu (Right-click a file type to see this option)
Use one of the preceding options and select Edit. The Edit <item-id> dialog appears. It displays the details listed in Table: File Type Metadata.
Enabling/disabling HIPAA compliant option
Single file type
This option is available on the:
ribbon bar (select a file type to see this option on the ribbon bar)
kebab menu (click on the
icon adjacent to each file type)
context menu (hover on a file type, and right-click to see this option)
For example, let us use the context menu option to enable the HIPAA compliant option.
Scenario: A file type's HIPAA compliant option is disabled (value is set to NO)
Solution: Right-click a file type and select Enable HIPAA Compliant . The HIPAA Compliant option for the file type gets enabled. The updated value automatically reflects in the table for the file type.
Multiple file types
This option is available on the ribbon bar when you select file types.
Select file types. You see HIPAA Compliant drop-down list on the ribbon bar, select it, this lists Yes and No options.
Select the required option. A confirmation message appears. Read and confirm the action. The updated value gets reflected in the table for all the selected file types.
Deleting file types
Single file type
This option is available on the:
ribbon bar (select a file type to see this option on the ribbon bar)
kebab menu (click on the
icon adjacent to each file type)
context menu (Right-click a file type to see this option)
Use one of the preceding options and select Delete. Confirm the action to continue or abort .
Multiple file types
This option is available on the ribbon bar when you select file types .
Select file types o n the ribbon bar and select Delete.
Confirm the action to continue or abort .
Viewing file type details
This option is available on the:
ribbon bar (select a file type to see this option on the ribbon bar)
kebab menu (click on the
icon adjacent to each file type)
context menu (Right-click a file type to see this option)
Use one of the preceding options and select View. The <File_Type_ID> page opens. Details of the selected file types are displayed .
NOTE:
Use the  button to edit metadata values except the Alias.