


Creating a template
Workspace templates are used to create workspaces by defining the structure of a workspace. This structure includes containers, their hierarchy, and names.
Creating a workspace template requires two steps:
Defining the basic template. This defines the basic information about the template, such as its name, default custom property aliases, and default security.
Defining the container structure. This defines the container structure, their hierarchy, and creation requirements. For information and procedures to define container structure, see Creating a folder structure.
Defining the basic template
1. In iManage Control Center, from the Dashboard panel, select Settings > Templates.
2. Select

Figure: Create Template dialog box
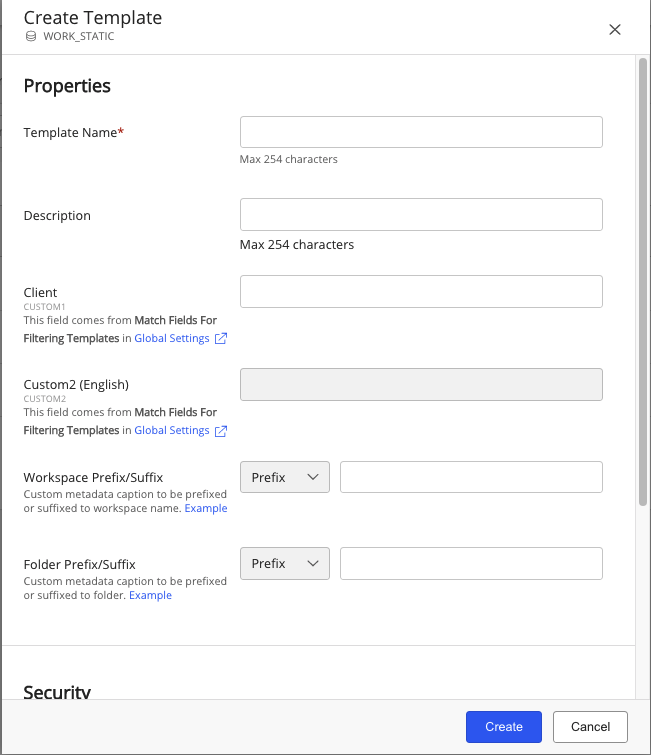
3. Enter the following information for the new template.
Table: Add Templates fields
|
Field |
Description |
|
Template Name* (Mandatory) |
This is the name of the template. Maximum characters length: 254. Special characters allowed: *().&-_[]`~|@$%^?:{}!',\#+<>;"= Unicode allowed: Yes Spaces allowed: Yes |
|
Description |
This is a description of the template. Maximum characters length: 254. Special characters allowed: *().&-_[]`~|@$%^?:{}!',\#+<>;"= Unicode allowed: Yes Spaces allowed: Yes |
|
Match Fields for filtering templates |
This enables users to search for templates based on these match fields while creating new folders/tabs/search folders in iManage Work client applications. The custom property aliases entered here will be included in workspaces created from this template. The default values are custom29, and custom30. For more information about these fields, see Global Settings. |
|
Workspace Prefix/Suffix |
This is the custom caption, or text, that is appended as a prefix or suffix to the name of the workspace. For more information, see Adding Name Prefixes and Suffixes |
|
Folder Prefix/Suffix |
This is the custom caption, or text, that is appended as a prefix or suffix to the name of the each container name. For more information, see Adding Name Prefixes and Suffixes |
|
Security |
|
|
Default Security |
This is the initial default security assigned to the workspace. Private: Secured workspace; available only to the owner or users who are explicitly granted access to the workspace. Public: Non-confidential workspace that is available to all users. View: Available only for viewing. |
|
Explicit Access (Users/Groups) |
This allows users and groups to have modified explicit access. Select the user or group. Each user or group can have their access modified by selecting the new access permission. |
4. Select Create.
To add folders, search folders, and tabs to this template, see Creating a folder structure.

