Groups
The following topics are available:
Introduction
Groups are collections of multiple users. Groups can be assigned to workspaces, folders and tabs, and documents, and with a specific access permission. This allows that a precise set of users can be assigned to the same item and all with the same access permission. Groups can be maintained by adding or removing users, or changing the access permission, rather than modifying individual users and their access permission. Users can be member of multiple groups.
For instance, a group can be created for general users containing of literally hundreds of users and assigned to a workspace with view access permission. In the same way, a group can be created for editors containing three users and with read/write access permission for one folder only.
Global groups and library-level groups
Based on your environment, iManage Control Center may display the following Groups menu, which contains the following options:
Figure: Groups menu
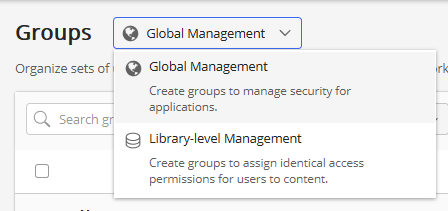
Global Management: Use this option to view, manage, and create global groups. Global groups are created and managed independently of any iManage Work library, and changes made to the global group are updated at the global level, and not individually within each library.
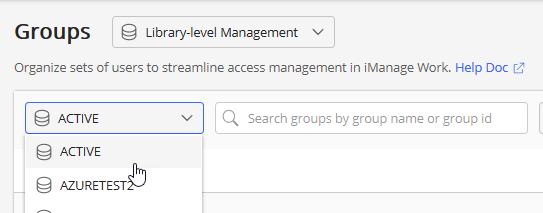
Library-level management: Use this option to create and manage groups at the library level. Library-level groups are created for a specific library and can be assigned to workspaces, containers, and documents within that library.
Selecting this option displays a secondary menu where you can select individual Work library:
Figure: Library menu
Searching for groups
On the ribbon bar, you see the following Search option. Use this feature to search by group name or group Id.
Figure: Search field
![]()
Creating a group
Based on your iManage Work environment, select one of the following options.
To create a global group that applies across all iManage Work libraries: At the top of the Groups page, select Global Management, then select
 .
.To create a library-level group:
At the top of the Groups page, select Library-level Management, select the library in which the group should be created, then select
 .
.
orAt the top of the Groups page, select the library in which the group should be created, then select
.
The Create Group dialog box appears.
Figure: Library Create Group

Enter the following group information.
Table: Group informationField
Description
Group ID* (Mandatory)
Enter a unique group ID for this group (string value up to 254 characters).
Name
Enter a name for the group (string value up to 254 characters).
Group Status
This indicates the group is enabled.
If set to Enabled, the group is active and can be assigned to containers, documents, or emails, and users can be assigned to, or removed from the group. This is the default.
If set to Disabled, the group is inactive, and cannot be assigned to containers, documents, or emails, and users cannot be assigned to, or removed from the group.
A group cannot be deleted. Disable the group if it is no longer required.
External Group
This indicates the group is for external users.
If set to Enabled, the group is limited to only external users. Regular users cannot be added.
If set to Disabled, the group is limited to only regular users. External users cannot be added. This is the default.
Select
 . The new group gets created.
Enabling or disabling groups
Single Group
This option is used to add users to the group. It is available on the:
Ribbon bar: Select a group to see this option on the ribbon bar.
Kebab menu: Select the
 icon adjacent to each group to see this option.
Context menu: Right-click the group to see this option.
If set to Enabled, the group is active and can be assigned to containers, documents, or emails, and users can be assigned to, or removed from the group.
If set to Disabled, the group is inactive, and cannot be assigned to containers, documents, or emails, and users cannot be assigned to, or removed from the group.
Multiple Groups
This option is available on the ribbon bar.
Select the groups.
If all the selected groups have the same status, select the new status in the ribbon:
If set to Enabled, the group is active and can be assigned to containers, documents, or emails, and users can be assigned to, or removed from the group.
If set to Disabled, the group is inactive, and cannot be assigned to containers, documents, or emails, and users cannot be assigned to, or removed from the group.
If all the selected groups do have the same status, select the new status from Group Status in the ribbon:
If set to Enabled, the group is active and can be assigned to containers, documents, or emails, and users can be assigned to, or removed from the group.
If set to Disabled, the group is inactive, and cannot be assigned to containers, documents, or emails, and users cannot be assigned to, or removed from the group.
Managing members
To add or delete users from a group, select one of the following options:
Kebab menu: Select the
icon adjacent to each group to see this option.
Context menu: Right-click the group to see this option.
To add users to the group:
Use one of the preceding options and select Manage Members. The group's <Group-name> page appears. Select
 .
.Either select users you want to add to the group, or look for particular members using the Search field, and click Add. The users get added to the group.
To delete users from the group:
Select the user.
Either right-click and select
 or on the ribbon bar, select
.
or on the ribbon bar, select
.
Editing a group
This option is available on the:
Ribbon bar: Select a document to see this option on the ribbon bar.
Kebab menu: Select the
icon adjacent to each document to see this option.
Context menu: Right-click the document to see this option.
Use one of the preceding options to edit the group. Alternately, select the group, this navigates you to DETAILS tab, select  to edit. The following Edit <Group_name> dialog appears.
Edit the required details. For more information about the field description, see Table: Group Information section.
Click Save.
Copying a group
This option is available on the:
Ribbon bar: Select a document to see this option on the ribbon bar.
Kebab menu: Select the
icon adjacent to each document to see this option.
Context menu: Right-click the document to see this option.
To create a copy of the existing group, use one of the preceding options and select Copy.
Enter a group Id. You must provide a different Group ID to create a copy.
Select Create.
Viewing group details
It is available on the:
Ribbon bar: Select a document to see this option on the ribbon bar.
Kebab menu: Select the
icon adjacent to each document to see this option.
Context menu: Right-click the document to see this option.
Clickable link: In the Name column, select a group.
Use one of the preceding options to view the group details. You see the following details:
Group ID
Group Name
Group Number
Status
External Group
OS Type
Domain
Sync Id
Last Sync Date
Group Distinguished Name
Assigning users and groups
Users and groups must be assigned to iManage Work items. Items include workspaces, containers, and documents. To assign a user or group, use an iManage Work client, and not the iManage Control Center. Any user with sufficient access permission for the item can make this assignment.
To assign a user or group:
Within an iManage Work client, navigate to the item, and select Show Details. This displays the properties tab.
Select View Security Details in Default Security. This displays the Security details tab.
Select Properties.
Select Add Users/Groups.
Select the users and groups from among the available choices. Multiple selections can be made.
For each user or group, assign an access permission from the security drop-down next to the user or group name.
When complete, select Confirm to save the changes to the users and groups.
To remove a user or group:
Within an iManage Work client, navigate to the item, and select Show Details. This displays the properties tab.
Select View Security Details in Default Security. This displays the Security details tab.
Select Properties.
Select Add Users/Groups.
Select the users and groups from among the available choices. Multiple selections can be made.
For each user or group, select Remove from their access permission of the security drop-down next to the user or group name.
When complete, select Confirm to save the changes to the users and groups.