Users
A user is the basic entity for accessing the iManage Work documents and applications. This is most often an individual person, but it can also be a service account to perform automated tasks. iManage Work requires users to be created or imported. This can be done manually, periodically through a directory service such as Microsoft Windows' active domain, or when migrating users to a new iManage Work system. The iManage Work system administrator then assigns roles to those users, adds users to groups, and optionally applies access rights to individual users when their default access rights need to be modified
Each iManage library has its own list of validated users. To gain access to a library, a user must be added to each library individually. A user's access to containers or documents within a library is defined by the combination of the following factors:
Security Policy Manager grants or denials. Security Policy Manager (SPM) is an optional iManage application that manages user access to system resources, including iManage Work.
The default security of the item (such as public or private or view)
The access permissions the user is granted to those items (private, read, read/write, or full access)
The user's membership in groups.
The role the user is granted. See Roles more information.
The following topics are available:
Creating users
Users for an iManage Work system are created in one of the following ways: Migration, directory service, and manually.
Migration
Users are migrated from an existing source database to a iManage Work installation. This mostly happens during an initial iManage Work system installation. It may also happen when having to import a large number of new users, such as after a merger with another organization or acquisition. Contact your designated customer service manager or your implementation partner.
Directory service
Users may be added through an organization's network. This is the most common and preferred method for creating users.
A directory service, such as Microsoft's Active Directory, or accessing another directory service through Lightweight Directory Access Protocol (LDAP), is used to maintain the user list and their statuses. As users get added and deleted from the organization's network, an iManage Work tool (called DirectorySync) periodical
Global role
ly synchronizes the organization's networked users with iManage Work and configures them as users. This includes creating, activating, or deactivating users. This service can be scheduled to run periodically, such as every minute, once a day, or as frequently as needed. It synchronizes the iManage Work user list with the connected directory service. User status can also be changed explicitly within iManage Control Center. iManage Work does not store passwords for users imported through a directory service. Their authentication is provided through their directory service's identification provider.
The tools and synchronization are coordinated among your organization's network administrators and your designated customer service manager or your implementation partners. Contact your designated customer service manager or your implementation partner to install or configure these tools.
Virtual users
An iManage Work system administrator can manually create a Virtual user. These are users who were not, or could not, be migrated through a directory service. That means a virtual users exists only within iManage, and not as part of the organization's network account. Once created, these users cannot be converted to another type, and must be managed manually, such as if they change names or need to be deactivated. The iManage system administrator can add, activate, or deactivate users directly through the iManage Control Center application.
External users
External users have no initial access to any container or document. They must be granted explicit access to each item. This is intended for users who should have access iManage Work but on a limited or temporary basis. For example, these may include outside consultants, temporary employees, or users who are not in the organization's domain.
To set an iManage Work user as an external user, set the External user option in their profile to Yes.
Global users and library-level users
Based on your environment, iManage Control Center may display the following Users menu, which contains the following options:
Figure: Users menu
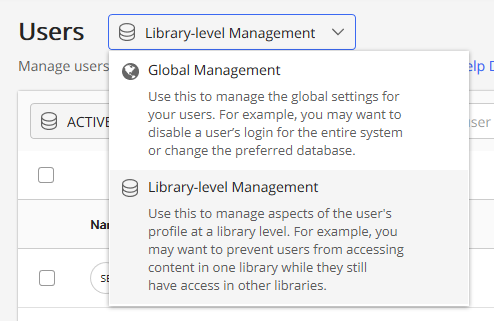
Global Management: Use this option to view, manage, and create global users. Global users are created and managed independent of any iManage Work library, and changes made to a user's profile or settings are updated at a global level, and not individually within each library.
Library-level Management: Use this option to specify which iManage Work libraries a global user may access.
Selecting this option displays a secondary menu where you can select individual Work libraries.
Figure: Library menu
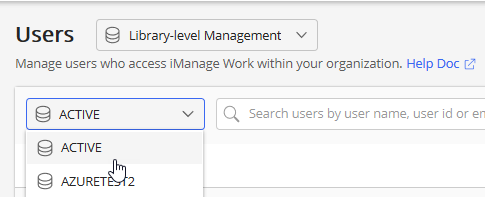
The list of users displayed changes based on your selection.
Creating a user
Based on your iManage Work environment, select one of the following options.
To create a global user that exists across all iManage Work libraries: At the top of the Groups page, select Global Management, then select
 .
.
After creating this global user, you must assign them to the libraries they will need to access, as described in Assigning users to a library.To create a library-level user:
At the top of the Users page, select Library-level Management, select the library in which the user should be created, then select
 .
.
orAt the top of the Users page, select the library in which the user should be created, then select
 .
.
The Create User dialog box appears.
Figure: Create User dialog box
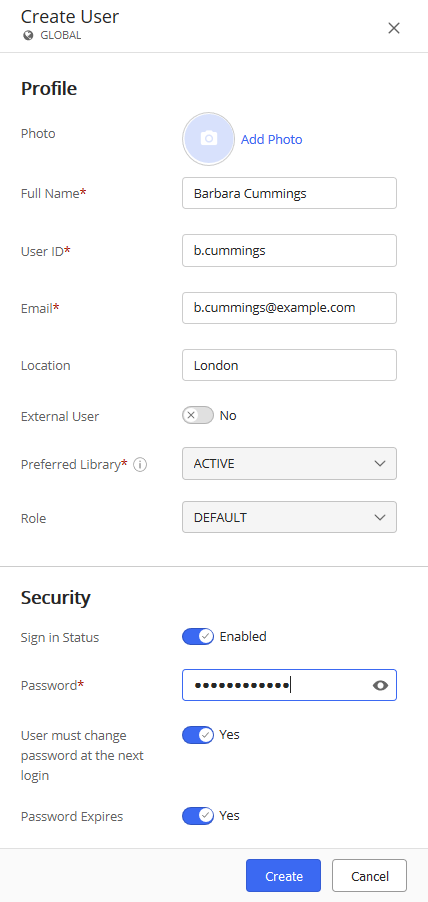
Enter information for this user as described in the User account information table.Select Create. The user account is created.
Table: User account information
|
Field |
Dependent field |
Description |
|
Photo |
Enables you to upload a photo. Select Add Photo to navigate to and select a photo. |
|
|
Full Name (Mandatory) |
Enter the user's full name. This is a friendly version of their name. For example: Andrew Case, or Marcie J. Davenport-Williams. Maximum length: 64 |
|
|
User ID (Mandatory) |
Enter the user's ID. This will be the user's personal identification within the iManage Work system. It must be unique among all users. When entering the user Id, follow company guide lines such as the first name and last name order, separating names with an underline, and so on. The value cannot be changed later. For example: ACASE or MARCIE-DAVENPORT. Maximum length: 64 |
|
|
Email (Mandatory) |
Enter the user's email address. This is an email address associated with the user, typically the company email address for the user. The user name, domain name, and domain extension can each be no longer than 64 characters. |
|
|
Location |
Enter the user's location. This is a friendly version of the name. For example, Chicago. Minimum length: 0 |
|
|
External User |
Select Yes to define this user as External. An external user has no default security access and must later be assigned explicit access for their tasks. An external user is a Virtual User without any privileges over content, unless explicitly granted on the content ACL For example, an external user may be a customer who requires temporary access, a part-time contractor, vendor or partner. Default: No (disabled). This field is dependent on the Preferred Library field. |
|
|
Preferred Library |
Choose the default library used by the user. When you set the value in this field, the Role field appears, which depends on the library you selected. |
|
|
Role |
Choose a user role from the drop-down list. |
|
|
Security |
||
|
Sign In Status |
If enabled, the user can sign in to iManage Work. Set to Disabled to prevent the user from signing in to iManage Work. Default: Enabled. |
|
|
Password (Mandatory) |
Enter the user's password. No default password is available for new users and they cannot be added with a blank Password field. Minimum length: 4 |
|
|
User must change password |
If enabled, this setting forces the user to change their password the next time they sign in. Default: Yes. |
|
|
Password Expires |
Exempt this user's password from the expiration settings. Use this option for system service accounts that should not expire. |
|
Assigning users to a library
From the Users drop-down list, choose Library-level management .
Select
 . The Assign User to Library dialog box appears:
Figure: Assign User to Library
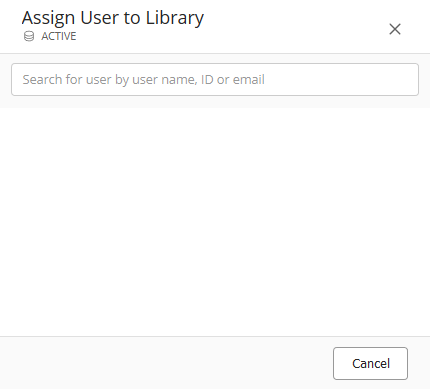
In the search field, enter any portion of the user's name. A list of users matching the characters you entered is returned.
Figure: Assign User to Library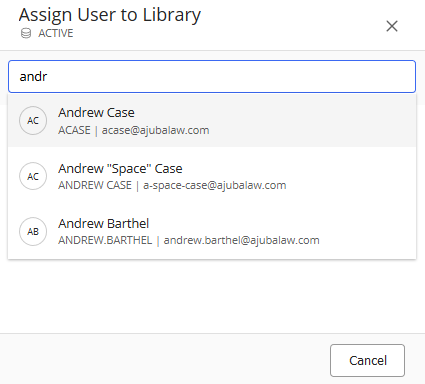
Select the appropriate user.
Figure: Assign User to Library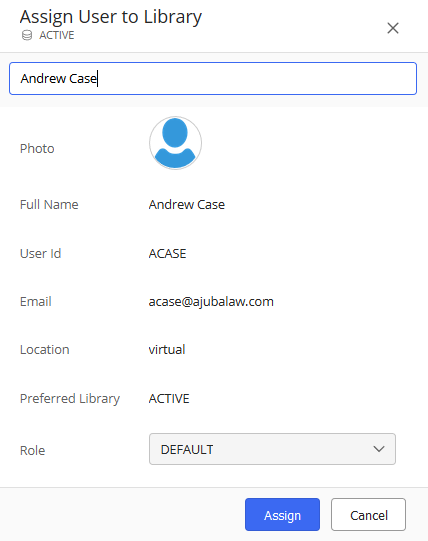
Enter the following user information:
Choose a Role for this user from the drop-down list.
Select Assign. The user is assigned to the selected library.
Searching for users
On the ribbon bar, you see the following Search option. Use this feature to search by the user's name, Id, or email.
Figure: Search field
![]()
Deleting users
Users imported or created from a directory service, such as Windows Active Directory, will be managed by the company's network system administrators, with their changes being automatically propagated into iManage Work.
iManage Work system administrators cannot delete virtual users. The preferred method is to lock the user's account by setting the Sign in Status to Disabled.
Resetting user passwords
This option is available on the:
Ribbon bar: Select a user to see this option on the ribbon bar.
Kebab menu: Select the

icon adjacent to each user.
Context menu: Right-click a user to see this option.
Use one of the preceding options and select Reset Password. The Reset Password dialog box that appears lists the following fields:
Field
Description
Password
Specifies the new user password. Minimum length: 4
Maximum length: 254
Spaces allowed: No
Unicode allowed: Yes
Special Characters allowed: YesMust change password at the next login
Specifies if the user must change their password at their next sign in.
If enabled, the user must their change password on the next sign in.
If disabled, the user does not have to change their password on the next sign in.
Password Expires
Specifies if the password expires. The password expiration period is an iManage Work system setting.
If enabled, the user's password expires.
If disabled, the user's password does not expire.
Select Save. The password gets saved.
Adding users to a group
Single user
This option is available on the following:
Ribbon bar: Select a user to see this option on the ribbon bar.
Kebab menu: Select the

icon adjacent to each user.
Context menu: Right-click a user to see this option.
In Access > Users, use one of the preceding options and select Add To Groups. The Add <User-ID> to Groups dialog box appears.
Select groups from the groups list or look for groups using the search field and select Add. User is added to the selected groups.
Multiple users
This option is available only on the ribbon bar.
In Access > Users, check the users and select Add To Groups. The Add Users to Groups dialog box appears.
Select groups from the groups list or look for groups using the search field and select Add. The users are added to the selected groups.
Enabling or disabling users
Single user
This option is available on the following:
Ribbon bar: Select a user to see this option on the ribbon bar.
Kebab menu: Select the

icon adjacent to each user.
Context menu: Right-click a user to see this option.
Use one of the preceding options and select Disable Sign in or Enable Sign in accordingly. For example, if a user is disabled, it means user is blocked from accessing the particular iManage Work library (i.e Allow Logon = No). In this case you can select a user and change the status to enabled if required.
Based on the option you have selected, the relevant <option-name> confirmation message box appears. Confirm the action to continue or abort.
Multiple users
This option is available only on the ribbon bar with the name Status.
Select users and select Status drop-down list.
Choose Disable Sign in or Enable Sign in accordingly. Based on the option you have selected, the relevant <option-name> confirmation message box appears. Confirm the action to continue or abort.
The value gets reflected in the user table under Allow Login column.
Editing user profile
This option is available on the following:
Ribbon bar: Select a user to see this option on the ribbon bar.
Kebab menu: Select the

icon adjacent to each user.
Context menu: Right-click a user to see this option.
Use one of the preceding options and select Edit Profile. The Edit Profile dialog box appears.
You can edit all fields except User ID.
Select Save. The updates are saved.
Editing user security
This option is available on the following:
Ribbon bar: Select a user to see this option on the ribbon bar.
Kebab menu: Select the

icon adjacent to each user.
Context menu: Right-click a user to see this option.
Use one of the preceding options and select Edit Security. The Edit Security dialog box that appears lists the following fields. Edit the required fields.
Fields
Description
Allow Login
Enable or disable the user from accessing their account.
Password
Enter user's sign in password. No default password is available for new users and they cannot be added with a blank Password field.
User must change password at the next login
Specifies if the user must change their password at their next sign in.
If enabled, the user must their change password on the next sign in.
If disabled, the user does not have to change their password on the next sign in.
Password Expires
Specifies if the password expires. The password expiration period is an iManage Work system setting.
If enabled, the user's password expires.
If disabled, the user's password does not expire.
Select Save. The updates are saved.
Editing user platform details
This option is available on the following:
Ribbon bar: Select a user to see this option on the ribbon bar.
Kebab menu: Select the

icon adjacent to each user.
Context menu: Right-click a user to see this option.
Use one of the preceding options and select Edit Platform Details. The Edit Platform Details dialog that appears lists the following fields. Edit the required fields.
Fields
Description
OS Type
The following OS types are available:
Default
Novel 3.x
Virtual
Window NT
Novell NDS
External
Active Directory
LDAP
Sync ID
Sync ID that is generated at the domain controller of a particular organization.
Container Name
Name of the container to which the user belongs.
Exchange Auto Discover
Exchange server name.
Distinguished Name
User name that you created is mapped to the container details.
Select Save.
Viewing user details
This option is available on the following:
Ribbon bar: Select a user to see this option on the ribbon bar.
Kebab menu: Select the

icon adjacent to each user.
Context menu: Right-click a user to see this option.
Clickable link: Select a user in the Name column.
Use one of the preceding options and select View. The <User-name> page opens which contains the following tabs:
Details: Lists the details pertaining to a user.
Groups: Lists the groups associated with a user.
Creating an NRTADMIN User
NRTADMIN access is granted by adding the user to the group NRTADMIN. Only an NRTADMIN user can create other NRTADMINs.
NRTADMIN applies only for users at the library level. An NRTADMIN cannot be applied to users at the global level. The NRTADMIN is assigned to one library. The user must be defined and assigned for library individually.
To create an NRTADMIN:
Select Access > Users > Add to Groups.
Select NRTADMIN.
An NRTADMIN automatically has full NRTADMIN privileges and supersedes all of their previous privileges.
Assigning users and groups
Users and groups must be assigned to iManage Work items. Items include workspaces, containers, and documents. To assign a user or group, use an iManage Work client, and not the iManage Control Center. Any user with sufficient access privileges for the item can make this assignment.
To assign a user or group:
Within an iManage Work client, navigate to the item, and select Show Details. This displays the properties tab.
Select View Security Details in Default Security. This displays the Security details tab.
Select Properties.
Select Add Users/Groups.
Select the users and groups from among the available choices. Multiple selections can be made.
For each user or group, assign an access privilege level from the security drop-down next to the user or group name.
When complete, select Confirm to save the changes to the users and groups.
To remove a user or group:
Within an iManage Work client, navigate to the item, and select Show Details. This displays the properties tab.
Select View Security Details in Default Security. This displays the Security details tab.
Select Properties.
Select Add Users/Groups.
Select the users and groups from among the available choices. Multiple selections can be made.
For each user or group, select Remove from their access privilege level of the security drop-down next to the user or group name.
When complete, select Confirm to save the changes to the users and groups
 button to edit each section on the User details page.