If you're using different warehouse vendors across different office locations, distinction must be made between these vendors to ensure uniqueness of box identifiers. iManage Records Manager facilitates the distinction of warehouse vendors by providing a vendor identifier option for boxes. Vendor ID is automatically prepended to Box ID to ensure unique box identifiers, and these are supported—for example, with reports and sorting—throughout relevant IRM applications.
This appendix provides a compilation of information about configuring vendor identifiers and example usage in desktop clients. Where applicable, the source references are detailed below each item.
Adding vendors in IRM
Adding vendors using Library Manager
Adding vendors using the Records Manager Data Loader
Adding vendors using Library Manager
Use Library Manager to define the vendors your organization uses to provide warehousing (boxing) solutions.
For more information on how to create a vendor, refer to Vendors.
Adding vendors using Records Manager Data Loader
Records Manager Data Loader can also be used to add vendors. For more information, refer to Using the Records Manager Data Loader, in particular the example in Vendor (for data loader).
Adding vendor fields in desktop client applications
You can customize desktop clients to add vendor ID or vendor ID fields where required, by modifying the data model using iManage Records Manager Application Designer, and by using the options available within the desktop clients.
For more information about using Application Designer, including more examples, refer to iManage Records Manager Application Designer User Guide. For more information about the desktop clients, refer to IRM Desktop Client for Records Managers User Guide and IRM Desktop Client for Users Guide.
Adding vendor field selection to box-related forms
Adding vendor ID column to box lists
Adding vendor ID as a column in box picker
Combining vendor ID with box ID in box properties
Adding vendor ID to boxes in box columns
Adding vendor ID to reports
Adding vendor field selection to box-related forms
You can add vendor field selectors to box-related forms in the desktop clients, using iManage Records Manager Application Designer. These selectable fields, or criteria pickers, provide a searchable list of all vendors added by your organization.
The procedure below is for the New Box form, but you can apply a similar procedure to—for example, Edit Box form and Search Box form.
Open iManage Records Manager Application Designer and sign in.
Select Draft to enter editing mode.
In the navigation pane, select Forms.
In the All Forms pane, expand the Box object.
Select the New Box form. The form opens in Forms Designer and its properties are listed in the Properties pane.
Resize the form if required, to fit the vendor criteria picker.
In the Controls pane, select Records Manager Controls.
Locate the Criteria Picker control and drag it to the form displayed in the designer pane.
In the Properties pane, locate the iManage RM section at the top of the pane.
In the Profile field, enter box::vendor.
In the Misc properties group:
Set the CriteriaType property to Vendor.
Set the FieldName property to BASE::VENDOR_RSID.
You can also add a label to the new field:
In the Controls pane, select Windows Forms.
Locate the Label control and drag it to the form displayed in the designer pane.
In the Properties pane, locate the iManage RM section at the top of the pane.
In the Profile field, enter box::vendor.
In the Appearance properties group, set the Text property to—for example, Vendor:.
Optionally adjust the height of the label using the Size property in the Layout properties group.
Select Save.
Select Publish.
Adding vendor ID column to box lists
You can configure vendor ID to be displayed as a separate column in all applicable box list columns.
Open iManage Records Manager Application Designer and sign in.
Select Draft to enter editing mode.
In the navigation pane, select View.
Select Box.
From the Columns for box pane displayed on the right side of the page, select the check box beside Vendor.
Select Save.
Select Publish.
Adding vendor ID as a column in box picker
You can configure the box picker (Browse and Select) dialog to include a separate vendor ID column.
Open IRM Desktop Client for Records Managers or IRM Desktop Client for Users.
Sign in to the client.
Select View > Customize.
Select Box.
Select the Criteria Lookup check box.
Under Available Fields, select Vendor.
Select Add to move Vendor to Selected fields.
Select OK.
Combining vendor ID with box ID in box properties
You can configure box properties of other items to always display vendor ID and box ID together.
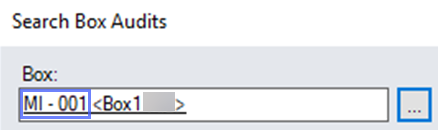
Figure: Vendor ID and box ID combined in Search Box Audit form
Open iManage Records Manager Application Designer and sign in.
Select Draft to enter editing mode.
In the navigation pane, select Forms.
In the All Forms pane, expand the Search Box Audits object.
On the open report in the Reports Designer, select Box:.
In the Properties pane, locate the iManage RM section at the top of the pane.
In the Name field, enter {BASE::VENDOR_RSID.BASE::VENDOR_ID} - {BASE::BOX_ID}.
Select Save to configure most of the box properties in desktop clients.
The Edit File Part box property is configured differently. The following steps describe how you can configure that box property.In the navigation pane, select Forms.
In the All Forms pane, expand the File Part object.
Select Edit File Part.
On the open report in the Reports Designer, select Box:.
In the Properties pane, locate the Misc section.
In the Display Format field, enter {BASE::VENDOR_RSID.BASE::VENDOR_ID} - {BASE::BOX_ID}.
Select Save.
Select Publish.
Adding vendor ID to boxes in box columns
You can configure box columns to always display the vendor ID beside the box ID.
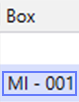
Figure: Vendor ID and Box ID in box column
Open iManage Records Manager Application Designer and sign in.
Select Draft to enter editing mode.
Select Configuration > Edit Components.
Select Caption: File Part (Name record Container), or any item with box information that you want to perform this configuration on.
For the Property named
Box, enter {BASE::VENDOR_RSID.BASE::VENDOR_ID} - {BASE::BOX_ID} in the Display Format field.Select Save.
Select Publish.
Adding vendor ID to reports
You can add vendor ID to reports as required. In this example, a vendor ID is added to the Box Label report.
Launch iManage Records Manager Application Designer.
Sign in.
Select Draft to enter editing mode.
From the navigation pane, select Reports.
In the All Reports pane, expand the Labels node.
Select Boxes.
Rearrange and resize the controls that are already on the report to accommodate the new controls that'll be added.
Locate and select the TextBox control under the Controls pane and drag the control to the open report in the Reports Designer.
In the Properties pane for the Schema Name field, select
 .
.In the Assign a schema value dialog, expand the Box node and then the Vendor node.
Select ID.
Select OK.
Select Save.
Select Publish.
Configuring and using vendor fields in barcode operations applications
Confirming vendor field availability in barcode operations application
Start the barcode scanner operations application.
On the toolbar, select Checkout.
If a Vendor field is visible, then your organization has configured a vendor identifier.
If there's no Vendor field, then your organization hasn't configured a vendor identifier.
For more information, refer to Setting or changing the warehouse vendor for boxes section in iManage Barcode Scanner Operations Guide.
Setting a vendor identifier in the mobile barcode scanners
Enabling vendor ID in mobile barcode scanners
Open the iManage Barcode Scanner app on your handheld device.
Select Settings from the menu.
In Barcode Alterations settings, set Enable Box Vendor Input to Yes.
Select Save. Entry of vendor ID is enabled.
Setting a vendor ID in the mobile barcode scanners
When vendor ID entry is enabled, you're prompted to enter (or scan) a box vendor ID when you first perform an action on a box—for example, check in or check out. The vendor ID that you first enter on the mobile device is retained for all subsequent box operations, including scans, until the vendor ID is edited or the setting is subsequently disabled.
For more information, refer to the Setting a warehouse vendor identifier section in iManage Barcode Scanner Operations Guide.