Sending and filing emails with attachments is the same as sending and filing emails, but there are additional steps for adding the attachments from iManage Work.
When you are finished creating your new email, select the
 icon on the message toolbar to open the iManage Work task pane.
Select Insert Manage Attachments.
In the iManage Work dialog, select the check boxes next to the documents you want to attach, and then select from the Attach file menu displayed at the end of the dialog:
Attach Link: To attach the NRL link.
Attach Hyperlink: To insert the URL link to the document in iManage.
Attach file and link: To insert the document and the NRL link.
(Optional) In the Rename attachments dialog that opens, enter new names for the attachments that'll be meaningful to your recipient.
When you are finished renaming attachments, or if you decide not to rename attachments, select Insert Attachments.
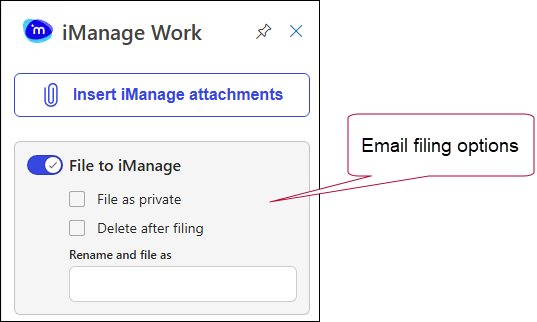
If you want to file the email, in the iManage Work task pane, if the File to iManage option isn’t already selected, slide the toggle to File to iManage.
(Optional) Select one or both of the following filing options and rename if desired:
File as private: File the email as private so that no other users can view the emails even when they have all rights to the workspace and the filing folder, unless you give them permission.
Delete after filing: Deletes the email from Microsoft Outlook folders after it’s filed to iManage Work.
Rename and file as: Enter a file name you want associated with the email other than the default subject line.
NOTE: If you rename the file and the file name exceeds 220 characters, you’ll be prompted to rename the file with fewer characters due to a Windows character limitation.
Find the location among the workspaces and folders visible in the task pane, or use the search bar to find a destination workspace and select the check box.
NOTE: If you select a workspace that doesn’t have a default email folder, a notice displays at the top of the task pane prompting you to select another folder under the workspace.
Select Send to send and file your email to the location(s) you selected.
The luggage tag is added at the end of the email subject line, to identify emails saved to iManage Work using the Send and File option and the tag displays the following details by default:
Your organization's identity
Name of the database where the email is filed
ID of the folder where the email is filed
The emails also have the ![]() Category applied.
Category applied.

NOTES:
After you file an email, the
 Category will be applied to that email for the To and Cc recipients in your organization, so they know it's already been filed to iManage Work.
 A Bcc recipient in your organization will only see the filed Category on the email if they filed it or if the Sender filed the email in Sent Items.
When you forward, reply, or reply to emails with the luggage tag, even these replies and forwards get filed and a record of the entire conversation is saved in iManage Work for future reference. To Send and File the replies and forwards to another location, repeat the above procedure.