Configuring Microsoft Exchange rule for client-side Send and File
When using the client-side Send and File feature in iManage Work Desktop for Windows 10.2 and later, outgoing emails are composed with the iManage folder address in the CC or BCC field. This folder address is used by the application to locate sent emails that must be filed. Since no SMTP server is required to receive these emails for server-side processing, it is necessary to create a rule in Microsoft Exchange which automatically deletes the copies of these emails. Without this rule, users would receive bounce back messages from the Exchange server as it would try to deliver a copy of the emails to the iManage folder addresses.
NOTE:
Though the steps for creating the rule depend on the version of Exchange, the steps for Exchange 2016 are nearly identical to those for Exchange 2013 and Office 365.
Configuring Microsoft Exchange rule only prevents bounce back messages from the receiving Exchange server. If messages are sent to the work folder addresses from external sources (for example, if an external user performs a reply all on a Send and File message with folder address in Cc), the sending Exchange server may still generate a bounce back message.
Creating rule in Exchange 2016
Open the Exchange Admin Center.
Navigate to mail flow > rules > Create a new rule. The new rule dialog window appears.
Enter a Name and for the Apply this rule if field, select The recipient address includes. The specify words or phrases dialog window appears.
Enter the email domain from the iManage Work Server. For example,
WCS.EXAMPLE.COM for on-premises
http://mail.cloudimanage.com/ when connecting to cloudimanage.com
Select the + icon, and select OK.
For the Do the following field, select Delete the message without notifying anyone.
Select Save.
Creating rule in Exchange 2010
Open the Exchange Management Console.
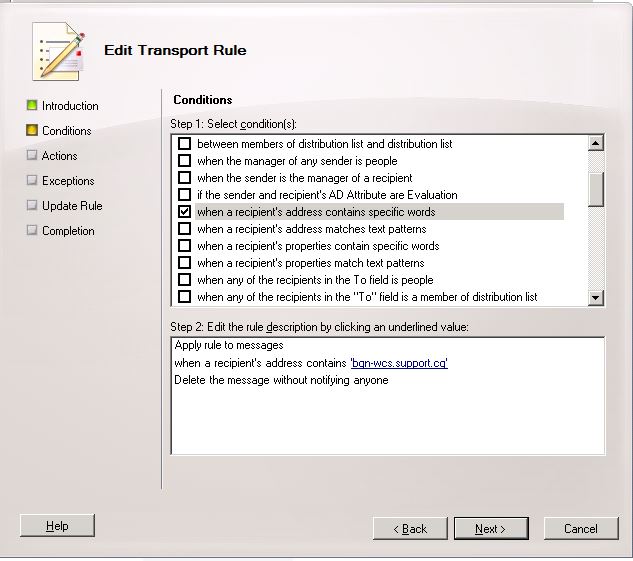
Go to Organization Configuration > Hub Transport and select New Transport Rule. The New Transport Rule wizard appears displaying the Introduction screen.
Enter a Name and select Next. The Conditions screen appears.
Select when a recipient's address contains specific words and select Next. The Specify text patterns dialog window appears.

In the Text patterns field, enter the WCS email domain (the same domain which is specified on the DMS server properties. For example,
WCS.EXAMPLE.COM for on-premises
http://mail.cloudimanage.com/ when connecting to cloudimanage.com
Select Add, then select OK.
The Actions screen appears.Select Delete the message without notifying anyone, then select Next. The Exceptions screen appears.
Select Next (without selecting any actions). The Create Rule dialog window is displayed.
Select New.