NOTE: To administer global roles, the user signed in to Control Center must be assigned to a Global Role, which has the Role Management privilege. For more information, refer to Global privilege descriptions.
To administer iManage Work library-level roles, the user signed in to Control Center must be a member of the NRTADMIN group. For more information about the specific operations allowed, refer to Understanding tiers.
Modifications to these settings may require up to eight hours to take effect.
Introduction
iManage Work uses role-based access control. Each user's ability to perform actions in iManage Work is based on the user's function within the organization. This is accomplished through two mechanisms: Privileges and roles.
Privileges
A privilege is a permission to perform specific tasks. For a complete list of iManage Work system privileges, refer to Library privilege descriptions and Global privilege descriptions.
Privileges are predefined by the system and can't be created or deleted. They can only be granted or denied.
When defining privileges for users, follow the principle of most restrictive access. Grant only the minimum necessary to users of that function to perform their job tasks.
Roles
A role lets you group together a set of privileges. When you create a role, you then assign one or more users to the role.
Roles may be created or deleted as needed.
A user must have one role assigned to them.
If no role is assigned to a user at the time they're created or imported, they'll automatically be assigned the role of DEFAULT or DEFAULT EXTERNAL.
Users can be reassigned roles at any time.
A privilege within a role may be granted or revoked at any time.
Roles don't define access to content. For that, refer to Security Access Levels.
For more information, refer to Privileges, Roles, and Groups.
Understanding global and library-level roles
iManage Control Center lets you create and manage roles globally (across all libraries), or per library. The Roles menu allows you to select the following options:
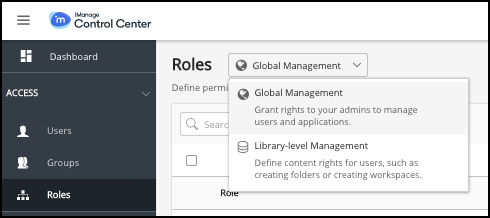
Global Management: Use this option to view, create, and manage global roles. Global roles are created and managed independently of any iManage Work library, and changes made to the global role are updated at the global level, and not individually within each library. This is useful for managing privileges for administrative users that access Control Center. Global roles have unique privileges: refer to Global privilege descriptions.
A user may be assigned to more than one global role. For more information, refer to Creating a global role.
Library Management: Use this option to view, create, and manage library roles. Library roles are created within, and are specific to, each iManage Work library. A library role is assigned to each user. A user must be assigned to at least one library role. If a library role isn't explicitly assigned to a user, the user is automatically assigned to either the DEFAULT or DEFAULT_EXTERNAL role, based on whether they've been defined as an internal or external user in their user profile.
Selecting this option displays a secondary menu where you must select an individual Work library. Library roles have unique privileges: Refer to Library privilege descriptions.
Figure: Library menu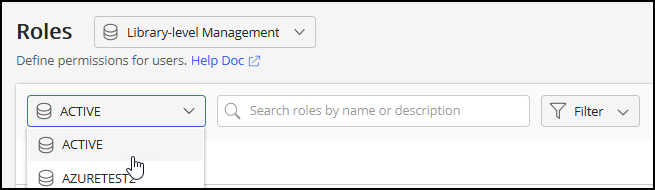
A user may only have one library role per library. For more information, refer to Creating a library role.
Roles and iManage Control Center access
The level of access a user has to iManage Control Center is automatically determined at sign-in by the role of that user. The controls applicable to the user are enabled; controls not applicable to the user won't be visible or actionable.
iManage Control Center is intended for iManage system administrators. iManage system administrators assigned to the specific Global role along with the NRTADMIN group or with Tier 1 or Tier 2 access will have their applicable controls visible.
Searching for roles
On the ribbon bar, you see the following Search option. Use this feature to search by role name.

Creating a global role
Global roles control access for administrative activities within Control Center are independent of any iManage Work library, such as administering global users, global groups and global roles, encryption keys, and upcoming features.
A user isn't required to be assigned to a global role. There's no default global role.
NOTE: A user may be assigned to multiple global roles at the same time. If a privilege is enabled in any of the roles to which the user is assigned, the user will be able to perform the action controlled by the privilege.
To create a global role:
Browse to Access > Roles.
At the top of the Roles page, select Global Management, then select + Create Global Role. The Create Role dialog appears.
Enter a Role Name, and Description. The role name is required and must be unique among the other role names.
Select which privileges should be enabled for this role. For more details, refer to Global privilege descriptions.
Select Create.
Global privilege descriptions
The following table describes each global privilege.
Field | Description |
|---|---|
Role Name (Mandatory) | Name for the role. It must be unique among all global management-level roles. The value can't be changed later.
|
Description | A friendly description or additional information about this role.
|
Privileges
Select each of the privileges to enable for the role.
App Management | Access level for the role to manage applications in Control Center. For example, add, update, or disable applications for use by iManage users. Users must be assigned to a global role with the App Management privilege enabled to view or perform operations on the Applications page in Control Center. |
Group Management | Access level for the role to manage global groups in Control Center. For example, create groups, rename groups, add users, and so on. Users must be assigned to a global role with the Group Management privilege enabled to view or perform operations on global groups on the Groups page in Control Center. |
Role Management | Access level for the role to manage global roles in Control Center. For example, create roles, delete roles, edit roles, and so on. Users must be assigned to a global role with the Role Management privilege enabled to view or perform operations on global roles on the Roles page in Control Center. |
Settings Management | Access level for the role to manage general settings in Control Center (those which aren't specific to any iManage Work library) Users must be assigned to a global role with the Settings Management privilege to view or perform operations on the Global settings page, as well as the following Work Clients pages: iOS, Office, and Classic client pages. |
User Management | Access level for the role to manage global users in Control Center. For example, create global users, disable their sign-in, edit their security, and so on. Users must be assigned to a global role with the User Management privilege enabled to view or perform operations on the Users page in Control Center. |
Key Management | Access level for the role to manage encryption keys. Users must be assigned to a global role with the Key Management privilege enabled to view or perform operations on the Encryption Keys page in Control Center. |
Upcoming Feature Management | Access level for the role to manage Upcoming Features. Users must be assigned to a global role with the Upcoming Features Management privilege enabled to view or perform operations on the Upcoming Features page in Control Center. |
Creating a library role
To create a role that applies to a specific iManage Work library:
Browse to Access > Roles.
At the top of the Users page, select Library-level Management, then select + Create Role.
In the Create Role dialog, enter a Role Name, Description, and select if this is an External Role. The role name is required and must be unique among the other role names.
Select which privileges should be enabled for this role. For more details, refer to Library privilege descriptions.
Select Create to create the new role.
Library privilege descriptions
The following table describes each library privilege.
Privilege | Description |
|---|---|
Profile | |
Role Name | Name for the role. It must be unique among all roles names for that library. The value cannot be changed later.
|
Description | This is additional information about this role. This is descriptive and doesn't need to be formatted and isn't validated.
|
External Role | Indicates if the role is for external users. If set to Yes, this role can only be assigned to External users. An external user has no default security access and must later be assigned explicit access for their tasks. For example, an external user may be a customer who requires temporary access, a part-time contractor, vendor or partner. |
Work application privileges | Allowed Actions |
System Access | Indicates if the role has read-only access to iManage Work documents and containers. This setting enables or disables all the other privileges for Documents, Workspaces, and Folders on this page.
|
Document | |
Import/Create | Allow users to import documents and emails. Without this privilege, users can't import or add content to iManage Work. |
Checkout Documents | Allow users to check out documents to prevent other users from editing the document. Without this privilege, the Checkout context menu option is disabled. 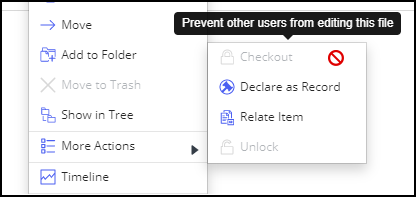 |
Unlock Documents | Allow users to unlock their own documents that they have checked out. Any changes to the checked-out document won't be saved to iManage Work, though the changes will remain on the user's local system. Administrators (members of the NRTADMIN group) have the privilege to unlock any user's locked document. |
Delete | Allow users to delete documents and emails. Without this privilege, users can't delete any documents or emails within iManage Work, even those to which they have full access, and the Move to Trash context menu option is disabled.  Also refer to the User Trash setting in Settings > Global to enable or disable the Trash feature. This feature allows users to recover items they've deleted (moved to trash). |
View for NRTADMINs | Allow users who belong to the NRTADMIN group to view the contents of, or download, other users' private documents and emails. Private documents and emails are those that have Default Security set to "Private".
|
Send Collaboration Links | Allow users to create, edit, and remove collaboration links. Users who can't send collaboration links will still be able to view who has access to the link.
|
Workspace | |
Create Workspaces | Allow users to create new workspaces. |
Create Public Workspaces | Allow users to create public workspaces. |
Delete Workspaces | Allow users to delete empty workspaces. NOTE: A workspace can only be deleted if it's empty or contains only empty folders. You must delete all documents and emails within the workspace or move them, along with their folders if you choose, to another workspace before you can delete it. |
Custom Metadata Management | Allow users to add new values to the custom properties Custom1-Custom12 and Custom29-Custom30 while creating workspaces. |
Folder | |
Create Public Folder | Create a new public folder. The user can still create private folders or subfolders with security inherited from the parent folder. |
Create Public Searches | Save public searches and mark them as public. |
Control Center Privileges | |
Control Center Access | Allow or restrict access and privileges in iManage Control Center for an iManage Work library:
For a complete list of privileges for each tier, refer to Understanding tiers. INFO: NRTADMIN access is granted by adding the user to the group NRTADMIN. For a selected library, use Access > Users > Add to Group, and select NRTADMIN. Only an NRTADMIN can create other NRTADMINs. An NRTADMIN automatically has full NRTADMIN privileges and supersedes any current-assigned privileges or roles. NRTADMIN privileges apply only for library management level operations, and only for a selected library. Users can be an NRTADMIN for multiple libraries, but they must be added individually to each library. An NRTADMIN can't be applied to users at the global-management level. |
Assigning a role to a user
To assign a role to a user:
Browse to Access > Roles.
Select any role.
Select the Users tab.
Select Assign to Users. The Assign to Users dialog displays.
Use the search field to find users by their user name, ID, or email address, then use the check boxes to select users.
Select Add. This adds the selected list of users to the role.
Viewing role details
Use this to see the status of each of the role's privileges.
Browse to Access > Roles.
Select View using one of the following options:
Ribbon bar: Select a role to see this option on the ribbon bar.
Kebab menu: Select the icon next to each role to see this option.
Context menu: Right-click a role to see this option.The details screen displays. Also refer to Editing roles.
Editing roles
To change any privileges within a role.
Browse to Access > Roles.
To edit a global role that applies across all iManage Work libraries, at the top of the Roles page, select Global Management. To edit a role within an iManage Work library, select Library-level Management, then select the library in which the role exists.
Select the
icon next to the role you wish to edit, then select Edit. The details screen displays.Modify the settings as needed. Refer to Library privilege descriptions and Global privilege descriptions for more information about the individual privileges.
Select Save.
Duplicating a role
You can use an existing role as the basis for creating a new one. After duplicating a role, modify the privileges as needed; refer to Editing roles.
To create a copy of the existing role:
Browse to Access > Roles, and locate the role to be duplicated.
Select Duplicate using one of the following options:
Ribbon bar: Select a role to see this option on the ribbon bar.
Kebab menu: Select the icon next to each role to see this option.
Context menu: Right-click a role to see this option.Enter a Role Name and Description. The role name is required and must be unique among the other role names. The description is optional, but recommended, and is a friendly description about the role.
Select Duplicate. A copy of the selected role gets created.
Deleting a role
Use the following steps to delete an existing role.
Browse to Access > Roles, and locate the role to be deleted.
Select Delete using one of the following options:
Ribbon bar: Select a role to see this option on the ribbon bar.
Kebab menu: Select the icon next to each role to see this option.
Context menu: Right-click a role to see this option.A Delete confirmation appears. Select Delete again to confirm the deletion.
NOTE: The following roles can't be deleted: DEFAULT and DEFAULT EXTERNAL. These are permanent roles used as the default if a user isn't otherwise assigned a role.
Understanding tiers
Tiers are predefined sets of privileges for iManage Work system administrators when performing activities in Control Center, and are assigned per iManage Work library.
There are two tiers, each designed to provide specific assistance to users.
Tier 1: Basic product support or help desk features.
Tier 2: Advanced product support or help desk features.
In addition, the NRTADMIN group is considered an iManage Work system administrator. This group includes the most complete access to all features.
Individual privileges within a tier set can't be modified. For example, the Trash Permanently delete privilege can't be added to the tier 1 set, nor can a user be granted only the Trash Permanently delete privilege. In the same way, the NRTADMIN group can't have the Trash Permanently delete privilege removed.
For more information about Tier 1 and Tier 2 privileges, refer to Library privilege descriptions. For additional information about the NRTADMIN group, refer to Creating an NRTADMIN User and Groups.
The following table lists the privilege set for each tier. Though not considered a tier, the NRTADMIN group is included in the table to show the privileges available to members of this group.
Table: Tier privileges
Privilege | Tier 1 | Tier 2 | NRTADMIN Group |
|---|---|---|---|
Users | |||
Assign users to a library | |||
Lock/Unlock1 | |||
Reset Password1 | |||
Groups | |||
Create library groups | |||
Disable | |||
Copy | |||
Add members | |||
Roles | |||
Create library roles | |||
Add users | |||
Manage user privileges | |||
Documents | |||
Unlock checked out documents | |||
Search | |||
Check effective access | |||
History | |||
Workspaces | |||
Search | |||
Check effective access | |||
Trash | |||
Restore | |||
Permanently delete | |||
Custom Fields | |||
Add/Edit | |||
Delete | |||
Disable | |||
Classes / Subclasses | |||
Add | |||
Delete | |||
File Handlers | |||
Upload New | |||
Edit | |||
Delete | |||
Enable/Disable | |||
File Types | |||
Add | |||
Edit | |||
Delete | |||
Captions | |||
Edit | |||
Templates | |||
Add, edit, or delete | |||
Forms | |||
Edit | |||
Applications | |||
Add, edit, update, or delete | |||
Global | |||
Edit | |||
Refile | |||
View | |||
Configure and Edit | |||
Authentication & SSO | |||
View | |||
Edit | |||
Web Client | |||
General Settings | |||
Features | |||
Access | |||
Web Views | |||
Edit | |||
Web Filters | |||
Edit | |||
Web Context Menus | |||
Edit | |||
iOS | |||
Edit or download | |||
Office | |||
View or edit | |||
Classic | |||
View or edit | |||
1 Users with Tier 1 or Tier 2 privileges can only lock/unlock users or reset user passwords on a Global level and only if they're assigned to a Global Role that has the User Management privilege.