Understanding the IRM Web Client interface
Interface overview
The components displayed in the IRM Web Client interface, and the functionality therein, reflect the permissions and privileges assigned to your role, and other possible customizations made to the client by your organization. For example, only users with File Plan Admin privilege or Approve Disposition privilege can view the Disposition Eligibility page, and action approvals.
Figure: IRM Web Client interface
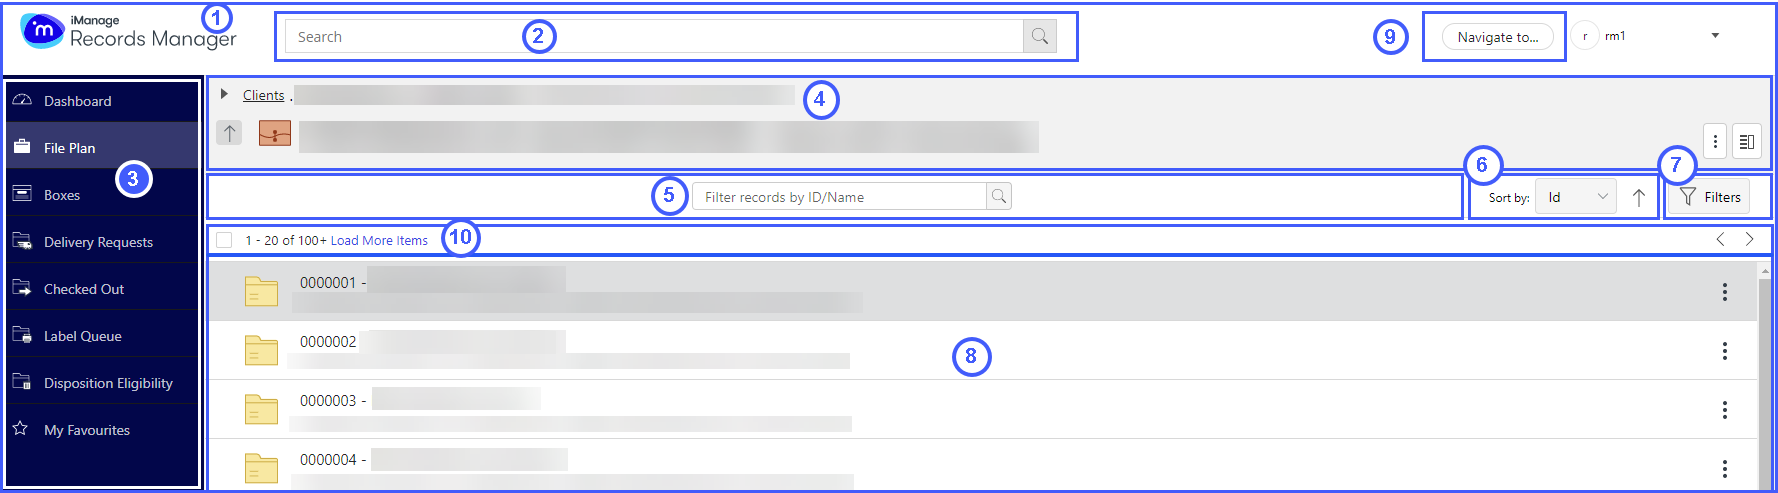
Records Manager Logo: Select this to return to the Dashboard page.
Search box
Navigation tab with buttons for:
Dashboard
File Plan
Boxes
Requests
Checked Out
Label Queue
Disposition Eligibility
My Favorites
Title panel with button for:
More actions (where applicable)
Filter by ID/Name
Sort field and sort order (and Multiselect actions where applicable)
Grid/List view option is also available here.Filters
Item list
Also refer to Loading more items in a list.
Also refer to Visual indication that a file part is empty.
Quick Navigation
Panel for multiselect, item loading, and quick-access pagination.
When Grid view is selected, an additional row is shown below this panel, displaying column headers. These can be customized.
NOTE: To reset password, select your username in the top-right corner. Select Reset Password. Enter a new password, ensuring you follow the instructions for password complexity, and select Submit.
Some pages of the IRM Web Client interface offer multiselect functionality, which, when engaged, utilizes interface sections in point 5 and point 6 above. For more information on multiselect, refer to Multiselect in IRM Web Client.
NOTE: The interface layout shown above is the default layout in the default language. The presence or location of some items may vary in accordance with the size of the screen and zoom level of the device or browser that you use to view IRM Web Client; the web client is responsive to different screen sizes.
Key features in the interface
The list of features offered by IRM Web Client is as outlined in the following table.
NOTE: The availability of some of the items in the interface—for example, the Label Queue, or CSV and XML report formats, depends on:
the privileges associated with your user role or group; and/or
your organization's configuration of IRM Web Client.
Feature | Available from | Description |
|---|---|---|
Dashboard |
|
|
File Plan |
|
|
Matter |
|
|
Boxes |
| View boxes. |
Requests |
| View your delivery requests or the delivery requests of others. |
Checked Out |
| View the records that are checked out to you or others. |
Label Queue |
| View information about file labels that you or others have queued for reprint. |
Disposition Eligibility |
|
|
Favorites | Navigation bar | View items you've listed as Favorites. |
 | Title panels; refer to the Description column. | The button is available at the following places in the Web Client, and has the corresponding functions as listed below each:
|
Show Details button  | Title panel for:
| The Show Details icon is used to expand or collapse the details panel. The details panel displays extra information about the selected item, including giving access to properties, some of which are editable. |
Delivery Request |
| Request delivery of a physical record to a location you want. |
Reassign |
| Reassign a physical record or checked-out box to another user, specifying a new location. |
Reprint File Label |
| Request that a physical record label be queued for reprinting. |
Reprint Box Label |
| Request that a box label be queued for reprinting. |
View in File Plan (Standalone Web Client Only) | Search results context menu | View a physical record in its place in the file plan. |
Properties |
| View, and for some properties, edit, information about, or add a comment for the selected client, matter, file part, box, or delivery request. TIP: You can view the Client and Matter information for a record or box in this panel, instead of navigating back to the file plan. |
Cancel Delivery Requests |
| Cancel a delivery request. |
Relate Item | Selected record context menu | Add a relationship between two records. |
Generate File Plan Summary Report | Selected matter title panel menu | Generate a file plan summary report for the selected matter. If multiple report formats are available, the user is prompted to select one. |
Generate Document Index Report | Selected record title panel menu | Generate a document index report for the selected record. If multiple report formats are available, the user is prompted to select one. |
Generate Box Detail Report |
| Generate a box detail report for the selected box. If multiple report formats are available, the user is prompted to select one. NOTE: A Box Detail Report for all boxes is also available but only if your organization has enabled it. For information about how to configure this setting, refer to the Settings > Enable the Summary Box Detail Report section in IRM Web Client Installation Guide. |
Generate Label Report |
| Generate a label report for the selected box(es) or record(s), or for all or selected items in Label Queue. If multiple report formats are available, the user is prompted to select one. |
Generate Disposition Eligibility Report | Disposition Eligibility title panel menu | Generate a report for all eligible items. This report reflects the filtering applied on the Disposition Eligibility page. |
Mark As Printed |
| Mark as Printed all or selected items in Label Queue, or all or selected items in the selected report. |
Column adjustment | Available for all lists, when Grid View is selected. |
|


Grid view and list view
List view is the default view for IRM Web Client, as shown in Interface overview.
Grid view is also available and displays any listed data in sortable columns. You can customize the visibility and width of these columns throughout the interface, enabling quick access to relevant information regardless of your device screen size.
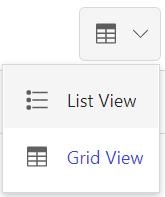
Use the Grid View / List View button  to select the view required. The view you select is retained for subsequent sign-ins.
Figure: Grid view and List view option
When grid view is selected, you can adjust column widths dynamically using the handle on a column header, or by double-clicking to expand.
To add or remove columns, or reset to visibility and widths to default, select  and then select the relevant option. Also refer to column adjustment.
Loading more items in a list
By default, 100 items are loaded in lists, such as items in the File Plan. If required, you can load more by selecting Load more items from the panel at the top of the list. Items are loaded incrementally, as follows:
100 items are loaded by default. Select Load more items. 500 items are loaded.
Select Load more items. 5000 items are loaded.
Select Load more items. All items are loaded.
NOTE: Regardless of the number of items loaded in a list, a maximum of 20 are displayed on a single page.
Visual indication that a file part is empty
Each type of file part media type has a corresponding icon, in the File Plan and elsewhere in the interface—for example, in search results or when drilling into the content of a Box.
For media types which contain other media or documents, the icon for that media type (for example, jacket or insert) is filled with color.
If such a media type is empty, the icon is displayed without color fill.
NOTE: This type of fill-color differentiation represents default IRM behavior. If your organization has configured custom icons, the behavior may vary.
Example of empty and non-empty file part media types
Description | Icon |
|---|---|
Insert containing documents |  |
Empty Insert |  |