iManage Threat Manager Detect and Protect rules let you automatically respond to risky behaviors before data is lost, without having to manually monitor activity. As a user with the Rule Editor role, you can create, edit, disable, and delete rules, defining criteria based on user activity, document metadata, library location, applications, and more.
When a rule is active, it runs continuously and generates an alert whenever its criteria are met. You can review and investigate in the Detect and Protect Alert List, and, if configured, automatically takes action, such as warning the user or disabling their account. Disabled accounts can be reviewed and re-enabled from Detect and Protect > Disabled Users.
This page walks you through creating a rule step by step, from general details and criteria through automated actions and notifications. It shows you how to view, edit, run, disable, reactivate, or delete existing rules from the Detect and Protect Rules dashboard.
In this section:
- Access Detect and Protect > Rules
- Create a Detect and Protect rule
- Manage Detect and Protect rules
- Criteria examples
- Example 1: Alert for exporting or printing more than 15 documents
- Example 2: Alert for exporting documents from a confidential matter
- Example 3: Alert when total document actions exceed 25
- Example 4: Alert on document activity while excluding agentic applications
- Example 5: Alert targeting agentic activity
- Example 6: Alert on external guest sharing activity
Access Detect and Protect > Rules
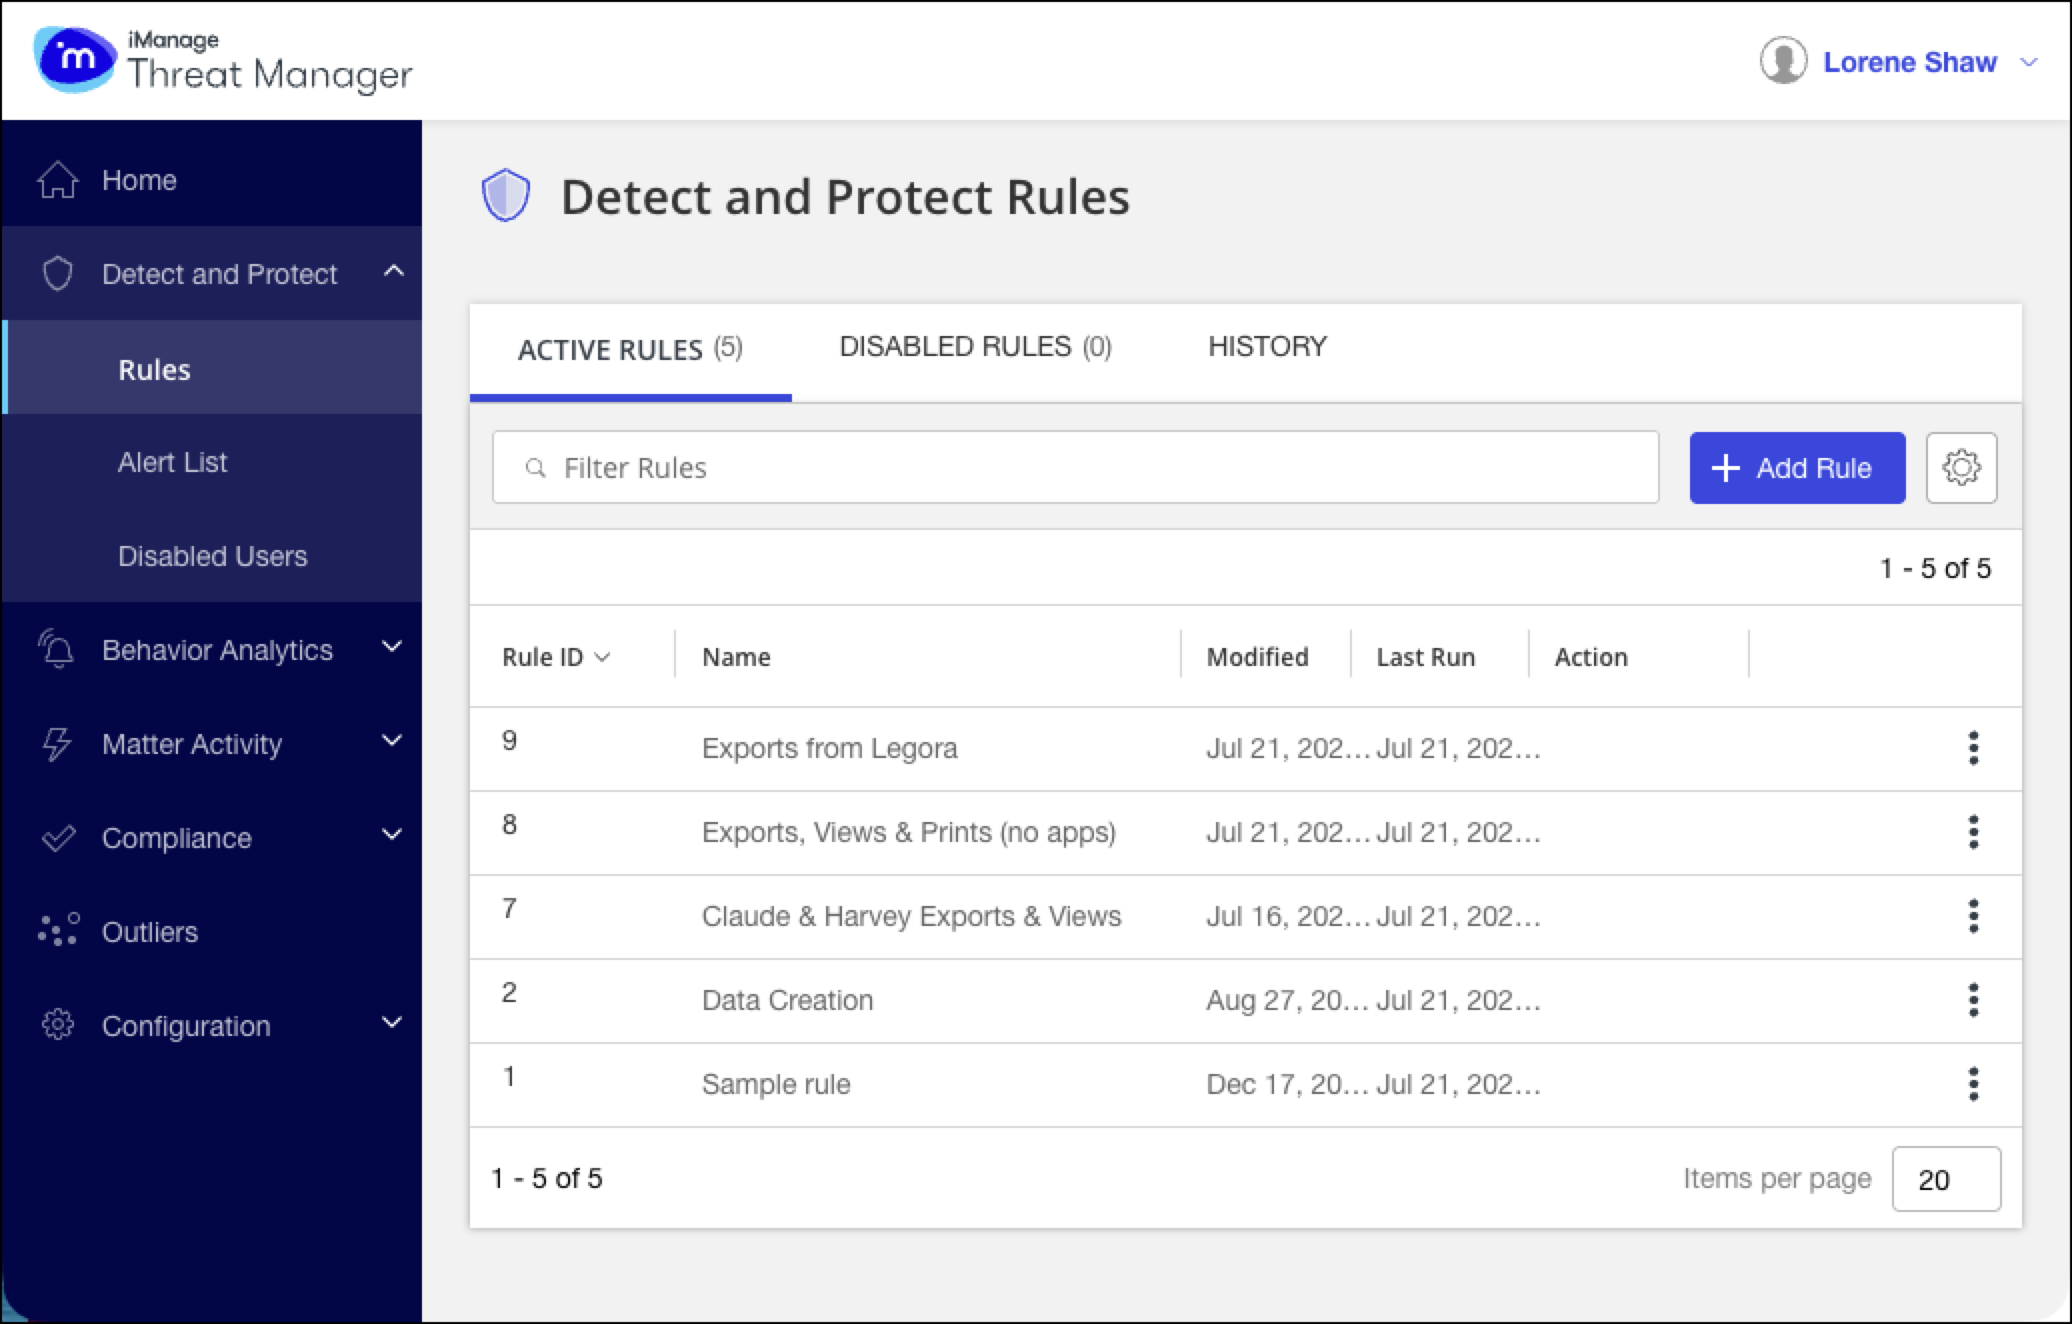
To access the Detect and Protect Rules dashboard, browse to Detect and Protect > Rules from the Home screen or the navigation bar.
Create a Detect and Protect rule
Rules are created from the Detect and Protect Rules dashboard. The following sections walk you through each part of the New Detect and Protect Rule, from initial setup to activation.
To create a Detect and Protect rule, you will:
1. Detect and Protect rule: Create
From the Home screen or the navigation bar, browse to Detect and Protect > Rules
Select Add Rule. The New Detect and Protect Rule page opens.
Next, enter the General details.
2. Detect and Protect rule: General details
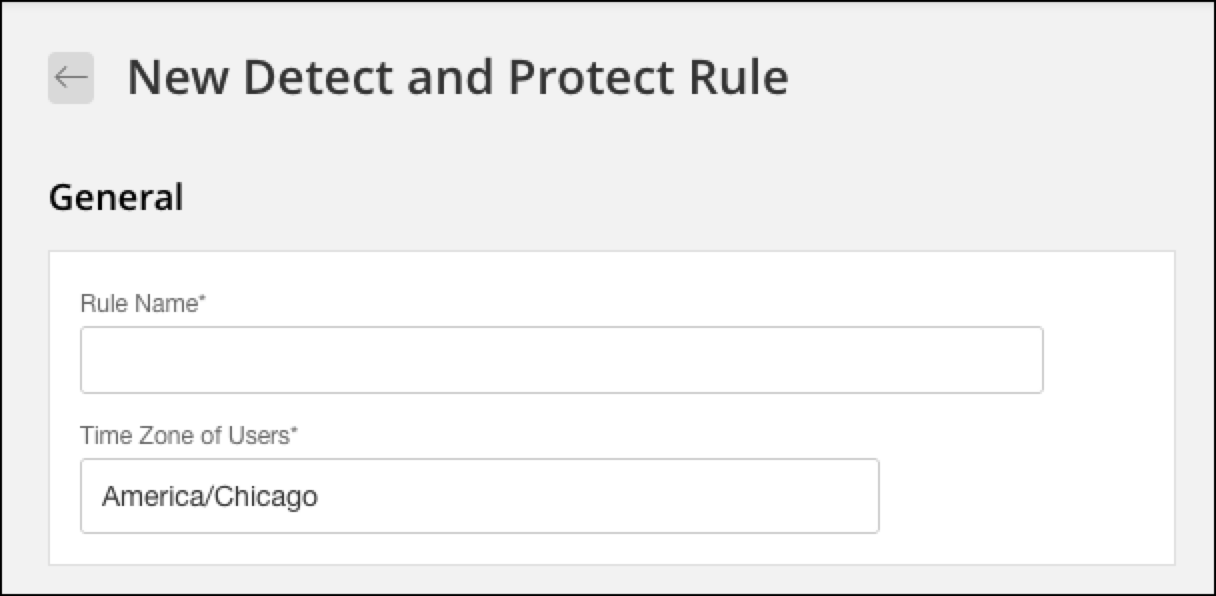
In the General section of the New Detect and Protect Rule page, you specify the Rule Name and Time Zone of Users, both of which are required settings.
Time Zone of Users determines the time zone in which alerts are recorded and defines the 24-hour window used to evaluate user activity. Aligning this with typical user working hours improves the accuracy and relevance of alerts.
For example, if you select Eastern Standard Time (America/New_York), the 24-hour day starts at UTC-5. Any activity during that period is used to calculate daily activity counts and trigger alerts.
NOTE: You don't need to create separate rules for different time zones (for example, by office or country). A consistent 24-hour window is effective as long as your criteria reflect known patterns of risk.
The main benefit of setting a time zone per rule is that it overrides the default system-wide time zone that is defined in the iManage Threat Manager configuration.
For more information, refer to the Configuration > Settings section in iManage Threat Manager Administration Help.
Enter General details:
In the General section of the New Detect and Protect Rule page, enter a Rule Name, up to 74 characters.
In Time Zone of Users, begin typing a country or city name to set a custom time zone for the rule. iManage Threat Manager displays matching options. Select the appropriate time zone from the list (for example, America/New_York).
Next, define the Criteria.
3. Detect and Protect rule: Criteria
Detect and Protect rules generate alerts, and optionally take action, when specified criteria are met or exceeded within a 24-hour period as specified by the time zone.
Criteria specify the conditions that trigger alerts. You can build rules using activities, document properties, metadata fields, and library restrictions, combining them with AND/OR logic to create simple or complex conditions.
There are three types of criteria:
Selection criteria: Define the document activities (for example, Export, Print) that trigger alerts.
Filtering criteria: Further refine alerts based on unique document, matter, or client counts. These are always combined with selection criteria using AND logic.
Library criteria: Limit alerts to specific libraries. Also combined with selection and filtering criteria using AND logic. By default, all libraries are included.
When any of the defined criteria are met within the 24-hour window, the rule generates an alert and/or takes a defined action.
The following section explains how to define rule criteria. For examples of common rule configurations built from these criteria types, refer to Criteria examples.
NOTES:
If filtering criteria are specified, and no selection criteria are specified, the unique client, matter, or document counts are computed across all activities.
If you don’t specify applications, iManage Threat Manager monitors activity across all applications.
A Detect and Protect rule triggers at most once per user within its 24-hour window. So if a user’s account is disabled and then re-enabled before the window resets, the same rule won’t generate a new alert or repeat its action for that user until the next window begins, even if the users activity continues to meet the rule’s criteria. If the rule triggers again in a later 24-hour window, it takes its configured action again, for example, disabling the account a second time. (The 24-hour window runs midnight to midnight in the rule’s specified time zone as detailed in Detect and Protect rule: General details).
To define rule criteria:
In the Criteria section of the New Detect and Protect Rule page, define Selection Criteria.
The field defaults to Export, an Activity criterion. To use a different criterion, select the field to open the drop-down menu, then choose a criterion type:
Figure: New Detect and Protect Rule > Criteria section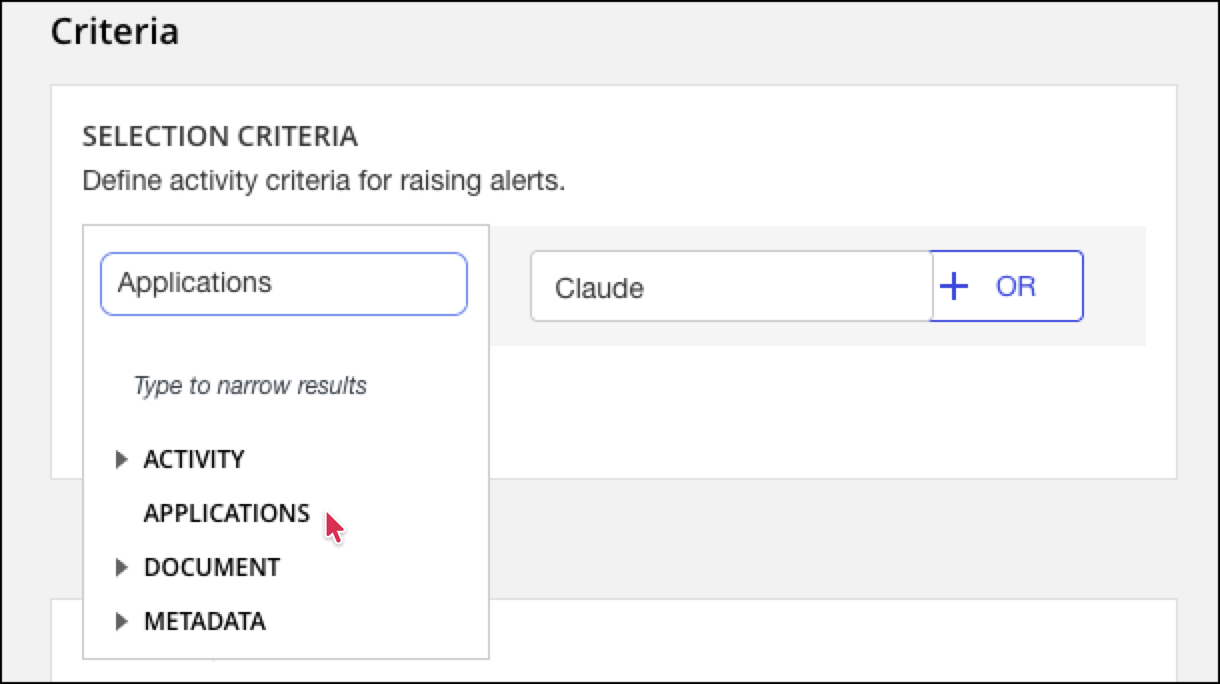
Activity: Includes all audited document actions (for example, Print, Export).
Applications: Filter activity based on the application that performed it (for example, Claude, Harvey). Threat Manager automatically populates this list from applications it has detected in ingested activity data; no manual registration is required in Threat Manager itself.
NOTE: An application must first be set up in Control Center before its activity can be recognized and tagged. If an expected application doesn’t appear in the list, check that it’s configured there.Document: Includes properties such as document name, type, class, or subclass.
Metadata: Includes any custom document fields available to iManage Threat Manager.
Define the value:
For Activity (for example, Print): Select the > or >= operator, then enter the count at which to trigger the alert.
For Applications (for example, Claude): Begin typing a name. Threat Manager displays matching applications currently ingested for your environment.
For Document (for example, Type): Enter a value such as PDF.
For Metadata (for example, Client): Enter the corresponding value, such as a client name.
To add additional selection criteria, select the And or Or icon as needed.
To remove a criterion, use the Minus icon.
(Optional) Define Filtering Criteria. In Filtering Criteria, select Filter by, to further refine alerts by unique counts:
Choose one of the following:
Clients Count: Unique clients involved in the Selection Criteria activity, within a single day. “Single day” refers to midnight to midnight in the rule’s specified time zone.
Documents Count: Unique documents involved in the Selection Criteria activity, within a single day.
Matters Count: Unique matters involved in the Selection Criteria activity, within a single day.
Select the > (greater than) or >= (greater than or equal to) operator.
Enter the count threshold above which or at which an alert is generated. To add additional filters:
Use the Or icon, then repeat Steps a–c.
Use the Minus icon to remove any filter.
(Optional) In Library Criteria, restrict the rule to a specific library. By default, rules apply to all libraries, although you can limit a rule to one containing sensitive content (for example, Human Resource files or a knowledge library). Only one library can be selected at a time. You can choose either All or the name of an individual library.
Next, select the Take User Action setting.
4. Detect and Protect rule: Take User Action
You can configure Detect and Protect rules to automatically act on users whose activity triggers an alert. This action is in addition to sending alert notifications.
By default, when criteria are met, iManage Threat Manager generates a Detect and Protect alert and notifies designated users. For more information, refer to Notifications.
IMPORTANT: Email notifications are sent using the email address associated with the user in iManage Work. Ensure all email addresses are correct. If user actions are configured, they are triggered immediately after the alert is generated.
To select the user action (act on users whose activity triggered the rule):
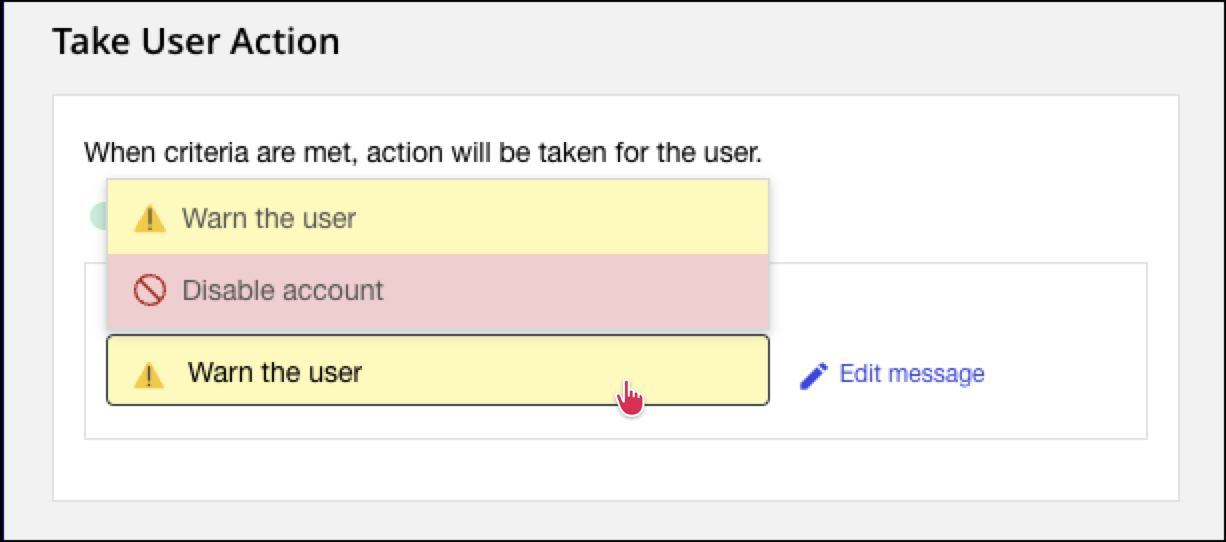
In the rule definition screen, scroll to the Take User Action section, and move the slider to the right (Yes). The default action, Warn the user, is displayed.
Select the action field and choose one of the following actions:
Warn the user: Sends an email alert to the user, letting them know their behavior was flagged as abnormal. You can customize the message that is sent.
Disable account: Disables the user’s iManage Work account, preventing further access. An email is also sent to the user, for example, advising them to contact Compliance.
NOTES:
To use the Disable account action, an iManage Work account with Tier 1 Control Center access privileges is required. For setup instructions, refer to Detect and Protect Work Account in the Configuration > Settings section of iManage Threat Manager Administration Help. This feature isn’t available for iManage Work accounts at cloudimanage.com.
If your environment uses automated services to sync users and groups with iManage Work, these services may re-enable a disabled account. To proceed with Disable account, you must acknowledge this by selecting Confirm when prompted.
(Optional) To customize the email message:
In the Take User Action section, select Edit Message.
In Configuration > Settings > Email Templates, locate the Notify User template and edit it as needed.
Select Save. A success message confirms your changes.
NOTE: For detailed information about editing templates, refer to Email Templates in the Configuration > Settings section of iManage Threat Manager Administration Help.
Next, specify the users and groups to include or exclude.
5. Detect and Protect rule: Users and Groups
Each Detect and Protect rule scans user activity to determine whether to generate alerts. By default:
Everyone is included
The Global Exclusions List is excluded
This means that all user activity is monitored except for those users or groups on the Global Exclusions List.
You can customize the rule’s scope by specifying:
Included users and groups: Users whose activity is evaluated and can trigger alerts.
Excluded users and groups: Users whose activity is ignored by the rule.
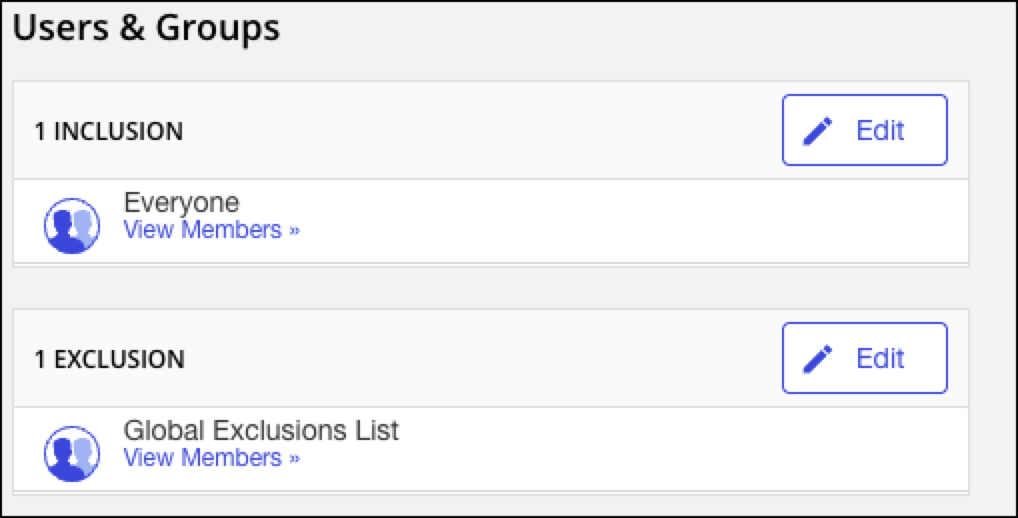
Table: Types of users
Icon | Type | Description |
|---|---|---|
 | Active User | An active and valid user in the system. |
 | Disabled User | The user ID exists in the system. However, it's in a disabled state. |
 | Group | An active and valid group in the system. |
 | Disabled Group | The group ID exists in the system. However, it's in a disabled state. |
 | Deleted User | The user ID doesn't exist in the Users table. This can happen for several reasons. For example, Deleted User occurs when a user is missing from the |
To specify users and groups to include or exclude:
Include users and groups:
In Users & Groups > Inclusion, select Edit.
In the People to Include dialog, use the filters as needed to narrow the list.
Select the check boxes for the users and groups you want to include.
Select OK. The selected users and groups now appear in the Inclusion list.
Exclude users and groups:
In Users & Groups > Exclusion, select Edit.
In the People to Exclude dialog, use the filters as needed to narrow the list.
Select the check boxes for the users and groups you want to exclude.
Select OK. The selected users and groups now appear in the Exclusion list.
Next, set the rule Notifications.
6. Detect and Protect rule: Notifications
Email notifications inform both iManage Work and non-iManage Work users about security or compliance events triggered by Detect and Protect Rules. You can add recipients as primary, CC, or BCC recipients, regardless of whether they use iManage Work.
NOTE: The notification list configured here is also used when a disabled user is manually re-enabled through the Threat Manager UI. In that case, a second email is sent to these recipients informing them of the re-enablement action. For more details, refer to User enablement notifications.
When a Detect and Protect alert is triggered, two notifications are sent:
To the user who triggered the alert. This email is configured by your organization and typically includes:
The triggering user’s name
A summary of the alert
Any actions taken by the rule
The start and end date/time of the detected activity
To designated recipients (for example, the practice head or compliance team). This email includes:
The triggering user’s name
Actions taken by the rule
The start and end date/time of the detected activity
A summary of up to five activities that exceeded rule criteria (with “More…” if additional activities exist).
A direct link to the alert details page in Threat Manager for quick investigation.
Additional information as defined by your organization.
NOTE: For more information about email content configuration, refer to Email Templates in the Configuration > Settings section of iManage Threat Manager Administration Help.
To specify notification recipients:
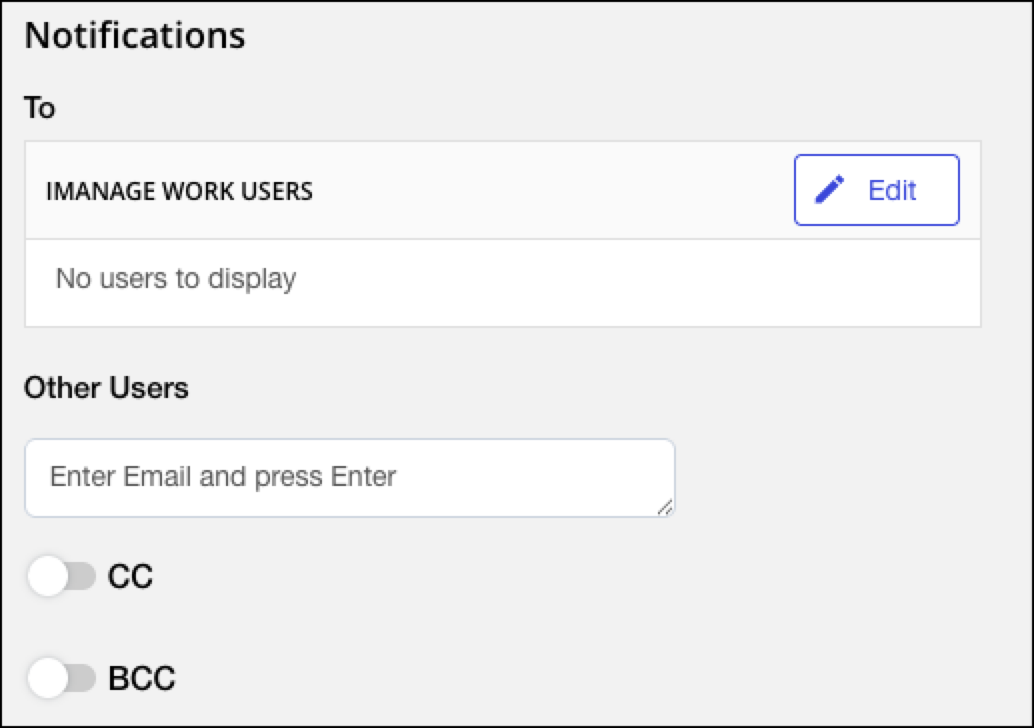
In the rule definition screen, scroll to the Notifications section.
Add iManage Work recipients:.
Under To, select Edit.
In the Users to Be Notified dialog, use filters as needed and select the check boxes for iManage Work users or groups who should receive alerts. You must select at least one.
Select OK to confirm. The selected recipients are listed in the Notifications section.
Add non-iManage Work recipients:
Under Other Users, enter an email address and then press Space, Enter, or comma (,) to add it to the list.
Repeat for additional address, as needed.
To remove an entry, select the X next to its name.
(Optional) Enable the CC and/or BCC options, and then repeat Steps 2 and 3 for each one.
You're now ready to save and activate the Detect and Protect rule.
7. Detect and Protect rule: Save and Activate Rule
On the New Detect and Protect Rule page, after you've configured all components of the rule, select Save and Activate Rule. A success message will confirm that the rule has been deployed. To view a summary of the rule, open its Rule Details.
Each rule is automatically assigned a non-editable Rule ID by iManage Threat Manager. This ID reflects the order in which the rule was created.
Manage Detect and Protect rules
The Detect and Protect Rules dashboard provides a central location to create, view, and manage all Detect and Protect Rules. It includes:
You can create new rules and perform actions like editing, disabling, deleting, or reactivating existing rules from this dashboard.
The dashboard offers the following navigation features:
Pagination: Navigate between pages using the left and right arrows at the bottom. Each page displays 10 rows by default.
Sorting: Sort table contents in ascending or descending order.
Drill-down: Select a row to view additional details in the Rule Details and History tabs.
NOTE: A warning icon (exclamation mark) appears next to the last run date column of any rule that has failed to run. A common cause is an invalid user email address in iManage Work.
For additional information, you can check the system logs. Refer to the Settings > Logs section in iManage Threat Manager Administration Help.
Active Rules tab
From the Active Rules tab, you can perform the following actions. To perform any action, select the three dots icon to choose from: View, Edit, Run Now, Disable, or Delete.
Task: View an active Detect and Protect rule
In the Active Rules tab, select the three dots and choose View, or select the rule name directly. The Rule Details and History tabs are displayed:
Rule Details: Summarizes effective included users (the number of users covered by the rule), effective excluded users, time zone, notification list (including CC and BCC recipients), actions, and rule criteria.
History: Shows all actions performed on the rule, including date/time, user, action type, and any comments. A sidebar provides a summary of each action when you select a row from the History tab.
Task: Edit an active Detect and Protect rule
In the Active Rules tab, select the three dots icon and select Edit, or select the rule name and choose Edit Rule. The Edit Detect and Protect Rule page opens.
Make changes as needed and select Update to save.
You can also edit a rule from:
Disabled Rules tab: Select the Rule Name and then select View. Then select Edit Rule.
History tab: Select the Rule Name and then select Edit Rule.
NOTE: You can edit active and disabled rules. You can't edit deleted rules.
Task: Run a Detect and Protect rule on-demand
In the Active Rules tab, select the three dots and select Run Now. This runs the rule immediately without affecting its regular schedule.
Task: Disable an active Detect and Protect rule
In the Active Rules tab, select the three dots and then select Disable. The Add a Comment dialog opens.
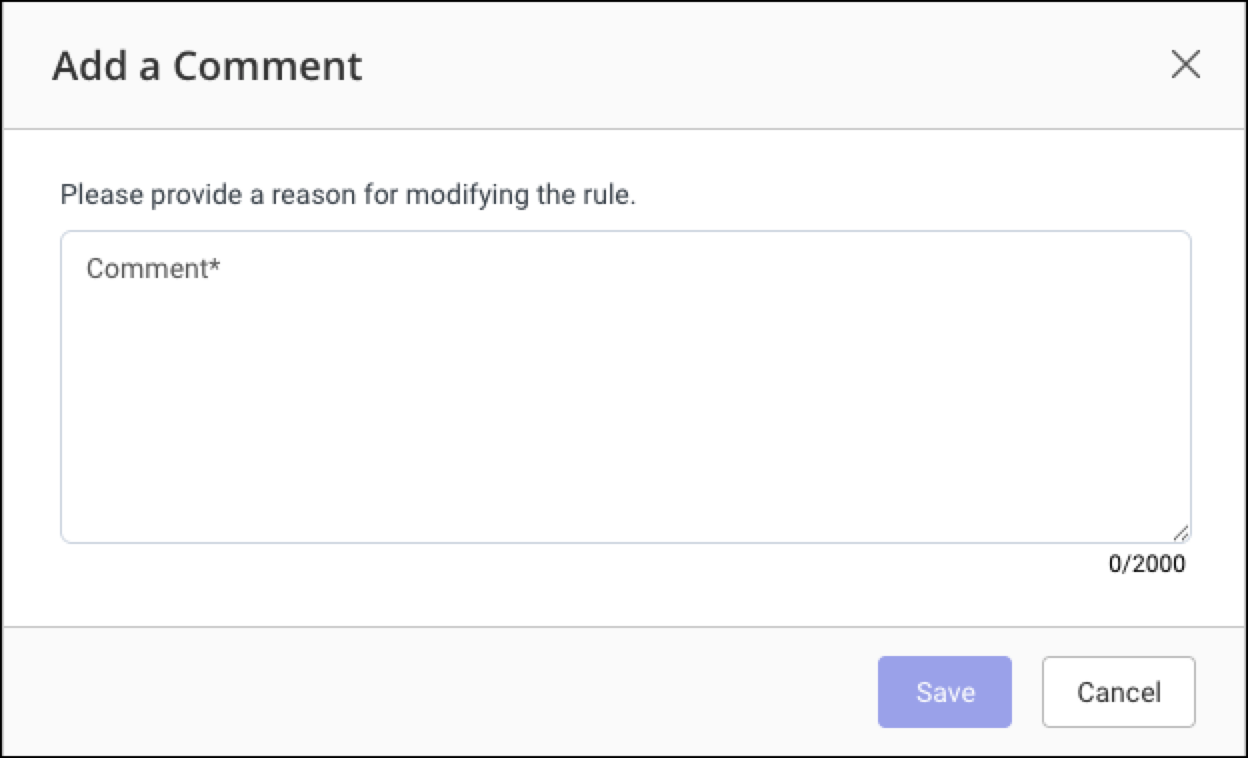
In the Comment field, provide a reason and select Save. The rule is removed from the Active Rules tab and is displayed under Disabled Rules.
To reactivate the rule, refer to Task: Activate a disabled Detect and Protect rule.
Task: Delete an active Detect and Protect rule
In the Active Rules tab, select the three-dots icon and select Delete.
Confirm in the pop-up dialog.
CAUTION: This action is permanent and can’t be undone.
The rule moves to the History tab, where you can select it to view its Rule Details, History, and sidebar summary.
Disabled Rules tab
From the Disabled Rules tab, you can perform the following actions:
Task: View a disabled Detect and Protect rule
In the Disabled Rules tab, select the three-dots icon next to the rule and select View. The Rule Details and History tabs open for that rule.
Task: Edit and reactivate a disabled Detect and Protect rule
In the Disabled Rules tab, open the rule’s Rule Details or History tab, select Edit Rule (top right). The rule opens in edit mode.
Make changes and select Update to save.
NOTE: Selecting Update reactivates the rule and moves it to the Active Rules tab.
Task: Activate a disabled Detect and Protect rule
In the Disabled Rules tab, select the three dots next to the rule and select Activate.
Enter a reason when prompted. The rule is reactivated and listed under Active Rules, and the History tab updates to reflect the change.
Task: Delete a disabled Detect and Protect rule
In the Disabled Rules tab, select the three dots next to the rule and then select Delete.
Confirm the deletion in the pop-up dialog.
CAUTION: This action is permanent and can’t be undone.
The History tab updates to show the deleted rule.
History tab
From the History tab, you can view the history of all current and former Detect and Protect rules, and drill down into Rule Details and the action History for a selected rule.
The History tab displays a chronological list of all actions performed on all rules, including:
Rule Name
Date and Time of the action
Comments (if any)
Task: View Detect and Protect rule details
The Detect and Protect Dashboard rules list is sorted with the most recent activity at the top. In the History tab, select a rule to view its Rule Details and History:
Rule Details: Provides a summary of the rule, such as:
Effective Included Users and Excluded Users
Time zone
Notification List. The users, including CC and BCC, who receive notifications for the rule.
Specified actions
Rule criteria summary. Includes Application criteria, if configured.
History: Shows all actions taken on the rule, along with:
Date and time
User who performed the action
Comments (if any)
Additionally, a Detect and Protect Rule Summary is displayed in a sidebar on the right when a rule is selected from the History tab.
Criteria examples
The following examples illustrate common rule configurations. For details on Selection, Filtering, and Library criteria used in these examples, refer to 3.) Detect and Protect rule: Criteria.
Example 1: Alert for exporting or printing more than 15 documents
Trigger an alert when a user exports or prints more than 15 unique documents in a 24-hour period:
When defining Selection Criteria for a Detect and Protect rule, select Export.
Select the > (greater than) operator, then enter 15.
Select the Or icon.
Select Print, select the > (greater than) operator, and enter 15.
In Take User Action, move the slider to the right (Yes). The default Action, Warn the user, is displayed.
In Users & Groups > Inclusion, ensure Everyone is selected.
In Users & Groups > Exclusion, ensure Global Exclusions List is selected.
In Notifications, select Edit to open the Users to Be Notified dialog. Then add risk and compliance managers who'll receive notifications that summarize alerts generated by the rule. Select OK to close the dialog.
Select Save & Activate Rule.
Example 2: Alert for exporting documents from a confidential matter
Trigger an alert when a user exports more than 5 documents from a specific confidential matter.
When defining Selection Criteria for a Detect and Protect rule, select Export.
Select the > (greater than) operator, then enter 5.
Select the And icon.
Select Metadata>Matter.
In Filter Matter, enter the name of the sensitive matter.
(Optional) Select an action to take.
In Users & Groups > Inclusion, ensure Everyone is selected.
In Users & Groups > Exclusion, ensure Global Exclusions List is selected.
In Notifications, select Edit to open the Users to Be Notified dialog. Then add risk and compliance managers who'll receive notifications that summarize alerts generated by the rule. Select OK to close the dialog.
Select Save & Activate Rule.
Example 3: Alert when total document actions exceed 25
Alert the NRTADMIN group when a user exports, prints, or mails 25 or more unique documents.
NOTE: If you’re a new customer, your system includes a “Sample” rule with this exact logic. You can edit it as needed.
When defining Selection Criteria for a Detect and Protect rule, select Export.
Select the >= (greater than or equal to) operator, then enter a count of 1.
Select the Or icon.
Select Mail, select the >= (greater than or equal to) operator, and enter a count of 1.
Select the Or icon.
In Selection Criteria, select Print.
Select the >= (greater than or equal to) operator.
Select a count of 1.
In Filtering Criteria, select Documents Count.
Select the > (greater than) operator.
Select a count of 25.
In Take User Action, move the slider to the right (Yes). The default Action, Warn the user, is displayed.
In Users & Groups > Inclusion, ensure Everyone is selected.
In Users & Groups > Exclusion, ensure Global Exclusions List is selected.
In Notifications, select Edit to open the Users to Be Notified dialog. Then add the NRTADMIN group to receive notifications that summarize alerts generated by the rule. Select OK to close the dialog.
Select Save & Activate Rule.
Example 4: Alert on document activity while excluding agentic applications
Trigger an alert on export or view activity, without counting activity performed by agentic applications, such as Ask iManage, Claude, or Harvey.
When defining Selection Criteria for a Detect and Protect rule, select Export.
Select the >= (greater than or equal to) operator, then enter a count of 15.
Select the Or icon.
Select View, select the >= (greater than or equal to) operator, and enter a count of 15.
Select the And icon.
Select Applications, then enter the name of an application you want to monitor, such as Microsoft Word.
Select the Or icon, then select Applications again and enter the name of another application to monitor. Repeat for each application in your environment except the agentic ones you want to exclude (for example, Ask iManage, Claude or Harvey).
In Take User Action, move the slider to the right (Yes) if you want to take an action, or leave it off to generate an alert only.
In Users & Groups > Inclusion, ensure Everyone is selected.
In Users & Groups > Exclusion, ensure Global Exclusions List is selected.
In Notifications, select Edit to open the Users to Be Notified dialog. Then add the risk and compliance managers who’ll receive notifications that summarize alerts generated by the rule. Select OK to close the dialog.
Select Save & Activate Rule.
Example 5: Alert targeting agentic activity
Trigger an alert on export or view activity performed by agentic applications, such as Claude or Harvey.
When defining Selection Criteria for a Detect and Protect rule, select Export.
Select the >= (greater than or equal to) operator, then enter a count of 15.
Select the Or icon.
Select View, select the >= (greater than or equal to) operator, and enter a count of 15.
Select the And icon.
Select Applications, then enter the name of an agentic application you want to monitor, for example, Ask iManage.
Select the Or icon, then select Applications again and enter the name of another application to monitor, for example, Claude. Repeat for each agentic application you want to monitor.
In Take User Action, move the slider to the right (Yes) if you want to take an action, or leave it off to generate an alert only.
In Users & Groups > Inclusion, ensure Everyone is selected.
In Users & Groups > Exclusion, ensure Global Exclusions List is selected.
In Notifications, select Edit to open the Users to Be Notified dialog. Then add the risk and compliance managers who’ll receive notifications that summarize alerts generated by the rule. Select OK to close the dialog.
Select Save & Activate Rule.
Example 6: Alert on external guest sharing activity
Trigger an alert when a user shares a document, revokes a share, or modifies a share’s expiration through a collaboration link.
When defining Selection Criteria for a Detect and Protect rule, select Guest Share.
Select the >= (greater than or equal to) operator, then enter a count of 1.
Select the Or icon.
Select Modified Expiration Guest Share, select the >= (greater than or equal to) operator, and enter a count of 1.
Select the Or icon.
Select Revoked Guest Share, select the >= (greater than or equal to) operator, and enter a count of 1.
In Take User Action, move the slider to the right (Yes) if you want to take an action, or leave it off to generate an alert only.
In Users & Groups > Inclusion, ensure Everyone is selected.
In Users & Groups > Exclusion, ensure Global Exclusions List is selected.
In Notifications, select Edit to open the Users to Be Notified dialog. Then add the risk and compliance managers who’ll receive notifications that summarize alerts generated by the rule. Select OK to close the dialog.
Select Save & Activate Rule.