New features are continuously being added to iManage Control Center. See what enhancements and feature changes are available in each update.
For features introduced in 10.5.x releases, refer to:
For features introduced in older releases, refer to:
10.5.0
Manage Forms within iManage Control Center
The new Forms page in iManage Control Center lets administrators configure the properties displayed in iManage Work 10 client applications. By adding or removing specific properties for workspaces, folders, searches, and documents and emails in iManage Work, users can view and update these properties to make the information in iManage Work more relevant.
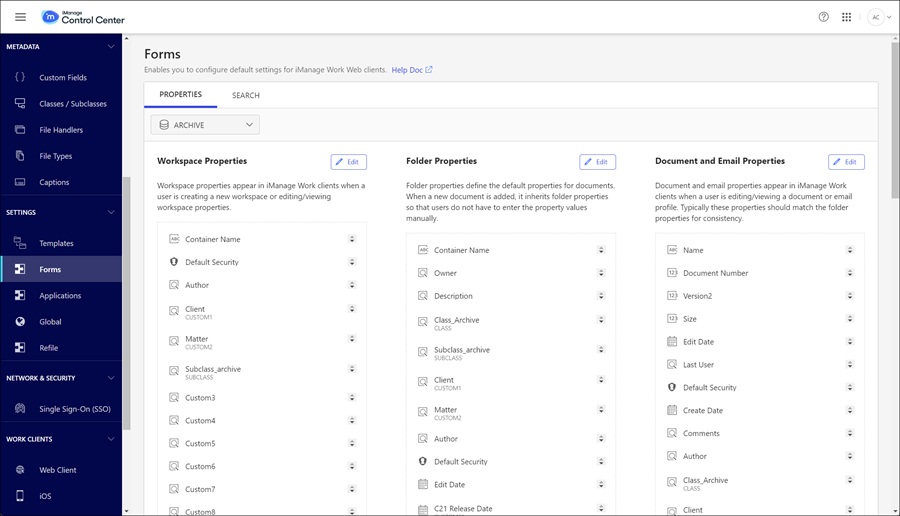
Administrators can control which properties appear in iManage Work client applications while users perform the following actions:
Creating new workspaces, folders, or uploading new documents and emails.
Editing existing workspaces, folders, documents and emails.
Searching for workspaces, documents and emails in iManage libraries.
Before, administrators could only change these properties using the legacy Dialog Editor application. Managing these forms directly in iManage Control Center now provides a simpler and more unified experience for administrators.
Managing Forms in iManage Control Center
To manage forms in iManage Control Center:
You must select Enable Forms Management as shown in the following figure. This step converts the legacy forms, including any customizations you made to the legacy forms in Dialog Editor, to a new format that is supported with the iManage Universal REST API.
Figure: Enable Forms Management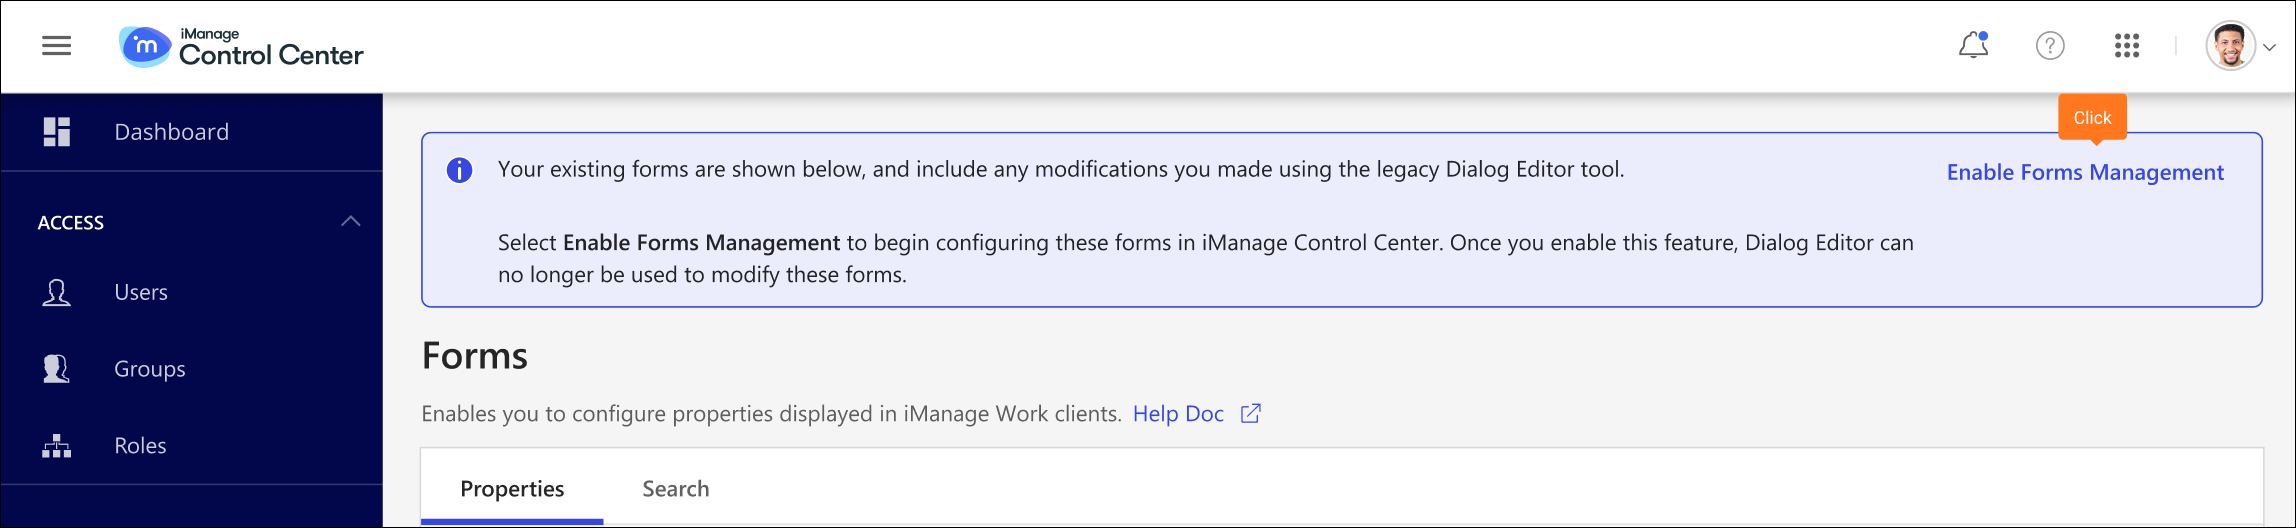
You must edit and then save all forms on the Forms page, even if they appear to show all the appropriate fields. This ensures that forms are saved in the new format so that Work 10 client applications can consume them.
After you enable forms management:
The legacy Dialog Editor tool can no longer be used to make customizations to forms for use in iManage Work 10 applications. Additional customizations can only be performed on the Forms page in iManage Control Center.
If you are using iManage Classic Clients (DeskSite or FileSite), you must continue to use Dialog Editor for customizations to forms for use in these Classic Client applications.
For more information about using this new capability, refer to Forms.
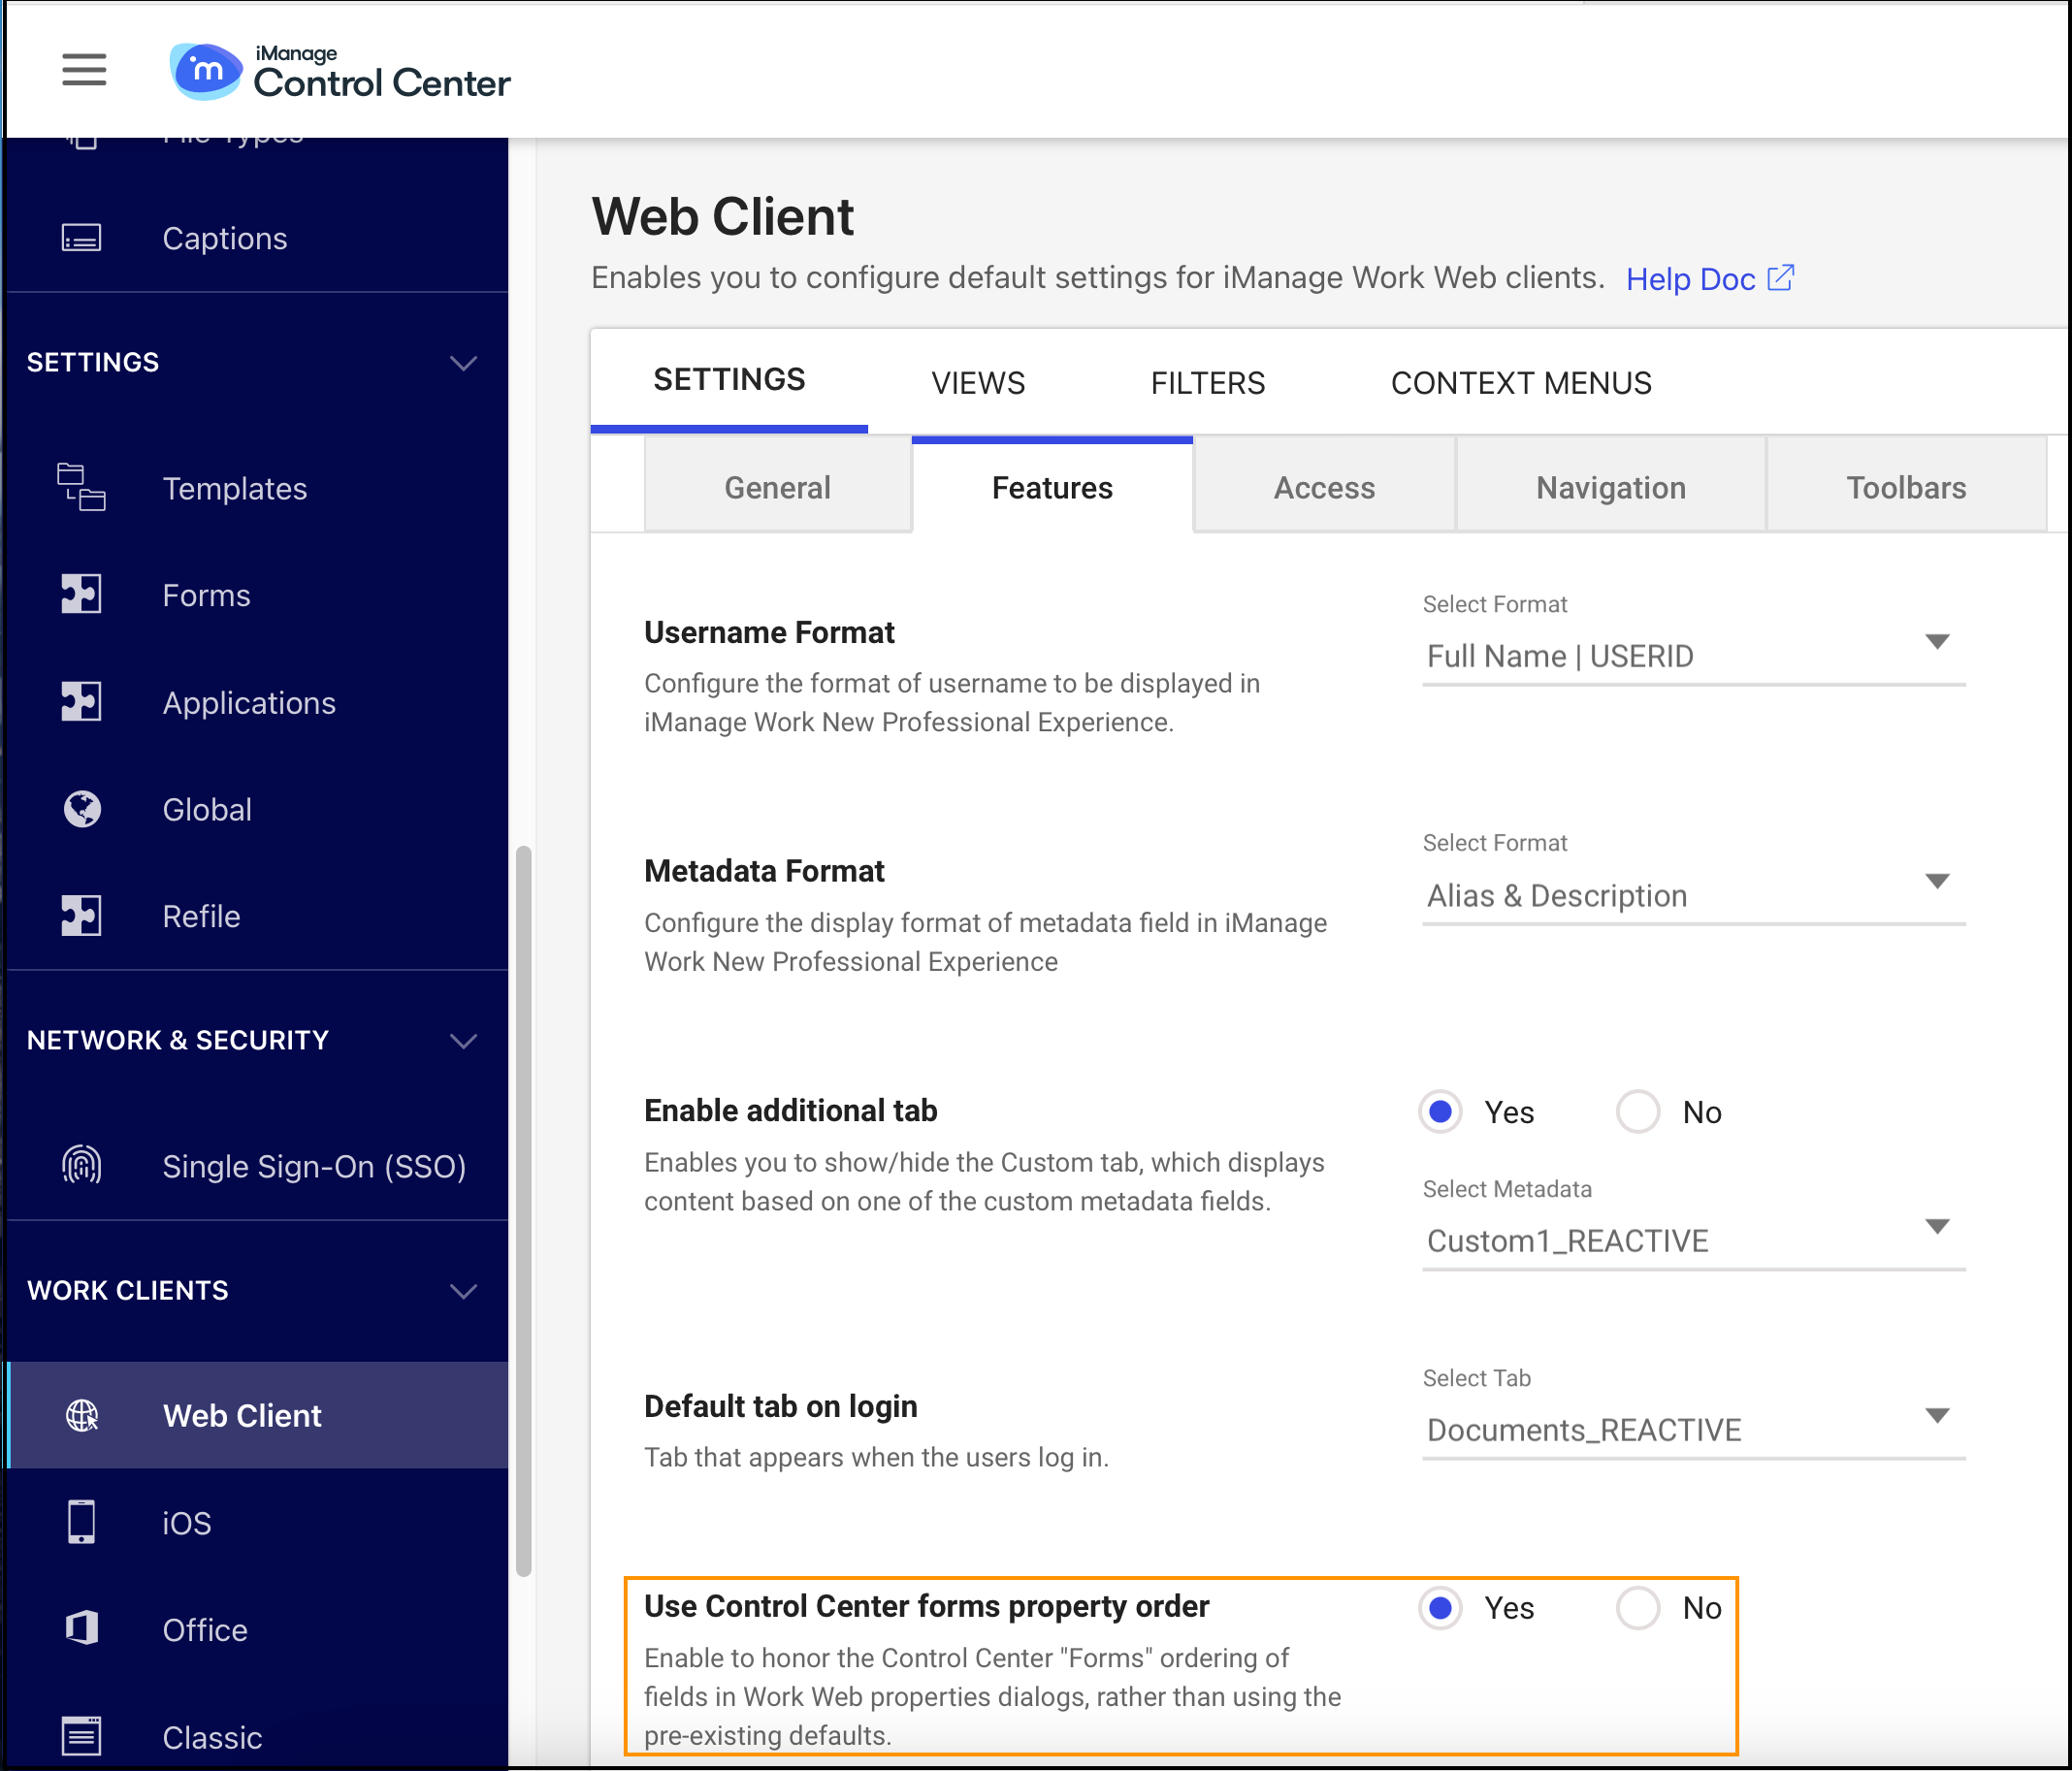
This change also allows Work 10 client applications to respect the order of the properties as configured in iManage Control Center. For more information, refer to Use Control Center forms property order.
Use Control Center forms property order
The order in which you configure these properties on the Forms page is now honored in iManage Work Web. By default, any properties added are shown at the bottom of any panels or dialogs which display these properties.
In order to ease the transition for your users, we've introduced a new Use Control Center forms property order setting. This allows you to decide when to when to make this change, giving your organization time to notify users before turning this feature on.
By default, the Use Control Center forms property order setting is turned off. Any properties you’ve added to the Forms page in iManage Control Center will continue to be displayed in their current order in any panels or dialogs in iManage Work Web.
To turn on this setting:
In iManage Control Center, browse to Work Clients > Web Client > Settings > Features.
Set Use Control Center forms property order to Yes.
Select Save.
NOTE: Users may need to clear their local cached settings to view the correct order of properties.
Enforcing Service Provider-initiated Single Sign-On
In previous versions of iManage Control Center, we introduced the ability for administrators to configure and manage their SAML SSO configuration directly from iManage Control Center. To support this capability, iManage uses Service Provider-initiated SAML SSO, where iManage is the service provider.
By moving to Service Provider-initiated SAML SSO, customers can manage their SAML SSO configuration entirely within iManage Control Center and their Identity Provider. As a failsafe, iManage Control Center provided an option for you to revert to legacy Identity Provider-initiated SAML SSO.
In this update, the Identity Provider option previously available has been removed.
If you have already enabled SAML Single Sign-On in iManage Control Center, no action is needed.
If you're enabling and configuring SAML Single Sign-On for the first time, Service Provider-initiated SSO is the default method used, without any option to select from IdP-initiated or Service Provider-intiated.
If you previously used the Identity Provider option, editing your Authentication Settings in iManage Control Center will automatically update your Single Sign-on configuration to use Service Provider-intiated SAML SSO authentication.
Users will continue to be able to authenticate before and after you switch to Service Provider-intiated SAML SSO. However, any future certificate updates must be performed within iManage Control Center.

To manage your Single Sign-on configurations, browse to Network & Security > Single Sign-On (SSO). For more information, refer to the Single Sign-on (SSO) page.
NOTES:
All iManage user accounts that should use Single Sign-On must be defined with the OS Type of Active Directory. This enforces SAML SSO authentication for these users, and prevents them from signing in using explicit sign-in. Any users imported using the iManage Directory Synchronization Service are automatically set to Active Directory.
We recommend having at least one user account with the OS Type of Virtual with access to iManage Control Center. This enables you to administer SSO changes in iManage Control Center in the event of a certificate expiry.
Settings section and Global settings page redesign
The menu items in the Settings section of the Control Center navigation pane have been rearranged to enhance user navigation. The updated order, from first to last, is:
Global
Templates
Forms
Applications
Refile
Also refer to the following figure for a graphical representation of this order.

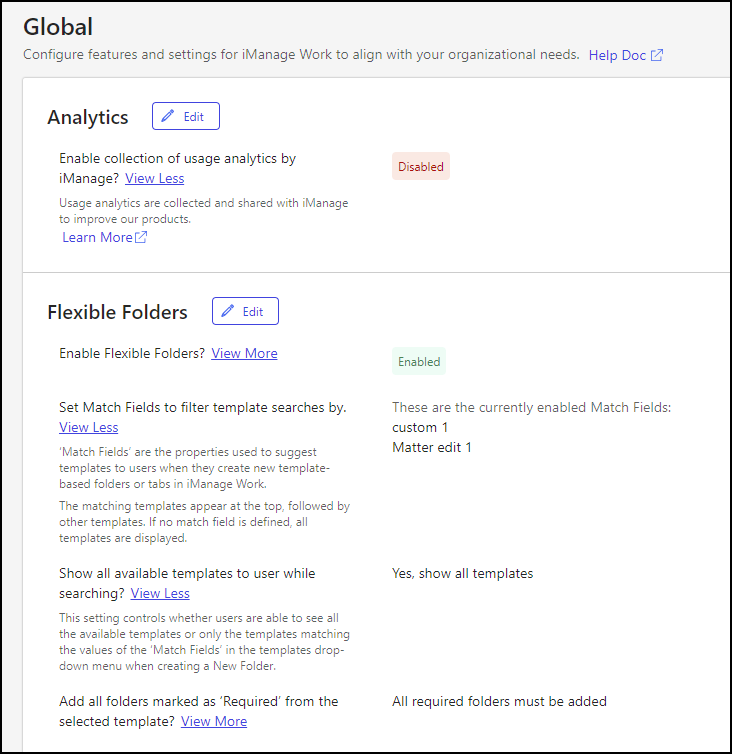
Redesigned Global settings page
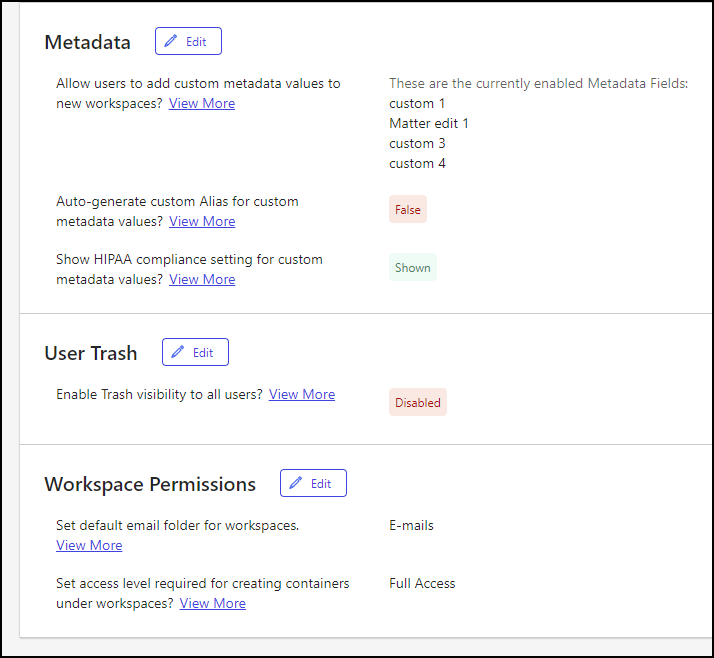
The Global settings page has been updated to organize settings by category, give more information, and make it easier to use.
Settings are now arranged in categories to better organize related options.
Labels have been renamed to more clearly reflect their purpose.
The table below illustrates the new categories and a mapping from each new global setting label to its former label.
Table: Global settings page category and setting mapping
Category | New Global setting label | Former Global setting label |
|---|---|---|
Analytics | Enable collection of search analytics by iManage | Enable analytics |
Flexible Folders | Enable Flexible Folders | Flexible Folders |
Set Match Fields to filter template searches by | Match Fields for Filtering Templates | |
Show all available templates to user while searching | Show all templates in template selection menu | |
Add all folders marked as ‘Required’ from the selected template | When adding folders from a template, should all required folders be added as well? | |
Metadata | Allow users to add custom metadata values to new workspaces | Allow to Create Metadata |
Auto-generate custom Alias for custom metadata values | Auto-generate custom Alias | |
Show HIPPA compliance setting for custom metadata values | HIPPA Option | |
User Trash | Enable Trash visibility to all users | User Trash |
Workspace Permissions | Set default email folder for workspaces | Default Email Folder |
Set access level required for creating containers under workspaces | Access rights required for creating folders under workspaces |
Global page improvements
Each Global settings page category includes an Edit button, allowing you to update settings without having to navigate through unrelated options.
Each setting on the Global settings page includes a brief description to help reduce clutter. To view additional information, you can select the View More link associated with a setting. This link acts as a toggle and changes to View Less when additional information is displayed.
The following figures show the reorganization and design improvements made.
Redesigned Global settings dialogs
Before, modifications to global settings were made through the Settings dialog. Now, there's a dedicated dialog for each category on the Global settings page. The following figure shows the Edit Flexible Folders dialog, providing an example of a category dialog. It opens when you select the Edit button next to the Flexible Folders category on the Global settings page.
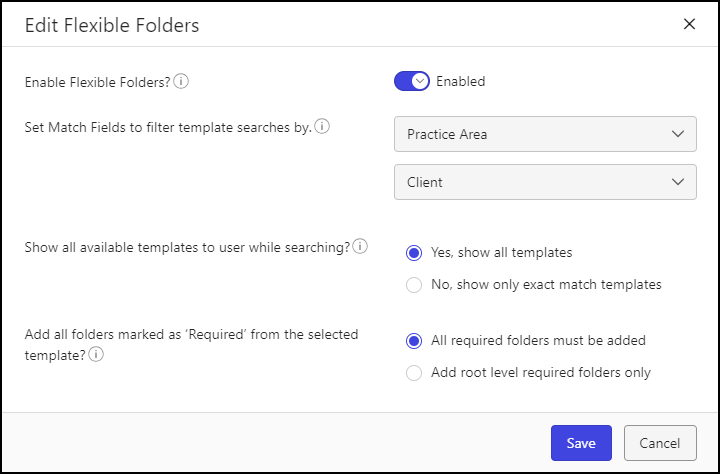
Tool tips offer additional details and are available for each setting within a category dialog. Select the circular information icon to reveal the corresponding tool tip.
For more information about these settings, refer to the Global page.
Removal of iManage Control Center 1.0
The legacy 1.0 version of the iManage Control Center interface and all underlying code has been removed.