November 2024
Manage IP restrictions for virtual user accounts
With this update, administrators may now assign trusted IP address ranges to iManage Work virtual user accounts through iManage Control Center. When this functionality is enabled for a user, the user can sign in to iManage Work only from a range of trusted IP address. Attempts to access the system from a non-trusted IP address are denied, providing an additional layer of security for virtual users.
This feature:
Is defined per user and isn't based on group or role assignments.
Is managed for users at the global management level only.
Applies to virtual users only.
Is disabled by default.
NOTE: iManage Security Policy Manager doesn't enforce IP restrictions for virtual users.
For more information about administering IP restrictions, refer to the IP Restrictions section on the Users page.
Managing IP restrictions
IP restrictions are managed through the IP Restriction setting on the Users page. This setting is only accessible when managing aspects of a user profile at a global level.
To turn on IP restrictions for a user:
In iManage Control Center, browse to Access > Users.
Select Global Management.
Use one of the following methods to assign IP restrictions to a new user or an existing user:
Create User: To access this dialog, select the + Create User button on the Users page.
Edit Access: To access this dialog, select an existing user name in the Users table to open the user profile page. In the Access section, select Edit.
Edit IP Restrictions: To access this dialog from the Users table:
Select the check box next to a user name and then select Edit IP restrictions in the ribbon bar.
Right-click anywhere in a user row and then select Edit IP restrictions.
Select the kebab menu in a user row and then select Edit IP restrictions.
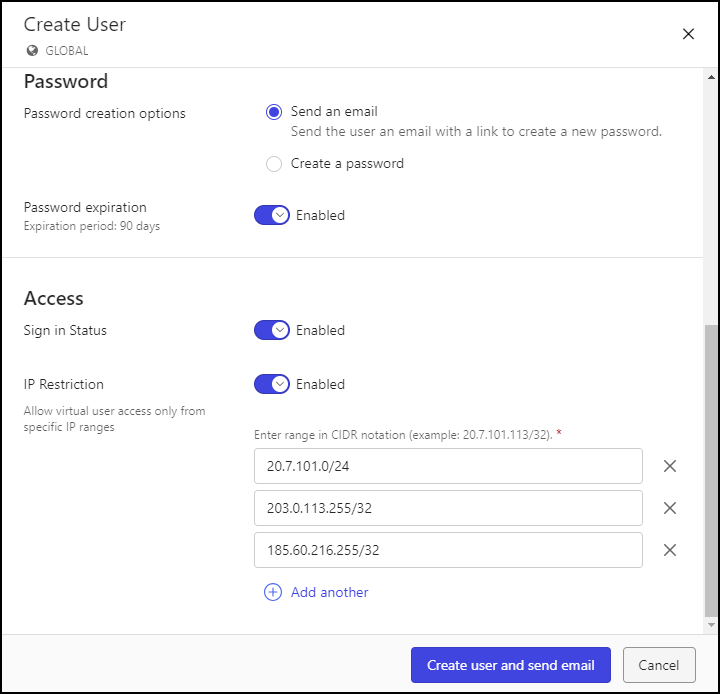
Set IP Restriction to Enabled.
Enter an IP address range that’s public, in IPv4 address format, and in Class Inter-Domain Routing (CIDR) notation.
Select + Add another to enter an additional IP address range or X to delete one, as needed. The following figure shows the IP Restriction section in the Create User dialog.
Figure: Create User dialogSelect Create user and send email, Create, or Save, depending on which dialog you’re in.
NOTES:
The IP Restriction setting can be enabled only if the Sign in Status of a user is enabled.
Changes to IP restriction settings for a virtual user are applied the next time they sign in.
IP address ranges must be public, in IPv4 address format, and in CIDR notation.
An example of CIDR notation is 20.7.101.0/24. This represents 256 IPv4 addresses, ranging from 20.7.101.0 to 20.7.101.255. In this case, the prefix is 20.7.101.0 and the prefix length is 24, which indicates how many bits are allocated to the routing prefix of the network.
Viewing IP restrictions
IP restrictions are hidden by default in the Users page table. To display IP restrictions:
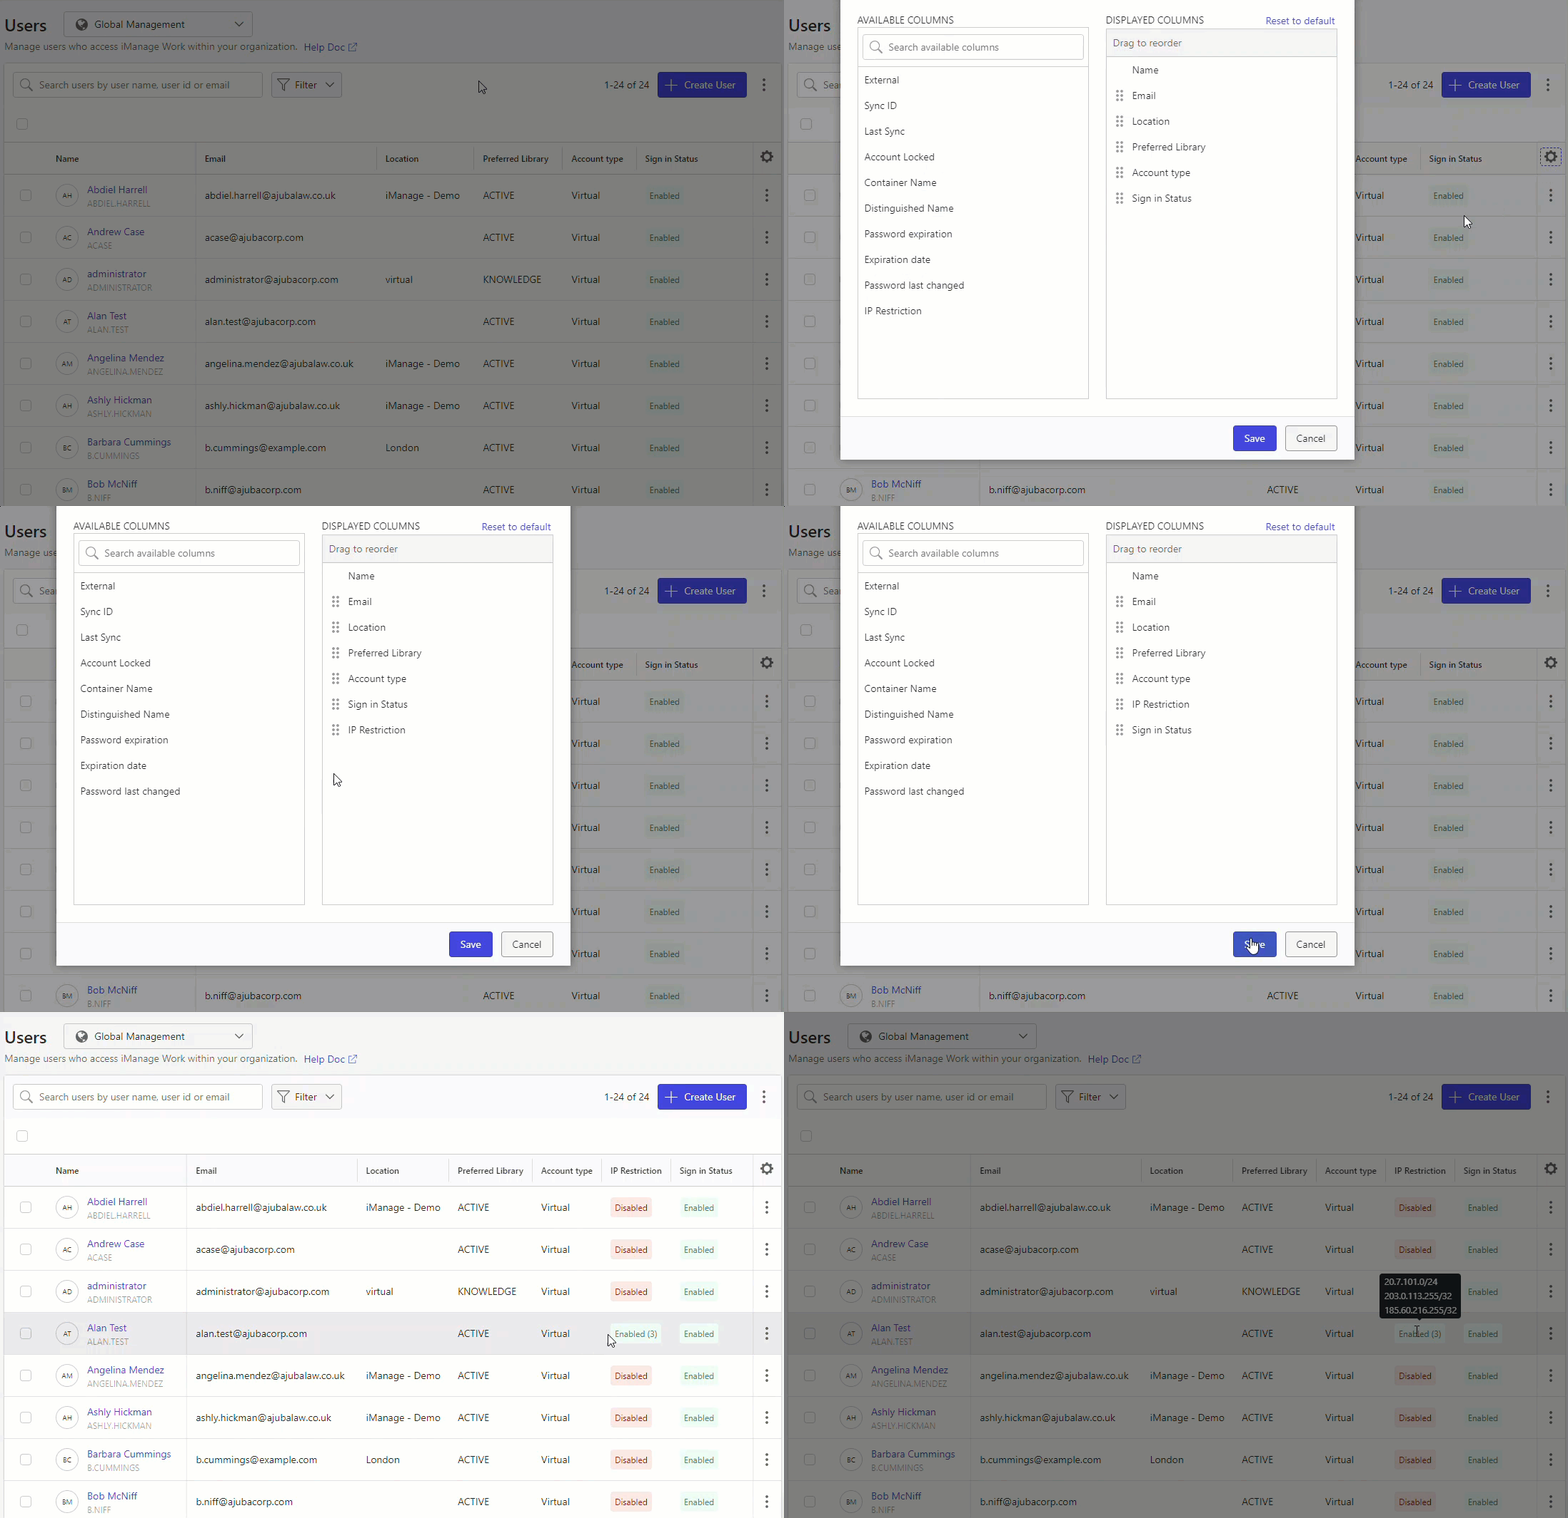
In the Users table, select the Gear icon to open the Edit Columns dialog. This dialog lets you add and remove columns and change the order in which columns are displayed.
In the Available Columns panel, hover over the IP Restriction column and select the + icon to move it to the bottom of the Displayed Columns panel.
Drag and drop the IP Restriction column to change column order, if desired.
Select Save.
Adding the IP Restriction column to the Users page table is shown in the following animation.
NOTE: On the Users page, IP restriction settings are viewable if you’re using Global Management but not if you’re using Library-level Management.
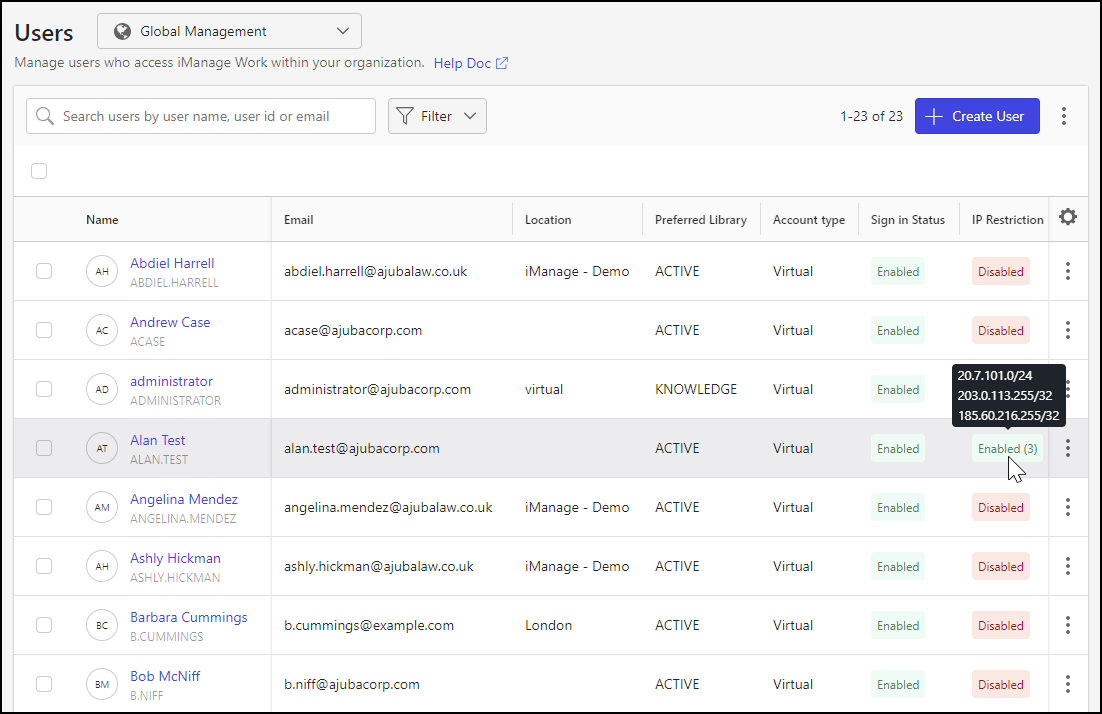
The IP Restriction column shows whether IP restrictions are enabled or disabled for each user. In the row for a user for whom IP restrictions are enabled, hovering over the column entry displays the trusted IP address ranges for a user, as shown in the following figure.
Filtering output by IP restriction status
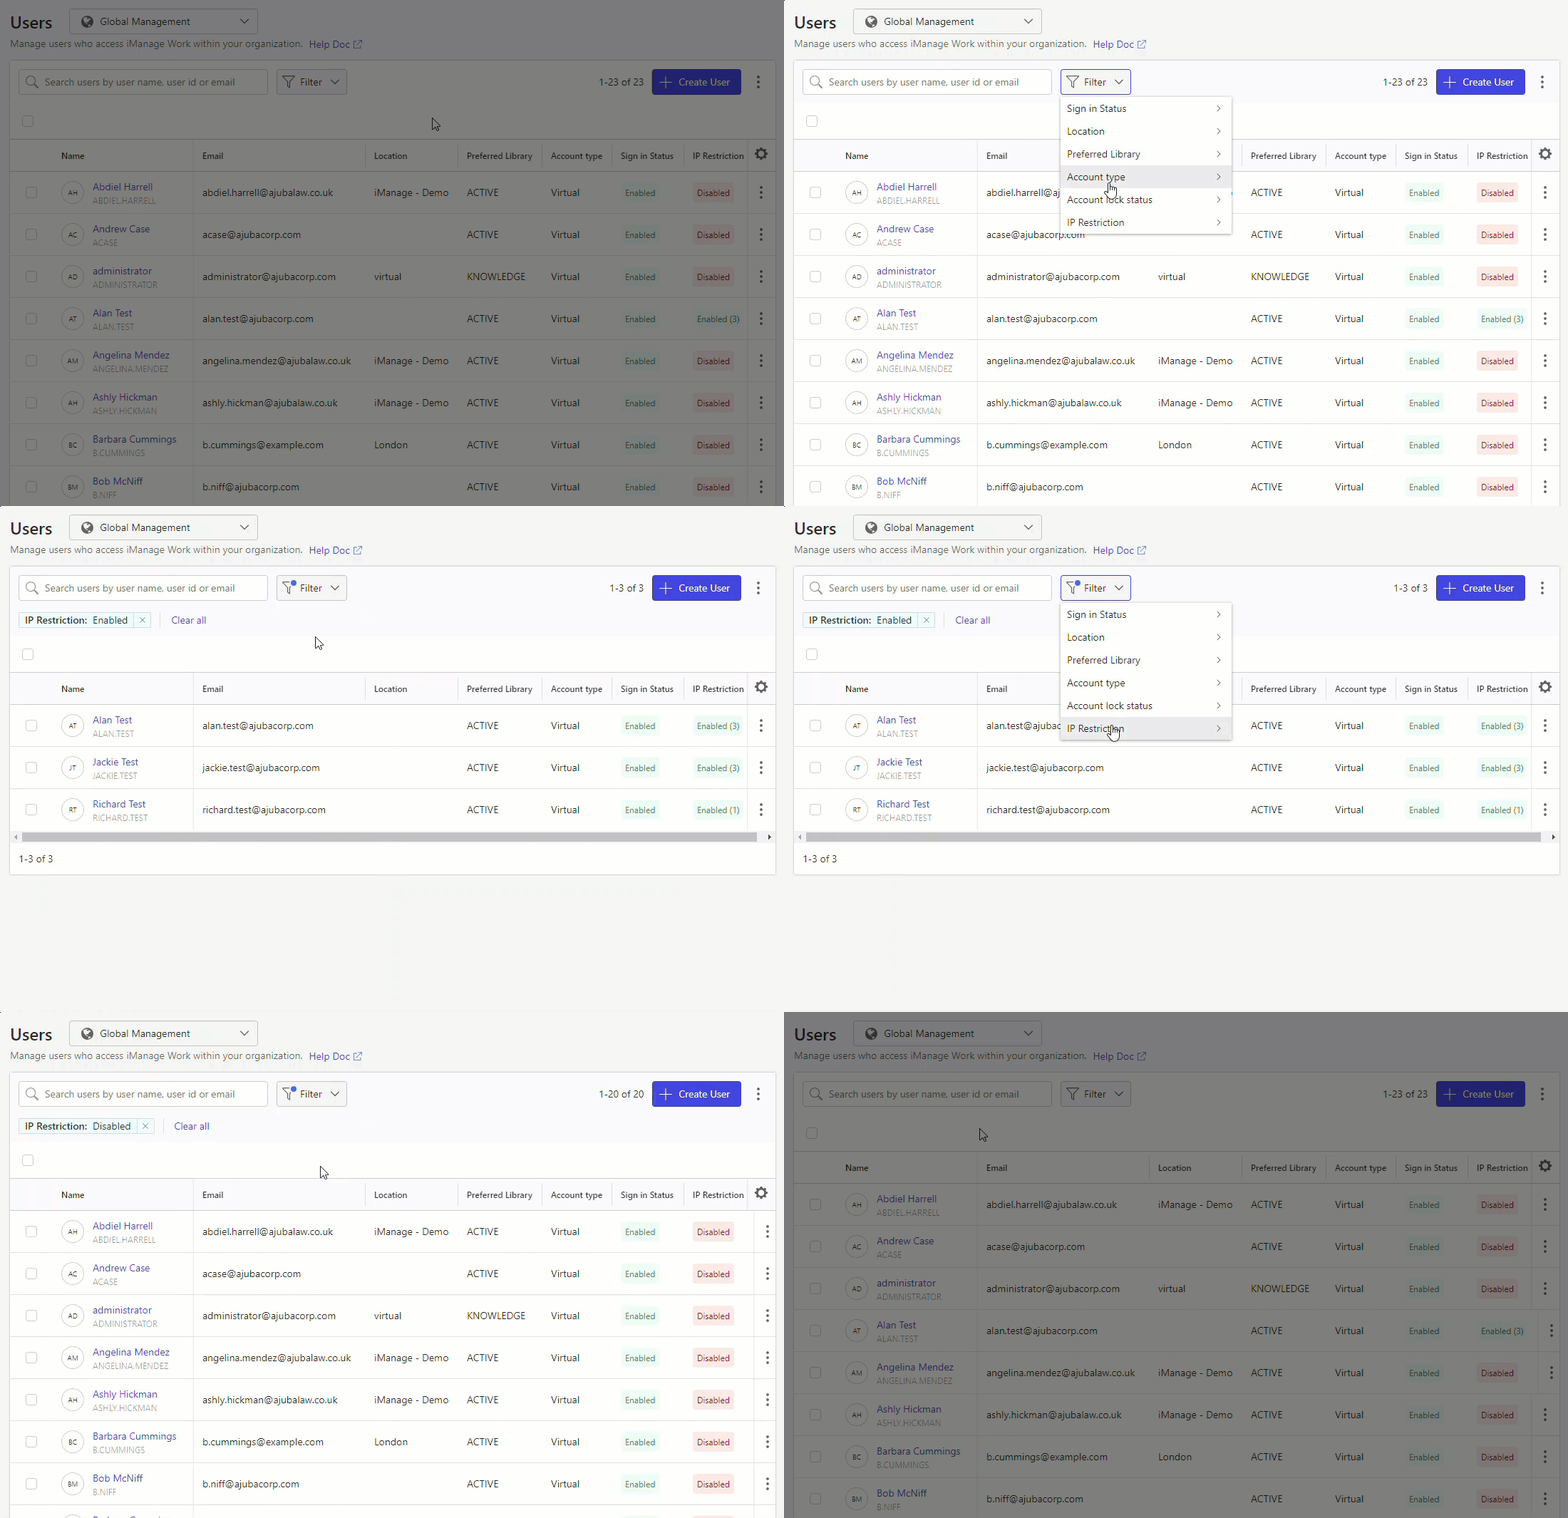
Filtering output based on IP Restriction status is supported on the Users page. Perform the following steps to apply the IP Restriction filter:
From the Filter drop-down list, select IP Restriction.
In the IP Restriction filter option dialog, select:
Enabled to show only the users with IP restrictions enabled.
Disabled to show only the users with IP restrictions disabled.
Use one of the following methods to clear IP restriction filtering:
From the Filter drop-down list, select IP Restriction.
In the IP Restriction filter option dialog, select Clear.
In the search ribbon:
Select X next to the IP Restriction filter option, or
Select Clear all.
IP restriction filtering behavior is shown in the following animation.
Automatically delete journals
Journals are the incremental saves you find in the document timeline. They're useful to retain for a while after editing, in case a user needs to revert to an earlier version. However, these incremental edits can accumulate over time and increase the storage usage of your company. By enabling this feature, you can help your company reduce storage usage in iManage Work.
With this update, you may now set up iManage Work to automatically remove journals after a designated number of days. This option is configured per iManage Work library.
NOTE: To enable the automatic deletion of journals for a library, the user must:
Be assigned to a Global Role that has the Settings Management privilege, and
Be a member of the NRTADMIN group for the library.
For more information about administering journal retention, refer to the Journal Retention section on the Global settings page.
Managing journal retention
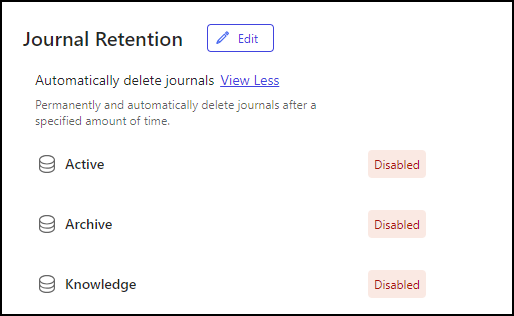
Automatic journal deletion is disabled by default. To configure journal retention settings in iManage Control Center, select Edit in the Journal Retention section of the Global settings page:
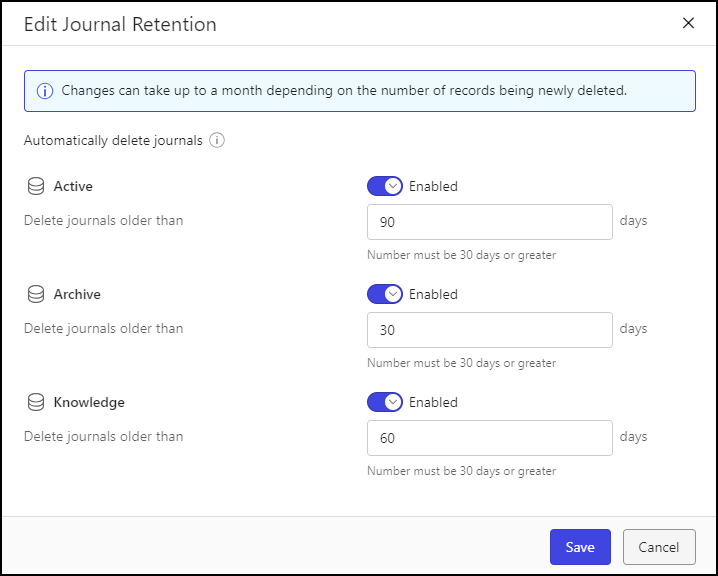
The Edit Journal Retention dialog is displayed and provides options to enable automatic deletion and to set the retention duration for each library.
For each library, the Edit Journal Retention dialog provides options to:
Enable or disable automatic deletion of journals: The automatic purging of journal items is disabled by default.
Specify the number of days journals remain before being purged: The default is 90 days, and the value must be 30 days or greater.
NOTE: If you're newly activating or significantly reducing the number of days, be aware that there might be many days worth of journals to delete, a process that could take up to a month to finish. If you're reducing the number of days or turning off this feature, please note that we can't restore content that has already been deleted. The change will take effect from this point onwards.
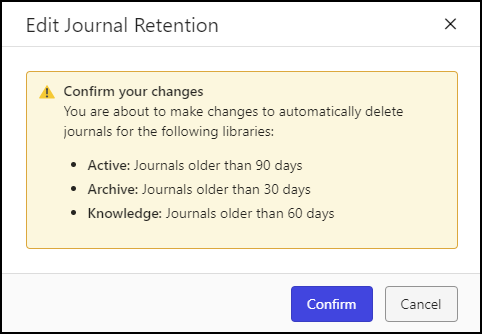
A confirmation dialog is displayed after updating and saving journal retention settings:
Hide sent date in the header of email previews
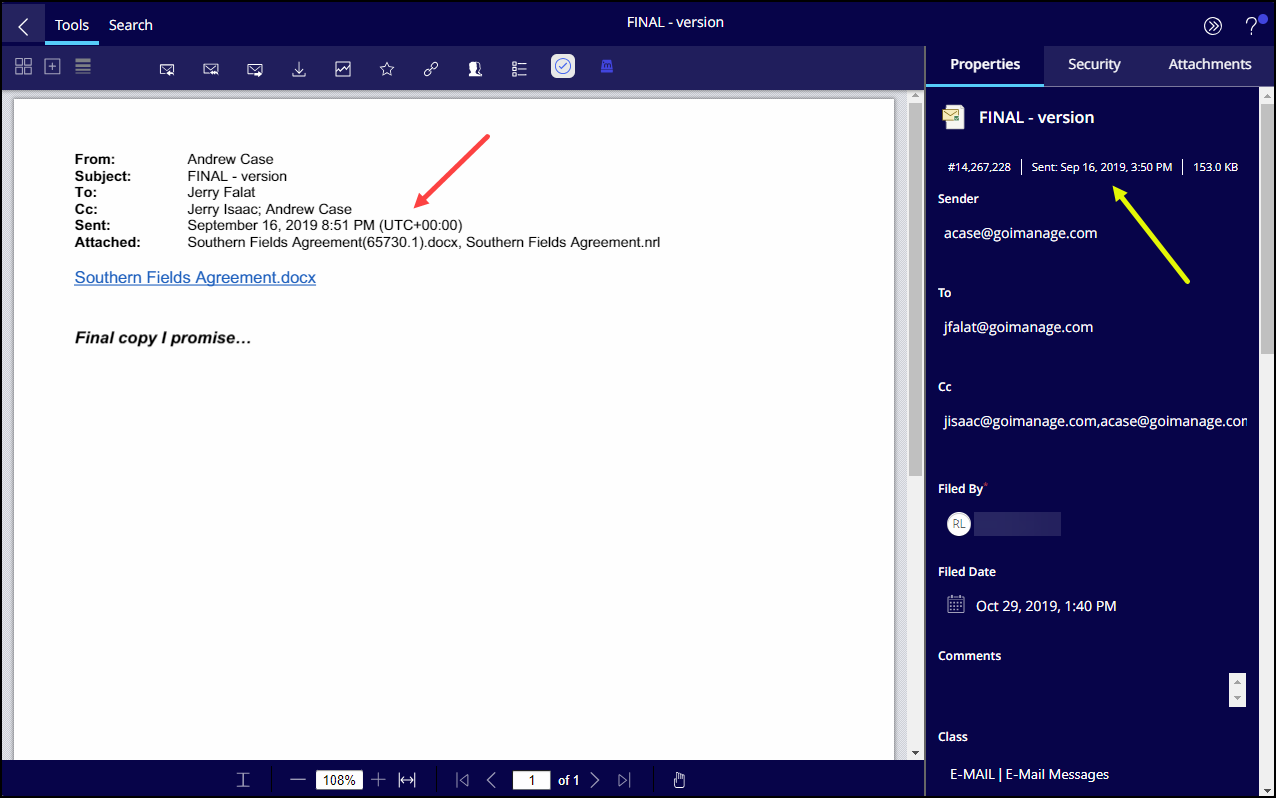
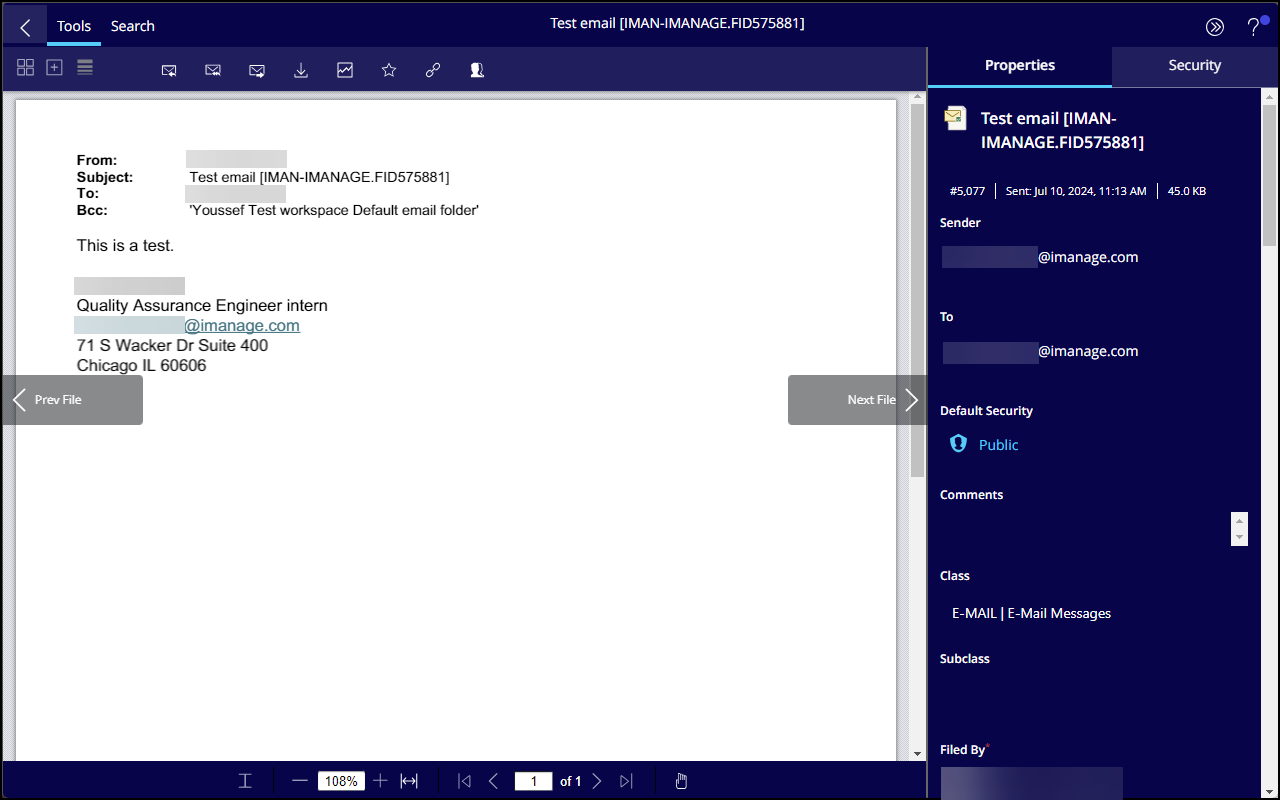
When previewing emails, the email header in the preview pane of iManage Work Web displays the sent date and time in UTC. This is because email previews are rendered in cloudimanage.com without knowledge of the local time zone for a user, and therefore the date and time can be displayed only in a single time zone.
Contrarily, the Properties panel shows the sent date and time in the local timezone for the user. This inconsistency causes confusion, as users need to convert the UTC time shown in the email preview to their local time. For more information about this disparity, refer to In Work 10 Web, display time in email reply as user's local time instead of UTC time.
The image below shows how the sent date displays differently in the preview pane and the Properties panel.
With this update, sent date and time no longer display in the email header of the preview pane. Users can now trust the sent date and time displayed in the Properties panel to know the accurate local time a message was sent. This is depicted in the image below.
Enable iHelp
This update introduces the iHelp capability for iManage Work Web users. This capability provides on-demand help and contextual guidance and includes the following sections:
Onboarding Checklist: Guides users through core task flows step-by-step.
Online Training: Links to iManage online training resources.
Documentation: Allows users to search for help articles that are available on docs.imanage.com.
Feedback: Reach out with any suggestions or questions for iHelp.
NOTE: iHelp is provided in English in the initial release. Multilanguage support is planned for a future release.
With iHelp, customers gain the following advantages:
Lower training expenses
Less strain on IT support
Decreased reliance on third-party tech support
Seamless assistance with contextual help
Enhanced user satisfaction
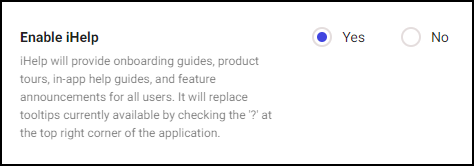
To turn on iHelp:
In iManage Control Center, browse to Work Clients > Web Client > Settings > Features.
Locate the Enable iHelp setting and select Yes to turn it on.
September 2024
Automatically delete items in Trash
With this update, you now may set up iManage Work to automatically remove items from Trash after a designated number of days. This option is configured per iManage Work library.
This capability simplifies the deletion of unwanted files, limits risk by removing the need to use custom scripts, and provides a more centralized administrator experience. It also helps your company reduce storage utilization in iManage Work.
For more information about administering Trash retention, refer to the Trash Retention section on the Global settings page.
Managing Trash retention
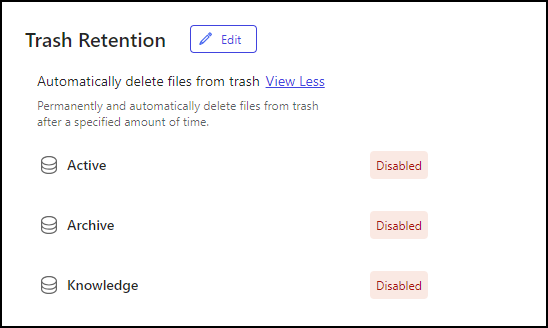
Automatic Trash deletion is disabled by default. To configure Trash retention settings in iManage Control Center, select Edit in the Trash Retention section of the Global settings page:
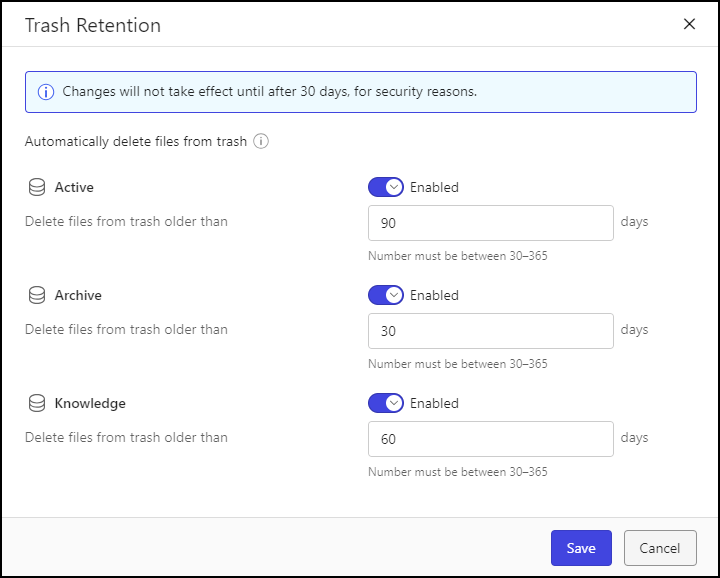
The Trash Retention dialog is displayed and provides options to enable automatic deletion and to set the retention duration for each library.
For each library, the Trash Retention dialog provides options to:
Enable or disable automatic deletion of Trash: The automatic purging of Trash items is disabled by default.
Specify the number of days items remain in Trash before being purged: The default is 90 days, with a range of 30–365 days.
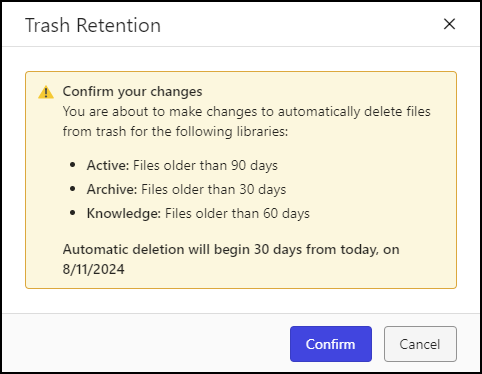
A confirmation dialog is displayed after updating and saving Trash retention settings:
When files are permanently deleted from Trash, all journal snapshots that are associated with the file are also deleted.
To see what items will be deleted from Trash, use the Trash page in iManage Control Center to search for files using the Deleted Date field. Set the value to align to the number of days you configured within the Trash Retention dialog. For example, Deleted Date = July 1, 2024.
Trash management safeguards
To prevent any misuse and allow other administrators the opportunity to intervene if needed, we safeguard against improper intentions by:
Automatic deletions are delayed 30 days after enabling this feature or making any configuration changes per library. After 30 days, the system will begin purging items from the trash based on the length of time the item was originally moved to the trash.
All changes to the Trash retention settings are recorded in the DOCHISTORY table.
Use iManage Control Center forms property order
In iManage Control Center, the Forms page lets administrators customize the properties displayed in iManage Work client applications. By adding or removing specific properties for workspaces, folders, searches, and documents and emails in iManage Work, users can view and update this information to make it more relevant.
In this update, the order in which you configure these properties on the Forms page is now honored in iManage Work client applications.
In order to ease the transition for your users, we have introduced a new Use Control Center forms property order upcoming feature. This allows you to decide when to enable this feature, giving your organization time to notify users before turning it on.
By default, the Use Control Center forms property order upcoming feature is disabled. Any properties you’ve added to the Forms page will continue to be displayed in their current order in any panels or dialogs.
To enable this Upcoming Feature:
In iManage Control Center, browse to Settings > Upcoming Features.
Right-click the Use Control Center forms property order feature, and select Enable Feature.
Figure: Use Control Center forms property orderIn the displayed confirmation dialog, select Enable to confirm your decision.
Any properties you’ve added to the Forms page in iManage Control Center are now displayed in the order you specified.
NOTE: Users may need to clear their local cached settings to view the correct order of properties.
If you take no action, the Use Control Center forms property order upcoming feature will become permanent for all users (it'll automatically be enabled) on December 16, 2024.
On this date, this upcoming feature will also be removed from the Upcoming Features page in iManage Control Center.
July 2024
Settings section and Global settings page redesign
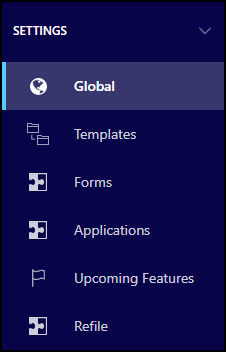
The menu items in the Settings section of the Control Center navigation pane have been rearranged to enhance user navigation. The updated order is shown in the following figure:
Furthermore, the Global settings page, which is used to configure general iManage Work settings, has undergone a redesign to organize settings by category, provide additional details, and improve the user experience.
Redesigned Global settings page
Settings on the Global settings page are rearranged into categories for better organization. Additionally, labels for global settings have been renamed to more clearly reflect their purpose. The table below illustrates the new categorization of global settings and includes a mapping from each new global setting label to its former label.
Table: Global settings page category and setting mapping
Category | New Global setting label | Former Global setting label |
|---|---|---|
Analytics | Enable collection of search analytics by iManage | Search analytics |
Documents | Allow edit on document versions | Allow to edit document versions |
Flexible Folders | Enable Flexible Folders | Flexible Folders |
Set Match Fields to filter template searches by | Match Fields for Filtering Templates | |
Show all available templates to user while searching | Show all templates in template selection menu | |
Add all folders marked as ‘Required’ from the selected template | When adding folders from a template, should all required folders be added as well? | |
Metadata | Allow users to add custom metadata values to new workspaces | Allow to Create Metadata |
Auto-generate custom Alias for custom metadata values | Auto-generate custom Alias | |
Show HIPAA compliance setting for custom metadata values | HIPAA Option | |
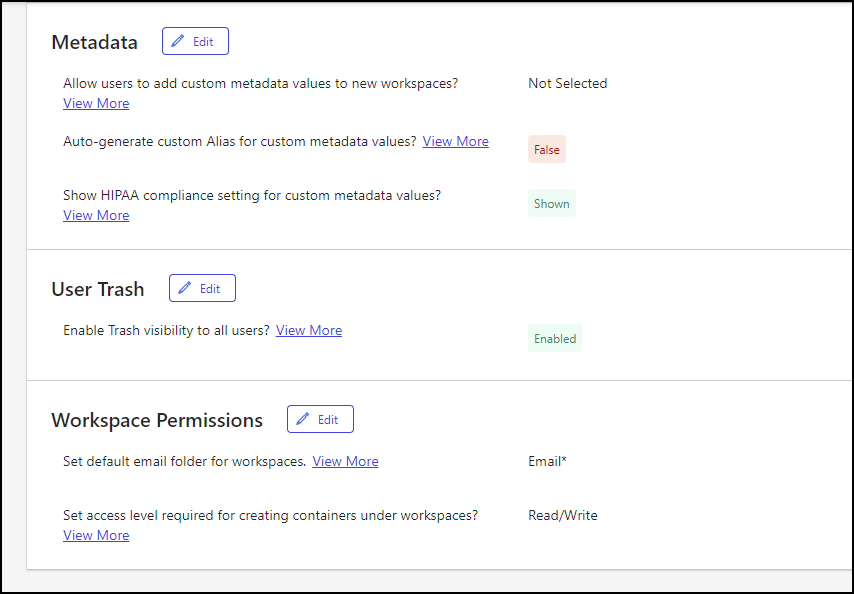
User Trash | Enable Trash visibility to all users | User Trash |
Workspace Permissions | Set default email folder for workspaces | Default Email Folder |
Set access level required for creating containers under workspaces | Access rights required for creating folders under workspaces |
Global page improvements
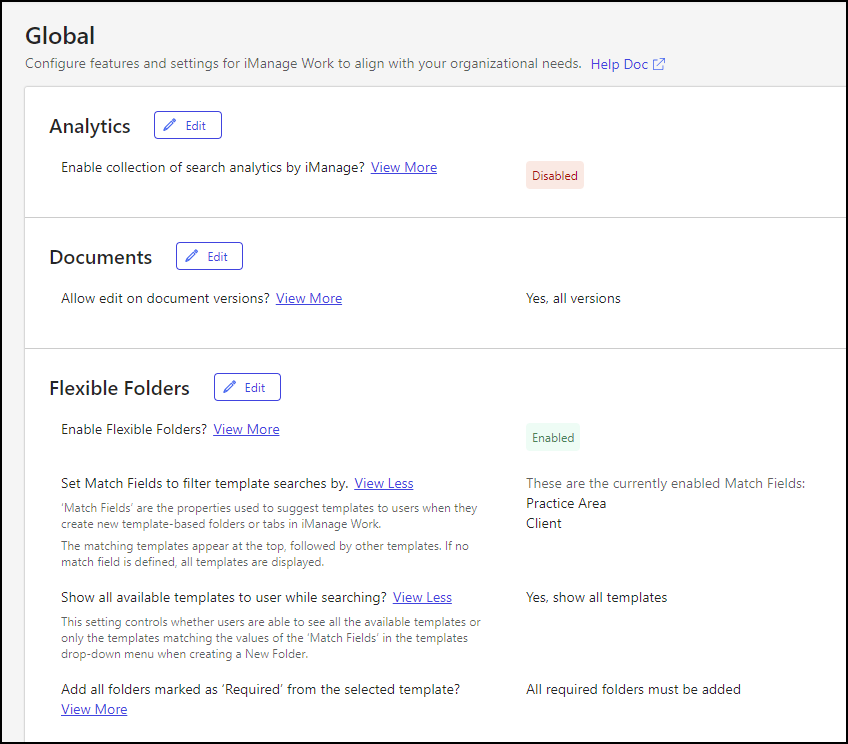
Each Global settings page category includes an Edit button, allowing you to update settings without having to navigate through unrelated options.
Each setting on the Global settings page includes a brief description to help reduce clutter. To view additional information, you can select the View More link associated with a setting. This link acts as a toggle and changes to View Less when additional information is displayed.
The following figures illustrate the reorganization and design improvements made to the Global settings page:
Redesigned Global settings dialogs
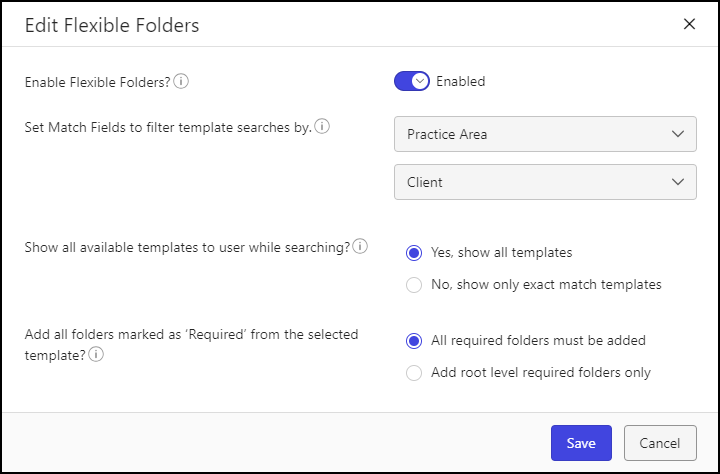
Before, modifications to global settings were made through the Settings dialog. Now, there's a dedicated dialog for each category on the Global settings page. The following figure shows the Edit Flexible Folders dialog, providing an example of a category dialog. It opens when you select the Edit button next to the Flexible Folders category on the Global settings page.
Tool tips offer additional details and are available for each setting within a category dialog. Select the circular information icon to reveal the corresponding tool tip.
For more information about these settings, refer to the Global page.
May 2024
Manage iManage Drive configuration files
The new iManage Control Center Drive page lets you manage Microsoft Windows and macOS configuration files for iManage Drive, an iManage Work client application. These configuration files are used to define the iManage Drive application mode and to customize account setup options.
As an administrator, you can modify the configuration files and then upload them to iManage Control Center. iManage Drive syncs with iManage Control Center to check for uploaded configuration files during startup and on a scheduled basis.
NOTE: The sync schedule is controlled by iManage Drive Admin setting refresh_remote_admin_settings_frequency. This setting defaults to sync once per day.
When a new or updated configuration file is detected, iManage Drive restarts, allowing the configuration settings to take effect.
For more information about syncing configuration files between iManage Control Center and iManage Drive, refer to the Downloading admin_settings file from iManage Control Center in iManage Drive Administrator Help. For more information about customizing iManage Drive configuration files, refer to the Configuring user settings section in iManage Drive Administrator Help.
NOTE: The upcoming release of iManage Drive 10.11 supports this functionality, to connect to iManage Control Center and retrieve these configuration files. To track iManage Drive releases, follow the Upcoming iManage Work Releases section in Help Center.
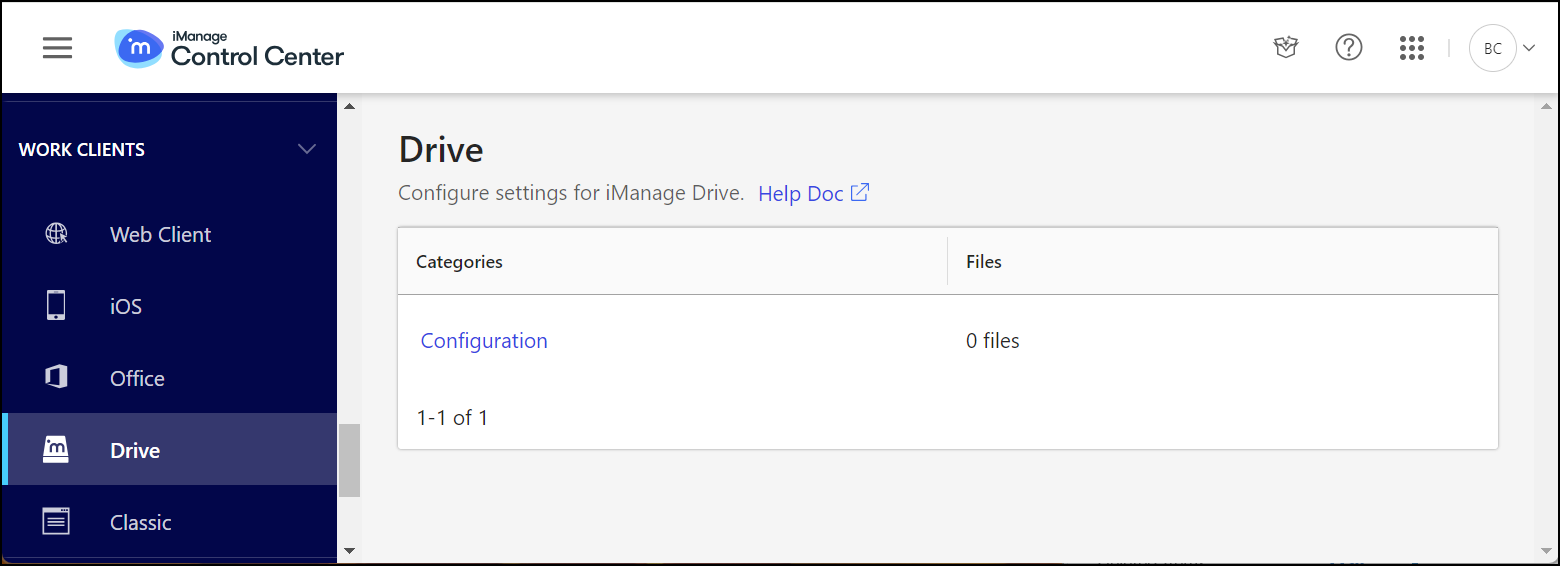
To access the new Drive page, browse to Work Clients > Drive in iManage Control Center.
NOTE: The Drive page is available only if the iManage Drive application is added and enabled on the Settings > Applications page in Control Center.
For more information about using iManage Control Center to manage and deploy configuration files to iManage Drive installations, refer to Drive in iManage Control Center help.
February 2024
Manage SAML and OIDC single sign-on
This enhancement allows administrators to configure and manage Security Assertion Markup Language (SAML) or OpenID Connect (OIDC) single sign-on (SSO) authentication within iManage Control Center.
With this self-service option, administrators can set up SSO themselves, instead of having to contact iManage. Administrators can also easily update the SSO configuration when their Identity Provider (IdP) SAML certificate or OIDC client secret is about to expire.
Customers who currently use SAML or OIDC SSO authentication with an IdP should note that your current configuration will remain valid. You do not need to take action. Following the service update, we encourage customers to transition to this self-service configuration option.
For instructions to configure SAML and OIDC SSO settings through iManage Control Center and your IdP, refer to Single Sign-On (SSO).
