The Allow / Deny List tab on the Collaboration page lets you set restrictions for accessing shared content. When configured, these restrictions specify which email domains are permitted or blocked from accessing the content. If no restrictions are set, access to shared content is open to all domains.
When setting up restrictions, you need to decide whether to list domains that are allowed access or domains that are denied access, as these access types can't be mixed. If you don’t have any restrictions, you don’t need to create a restriction list.
NOTE: To set up shared content access restrictions, the user must be assigned to a Global Management role that has the Settings Management privilege. For more information, refer to Global privilege descriptions.
This section includes the following topics:
Change the restriction mode
In the Allow / Deny List tab, the restriction mode specifies which restriction type, if any, is applied for content sharing. The following modes are supported:
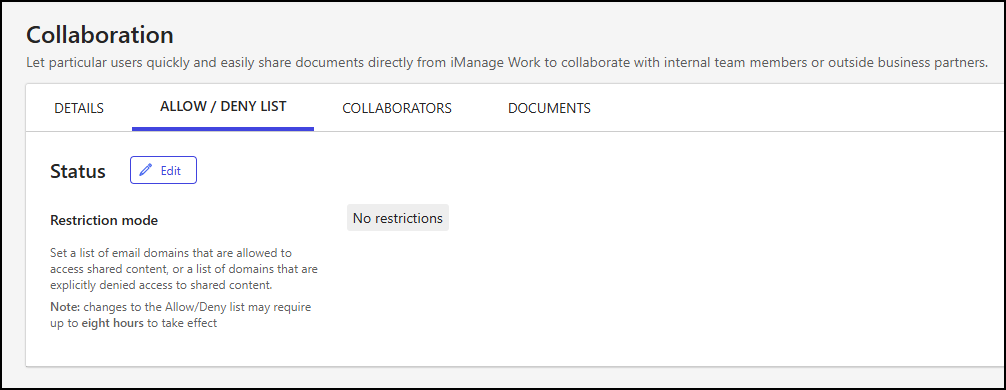
No restrictions (default): Access to shared content is allowed from all domains.
Only allow certain domains: Access to shared content is limited to specific domains.
Deny certain domains: Access to shared content is blocked for certain domains.
The following figure shows how the Allow / Deny List tab looks when the restriction mode is set to No restrictions.
To change the restriction mode:
In iManage Control Center, browse to Settings > Collaboration.
Select the Allow / Deny List tab.
In the Status section of the Allow / Deny List tab, select Edit.
In the Status dialog, select the Restriction mode:
No restrictions: Access to shared content is allowed from all domains.
Only allow certain domains: Access to shared content is limited to specific domains.
Deny certain domains: Access to shared content is blocked for certain domains.
Continue based on the restriction mode you select:
If you choose No restrictions, or if you choose Only allow certain domains or Deny certain domains and a list of allowed or denied domains already exists, select Save.
If you choose Only allow certain domains and a list of allowed domains doesn’t already exist, select Next.
In the Add allowed domains dialog, enter values for the following fields, as described in Domain collection field descriptions:
Collection name
Allowed domains
Comment
Select Save.
An example of the Add allowed domains dialog is shown in the following figure.Figure: Add allowed domains dialog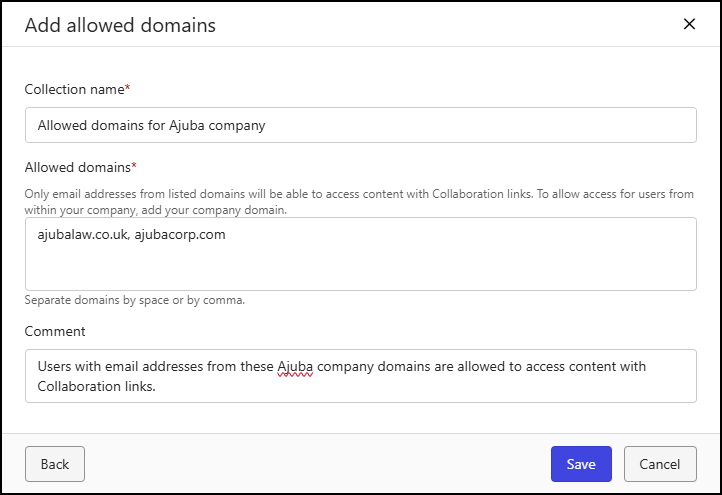
NOTE: When using the Only allow certain domains restriction mode, you must add your own company domain(s) to ensure that users within your company can access content shared through collaboration links.
If you choose Deny certain domains and a list of denied domains doesn’t already exist, select Next.
In the Add denied domains dialog, enter values for the following fields, as described in Domain collection field descriptions:
Collection name
Denied domains
Comment
Select Save.
An example of the Add denied domains dialog is shown in the following figure.Figure: Add denied domains dialog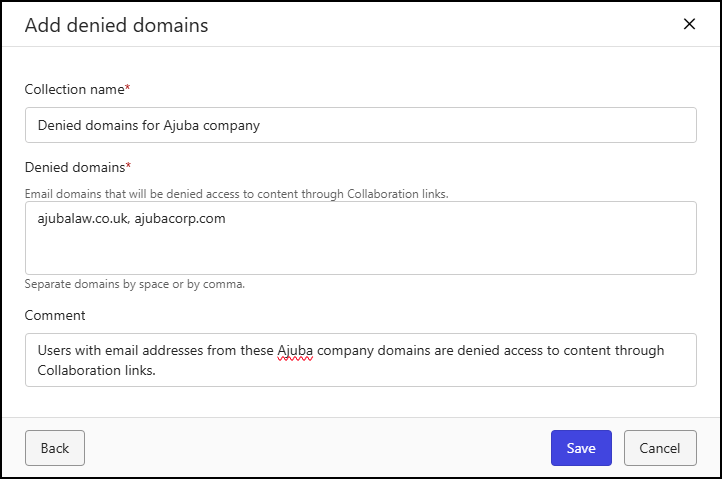
Domain collection field descriptions
The table below describes the fields in the Add allowed domains and Add denied domains dialogs.
Table: Domain collection fields
Field | Description |
|---|---|
Collection name | The name given to the collection of allowed or denied domains.
|
Allowed domains | One or more properly formatted domains from which email addresses can access content shared through collaboration links. When multiple domains are entered, each domain must be separated with a space or a comma.
NOTE: This field is shown only in the Add allowed domains dialog. |
Denied domains | One or more properly formatted domains from which email addresses are denied access to content shared through collaboration links. When multiple domains are entered, each domain must be separated with a space or a comma.
NOTE: This field is shown only in the Add denied domains dialog. |
Comment | An optional note assigned to the collection of allowed or denied domains.
|
Manage the allowed domains list
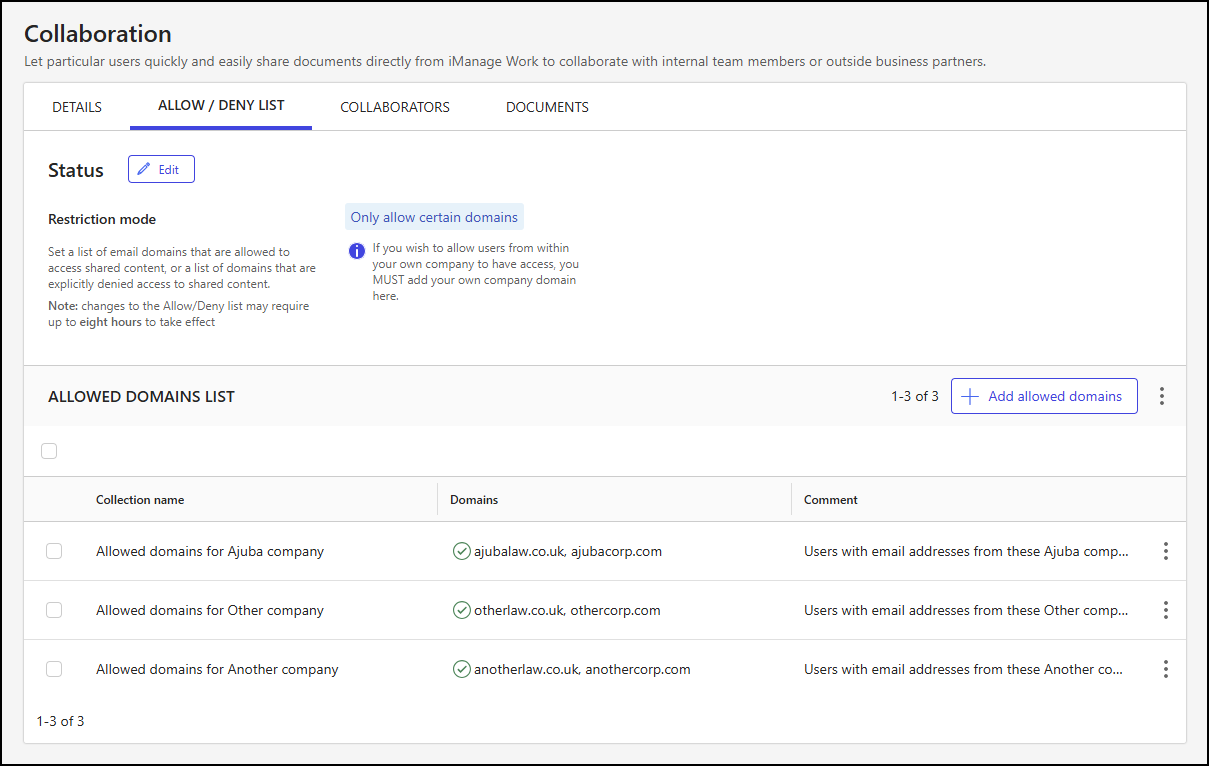
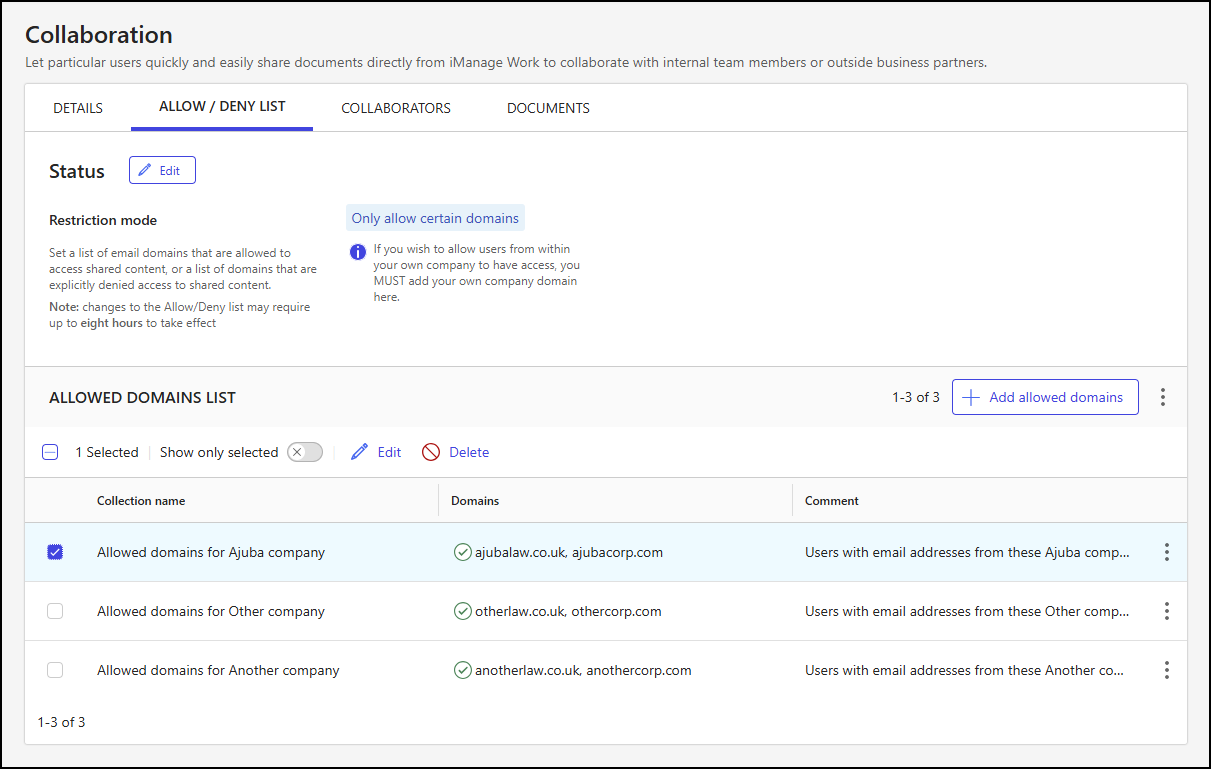
The Allow / Deny List tab on the Collaboration page is displayed as shown in the following example when the restriction mode is set to Only allow certain domains.
With the restriction mode set to Only allow certain domains, you can:
Select allowed domain collections
The Allowed Domains List section on the Allow / Deny List tab lets you view and manage your allowed domain collections. Collections are displayed in a table that includes the following details:
The name of the allowed domains collection.
The list of allowed domains.
An optional comment about the allowed domains collection.
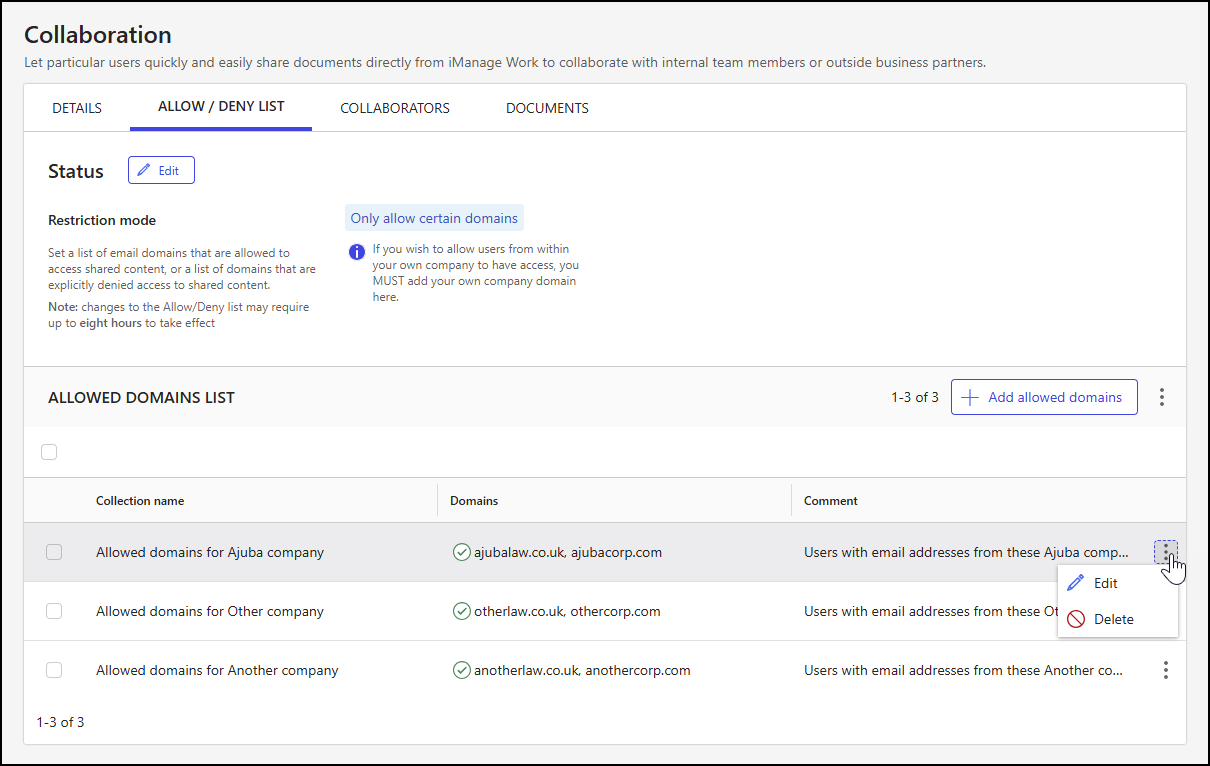
In the table, you can choose one, multiple, or all collections currently shown on the page and perform actions on them.
To choose all collections, select the check box above the table.
To choose one or more collections, select the check box next to each collection within the table.
When one or more allowed domain collections are selected, actions are displayed on the toolbar menu, as shown in the following figure.
The following toolbar menu actions are supported:
Show only selected: Shows only the selected collections.
Edit: Lets you update the collection name, assigned domains, and comment. For more information, refer to Edit an allowed domain collection.
Delete: Deletes the selected collections. For more information, refer to Delete allowed domain collections.
NOTE: The Edit action is displayed only when a single collection is selected. The Show only selected and Delete actions are available when one or more collections are selected.
The Edit and Delete actions are also available for individual collections by:
Right-clicking a collection row.
Selecting the kebab menu in a collection row.
An example of the kebab menu is shown in the following figure.
Create an allowed domain collection
Follow these steps to create a collection of domains from which email addresses can access content shared through collaboration links.
In iManage Control Center, browse to Settings > Collaboration.
Select the Allow / Deny List tab.
In the Allowed Domains List section of the tab, select Add allowed domains.
In the Add allowed domains dialog, enter values for the following fields, as described in Domain collection field descriptions:
Collection name
Allowed domains
Comment
Figure: Add allowed domains dialog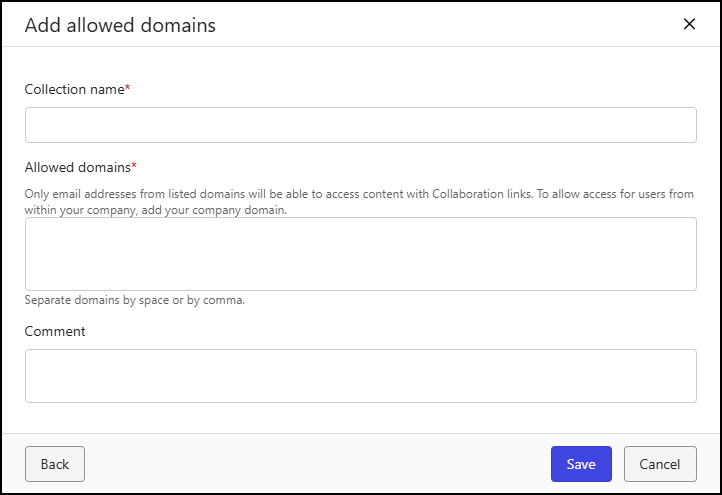
Select Save.
NOTE: It can take up to eight hours for the addition to be replicated globally.
Edit an allowed domain collection
You can select an allowed domain collection for editing by following the guidance in Select allowed domain collections, or by either right-clicking a collection row or selecting the kebab menu of an individual collection.
NOTE: You can edit only one allowed domain collection at a time.
Follow these steps to edit an allowed domain collection:
In iManage Control Center, browse to Settings > Collaboration.
Select the Allow / Deny List tab.
In the Allowed Domains List section of the tab, locate the collection you need to manage.
Using either the toolbar, right-click menu, or kebab menu, select Edit.
In the Edit allowed domains dialog, update values for the following fields, as needed, and as described in Domain collection field descriptions:
Collection name
Allowed domains
Comment
Figure: Edit allowed domains dialog
Select Save.
NOTE: It can take up to eight hours for the update to be replicated globally.
Delete allowed domain collections
You can select one or more allowed domain collections for deletion by following the guidance in Select allowed domain collections, or by either right-clicking a collection row or selecting the kebab menu of an individual collection.
NOTE: You can delete one, multiple, or all allowed domain collections at a time.
Follow these steps to delete one or more allowed domain collections:
In iManage Control Center, browse to Settings > Collaboration.
Select the Allow / Deny List tab.
In the Allowed Domains List section of the tab, locate the collection(s) you need to manage.
Using either the toolbar, right-click menu, or kebab menu, select Delete.
In the Delete allowed domain(s) alert, select Delete.
NOTE: It can take up to eight hours for the deletion to be replicated globally.
Download the allowed domain collections table
To download the allowed domain collections table to your device, select theicon in the upper-right portion of the table, and then select Download as CSV.
Manage the denied domains list
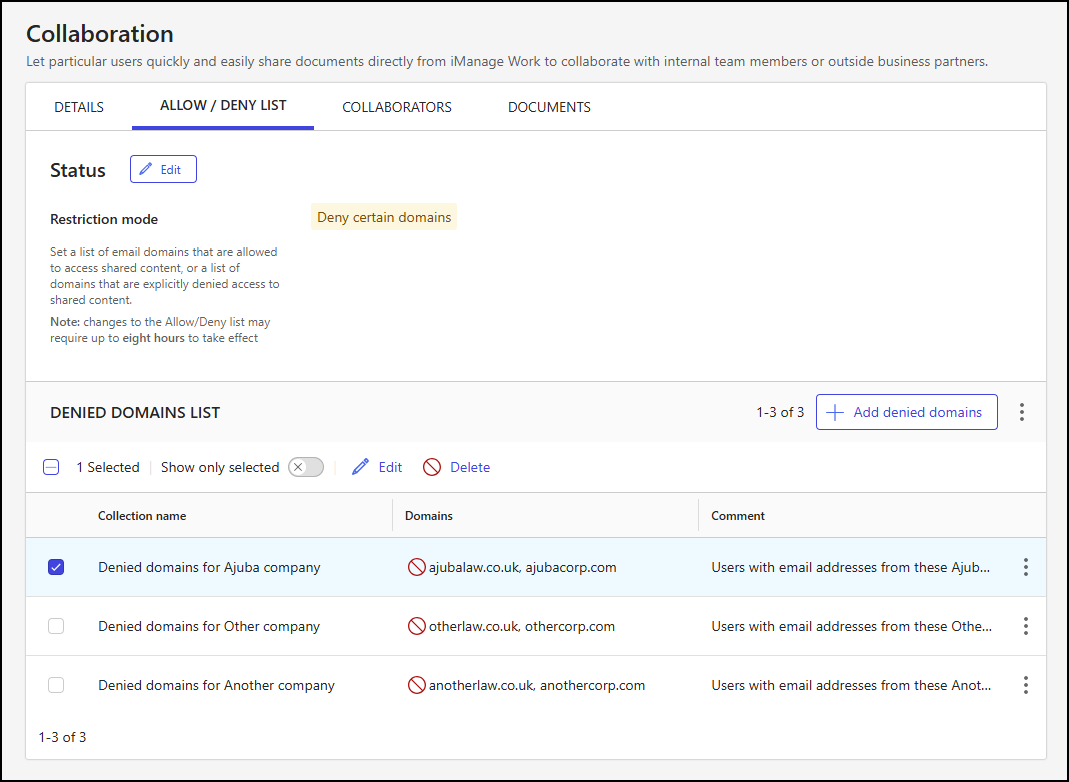
The Allow / Deny List tab on the Collaboration page is displayed as shown in the following example when the restriction mode is set to Deny certain domains.
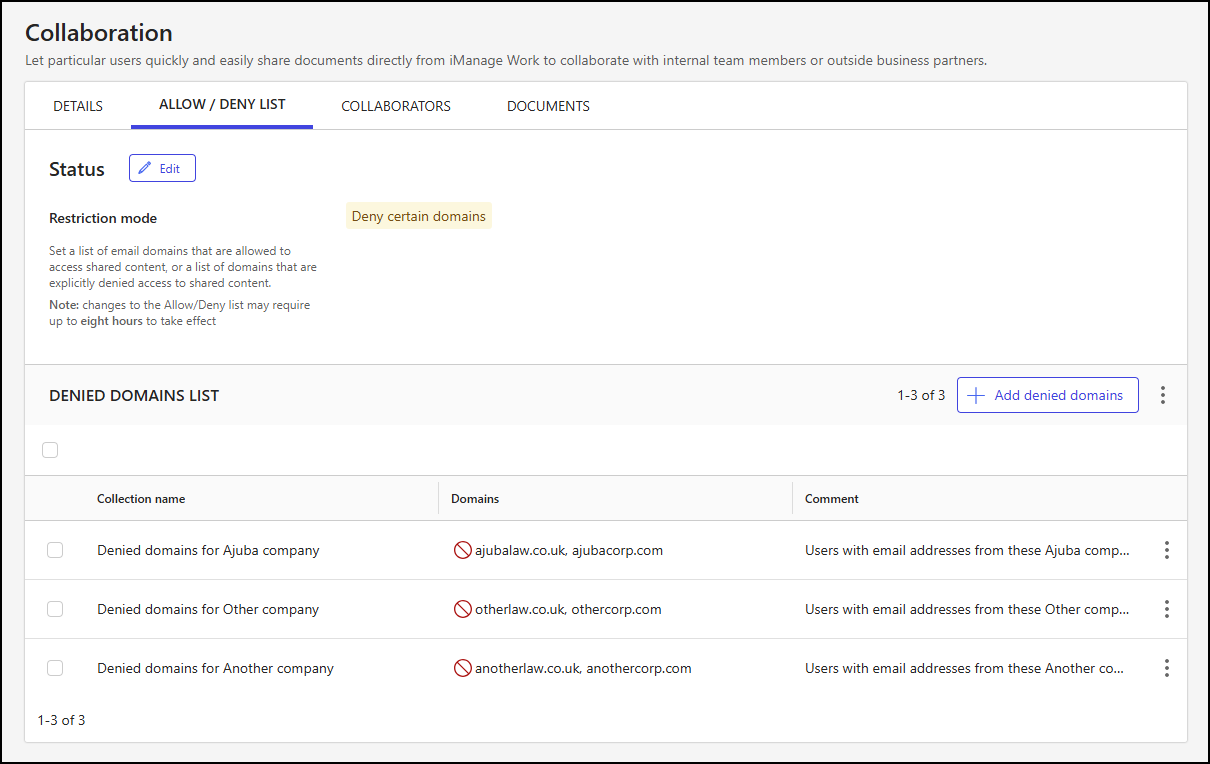
With the restriction mode set to Deny certain domains, you can:
Select denied domain collections
The Denied Domains List section on the Allow / Deny List tab lets you view and manage your denied domain collections. Collections are displayed in a table that includes the following details:
The name of the denied domains collection.
The list of denied domains.
An optional comment about the denied domains collection.
In the table, you can choose one, multiple, or all collections currently shown on the page and perform actions on them.
To choose all collections, select the check box above the table.
To choose one or more collections, select the check box next to each collection within the table.
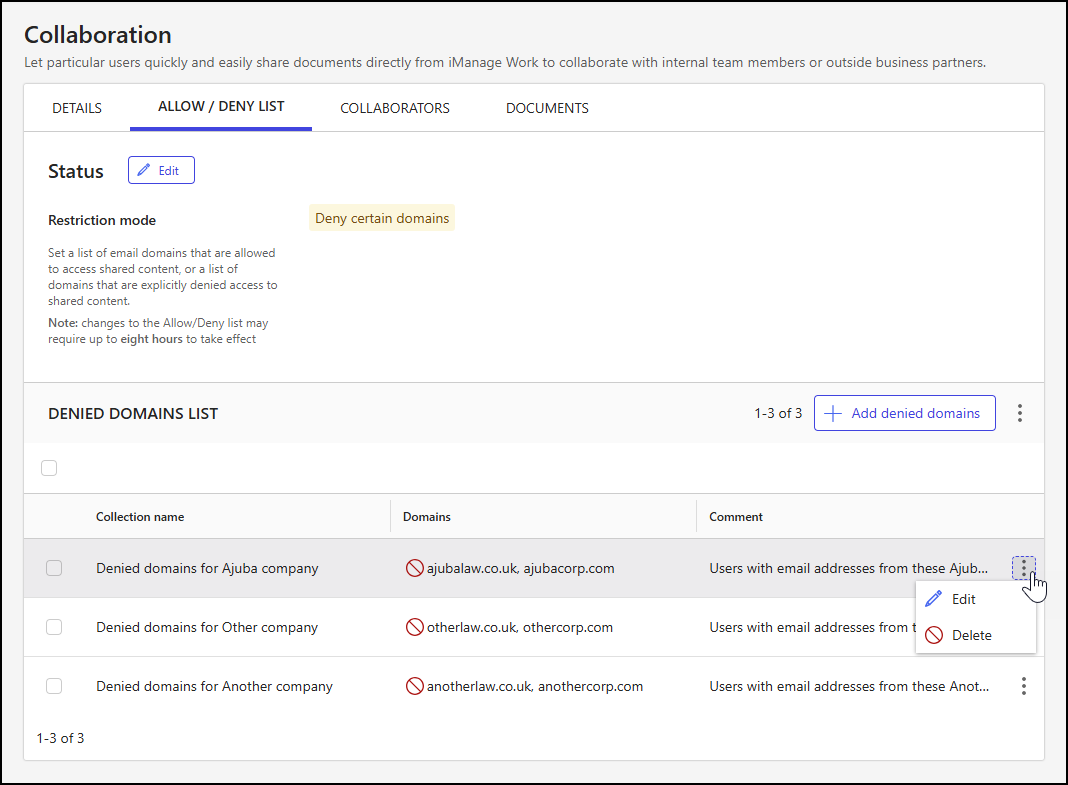
When one or more denied domain collections are selected, actions are displayed in the toolbar menu, as shown in the following figure.
The following toolbar menu actions are supported:
Show only selected: Shows only the selected collections.
Edit: Lets you update the collection name, assigned domains, and comment. For more information, refer to Edit a denied domain collection.
Delete: Deletes the selected collections. For more information, refer Delete denied domain collections.
NOTE: The Edit action is displayed only when a single collection is selected. The Show only selected and Delete actions are available when one or more collections are selected.
The Edit and Delete actions are also available for individual collections by:
Right-clicking a collection row.
Selecting the kebab menu in a collection row.
An example of the kebab menu is shown in the following figure.
Create a denied domain collection
Follow these steps to create a collection of domains from which email addresses are blocked from accessing content shared through collaboration links.
In iManage Control Center, browse to Settings > Collaboration.
Select the Allow / Deny List tab.
In the Denied Domains List section of the tab, select Add denied domains.
In the Add denied domains dialog, enter values for the following fields, as described in Domain collection field descriptions.
Collection name
Denied domains
Comment
Figure: Add denied domains dialog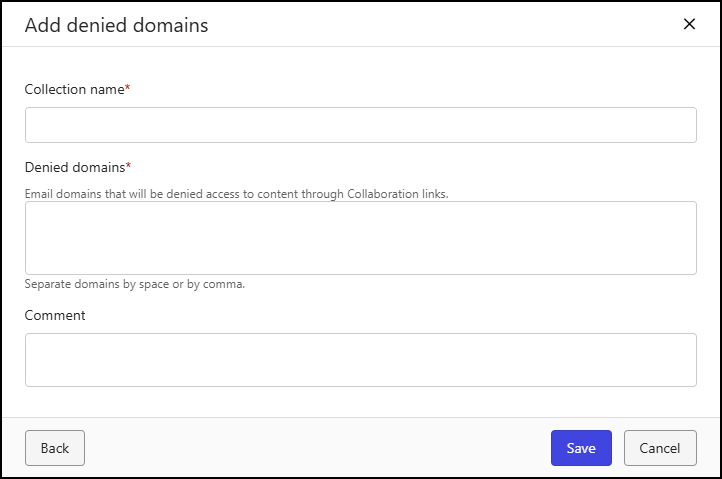
Select Save.
NOTE: It can take up to eight hours for the addition to be replicated globally.
Edit a denied domain collection
You can select a denied domain collection for editing by following the guidance in Select denied domain collections, or by either right-clicking a collection row or selecting the kebab menu of an individual collection.
NOTE: You can edit only one denied domain collection at a time.
Follow these steps to edit a denied domain collection:
In iManage Control Center, browse to Settings > Collaboration.
Select the Allow / Deny List tab.
In the Denied Domains List section of the tab, locate the collection you need to manage.
Using either the toolbar, right-click menu, or kebab menu, select Edit.
In the Edit denied domains dialog, update values for the following fields, as needed, and as described in Domain collection field descriptions:
Collection name
Denied domains
Comment
Figure: Edit denied domains dialog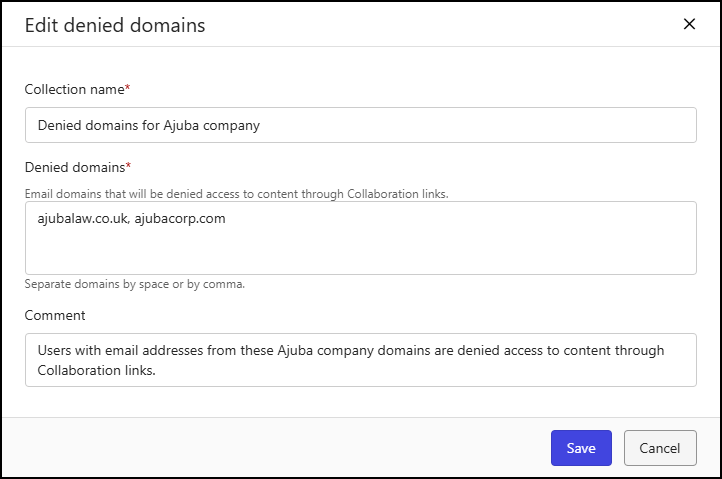
Select Save.
NOTE: It can take up to eight hours for the update to be replicated globally.
Delete denied domain collections
You can select one or more denied domain collections for deletion by following the guidance in Select denied domain collections, or by either right-clicking a collection row or selecting the kebab menu of an individual collection.
NOTE: You can delete one, multiple, or all denied domain collections at a time.
Follow these steps to delete one or more denied domain collections:
In iManage Control Center, browse to Settings > Collaboration.
Select the Allow / Deny List tab.
In the Denied Domains List section of the tab, locate the collection(s) you need to manage.
Using either the toolbar, right-click menu, or kebab menu, select Delete.
In the Delete denied domain(s) alert, select Delete.
NOTE: It can take up to eight hours for the deletion to be replicated globally.
Download the denied domain collections table
To download the denied domain collections table to your device, select theicon in the upper-right portion of the table, and then select Download as CSV.