NOTE: To perform operations on this page, the user signed in to Control Center must be a member of the NRTADMIN group, or be assigned to a role with Tier 1 or Tier 2 access to Control Center. For more information about the specific operations allowed, refer to Understanding tiers.
The Workspaces page lets you search for workspaces using various search criteria, and perform the following actions to manage workspaces:
Verify user access rights for the selected workspace using the Check Effective Access feature.
Verify user access rights based on the groups assigned in the access control list (ACL) using the Security feature.
View the details of a workspace using the View feature.
Copy a link to one or more workspaces using the Copy Link option.
View generic table options in the User interface overview section.
Perform bulk security updates.
Searching for workspaces
Select Content > Workspaces. The list of default search fields appears as shown in the following figure:
Figure: Workspaces page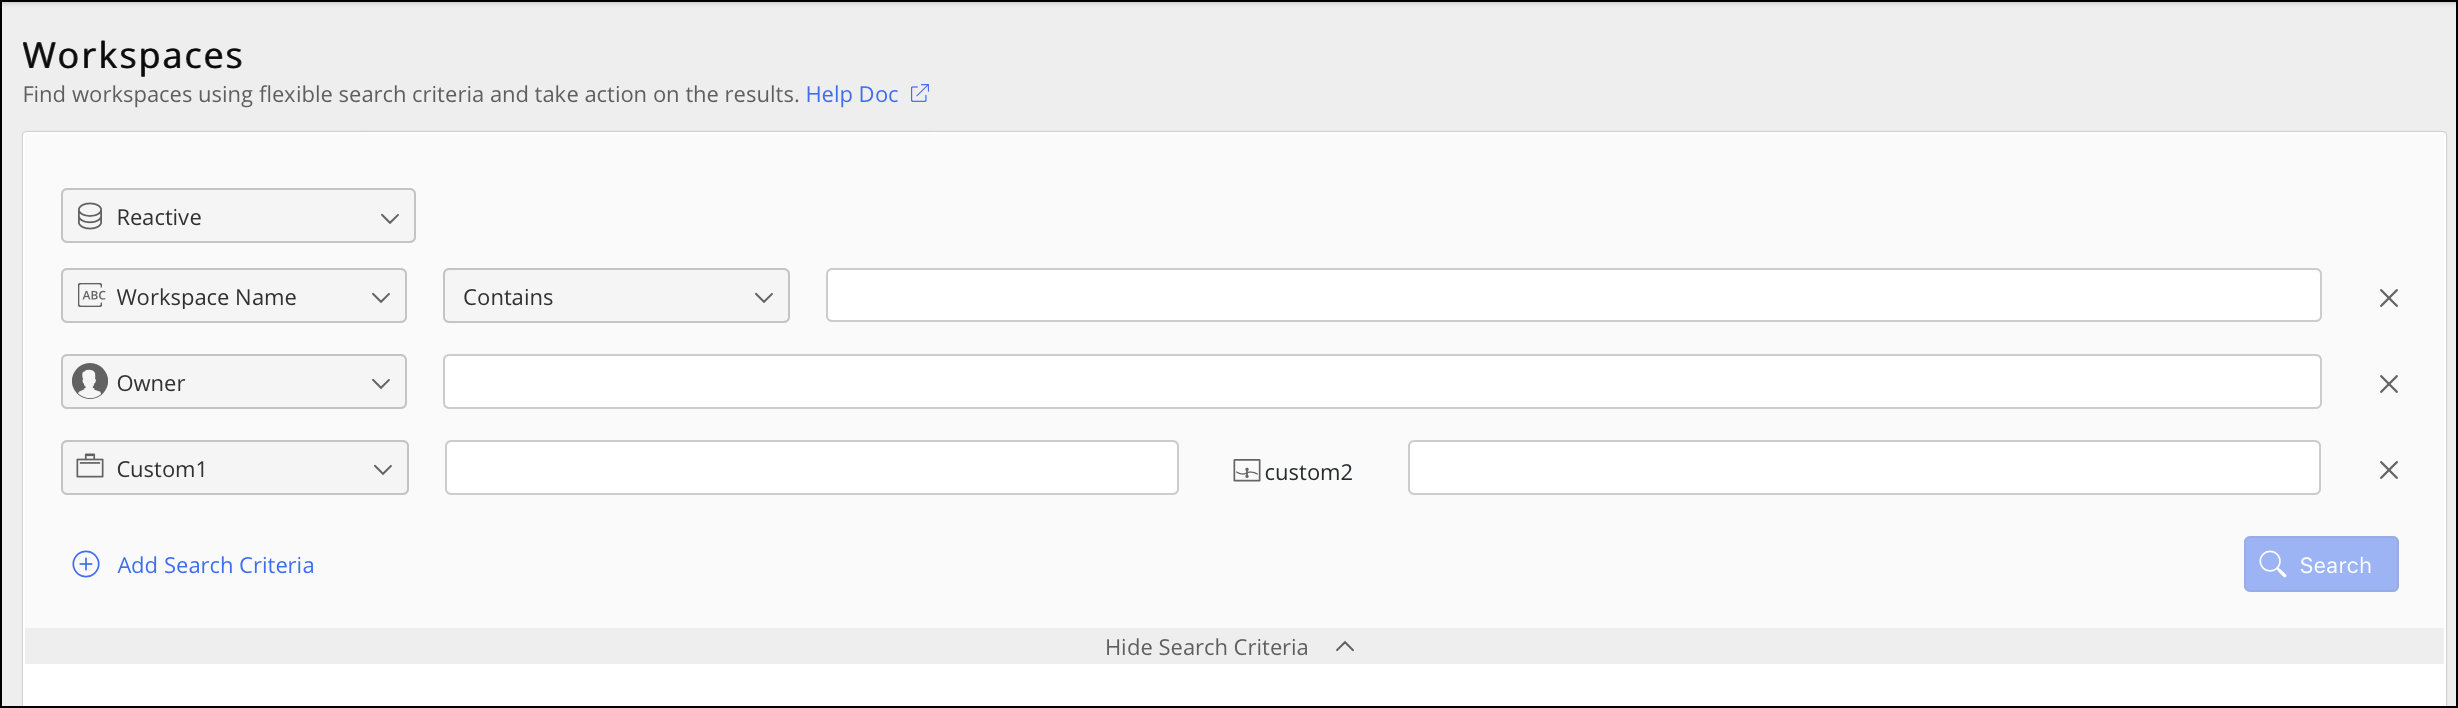
Use these search fields to refine your search, then select Search.
To add more search criteria, select Add Search Criteria.
With the Search button enabled, the Clear values option is displayed.
In the preceding figure, the Hide Search Criteria toggle option is displayed.
To hide the search criteria and focus only on the list of filtered documents, select Hide Search Criteria.
Selecting Hide Search Criteria changes it to Show Search Criteria. Select this to view the search criteria list.
NOTE: For performance reasons, search results are limited to 10,000 items. If your search exceeds 10,000 results, refine the search with additional criteria.
You can alternatively perform searches without the 10,000 result limitation using the iManage Work Universal (REST v2) API.
iManage Control Center preserves the search fields you enter when searching for documents, workspaces, or Trash. When you add or remove search fields, your settings are automatically saved and will be present the next time you sign in and access the Documents, Workspaces, or Trash pages. This provides the advantage of not having to remember or reselect your search fields for subsequent searches.
Search fields are stored locally in the browser's cache for each library. If you switch to a different browser or to a different device, you'll see the default search fields.
Checking Effective Access
To verify the access rights of a user for a selected workspace, use the Check Effective Access option. It evaluates all permissions (container default security, access permission, group memberships, and role abilities) and is available on the:
Ribbon bar: Select a workspace to see this option on the ribbon bar.
Kebab menu: Select the
 icon next to each workspace to see this option.
Context menu: Right-click a workspace name to see this option.
Use one of the preceding options to check the effective access of the workspace.
Right-click a workspace and select Check Effective Access. The following dialog is displayed.
Figure: Check Effective Access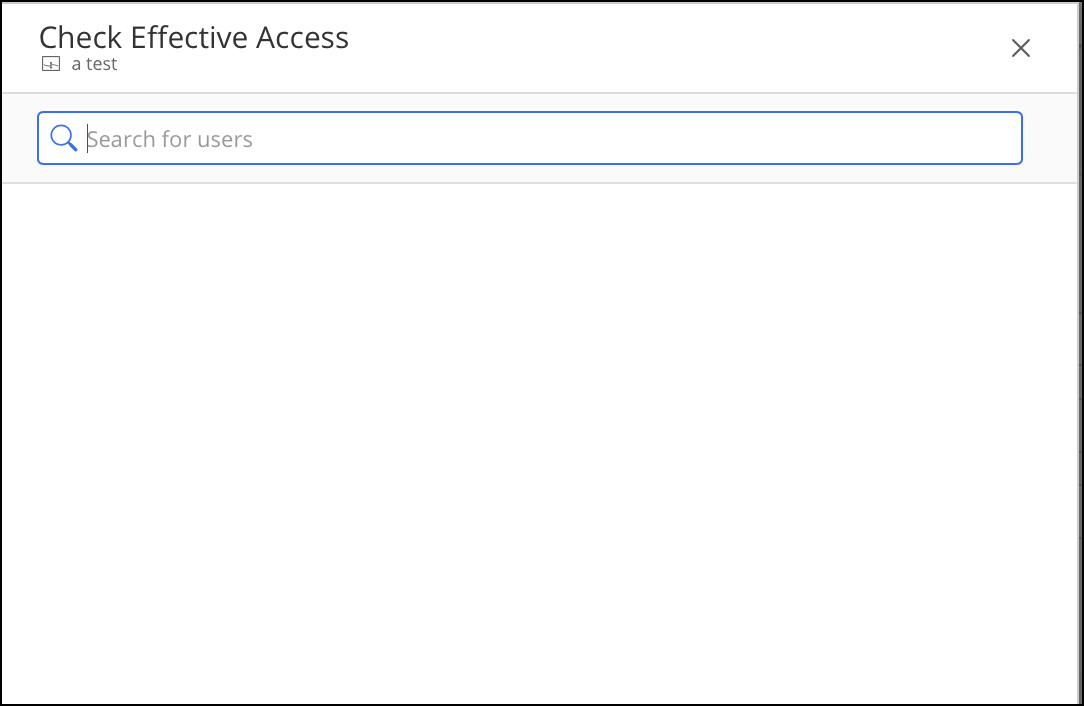
Enter a user name or ID. A suggestion list appears.
Select a user. You’ll see the access right of the selected workspace.
Verifying security
To verify access permissions for the users and groups assigned in the Access Control List (ACL), you can use Security option. It’s available on the:
Ribbon bar: Select a workspace to see this option on the ribbon bar.
Kebab menu: Select the
icon adjacent to each workspace to see this option.Context menu: Right-click a workspace name to see this option.
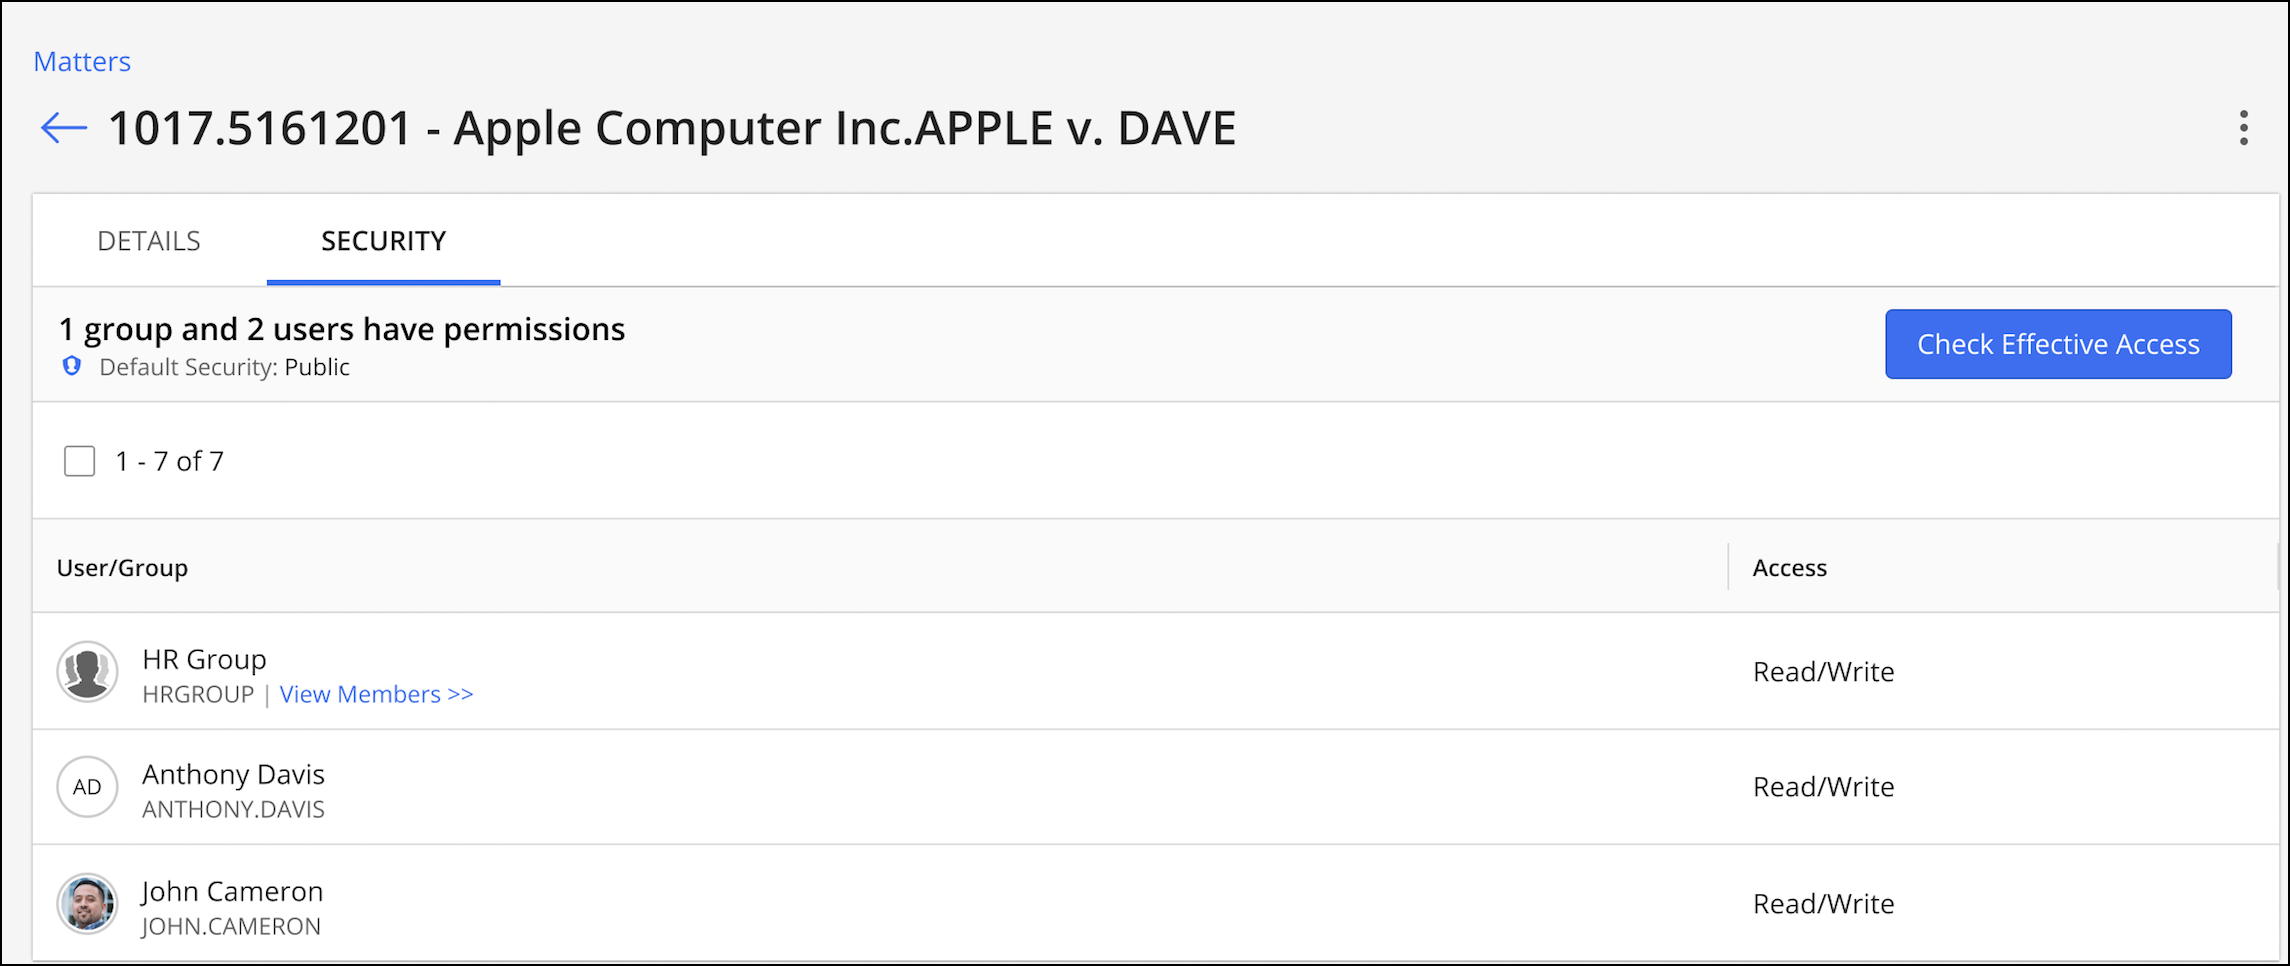
Right-click a workspace and select Security. The security details for the workspace is displayed. The following figure provides an example.
Viewing workspace details
To view the details of a workspace, use this View option. It's available on the:
Ribbon bar: Select a workspace to see this option on the ribbon bar.
Kebab menu: Select the
icon next to each workspace to see this option.Context menu: Right-click a workspace name to see this option.
Clickable link: In the Doc #/Version column, select a workspace.
Use one of the preceding options to view the following workspace details:
Library
Name
Owner
Created On
Bulk security update
NOTE: To perform bulk security updates on documents, the user must be a member of the NRTADMIN group. For more information, refer to Creating an NRTADMIN User.
This section includes the following topics:
Edit user/group permissions
Workspaces are shown on the iManage Control Center Workspaces page after performing a search using one or more search criteria. The figure below shows the options available when a workspace is selected from the search results list.
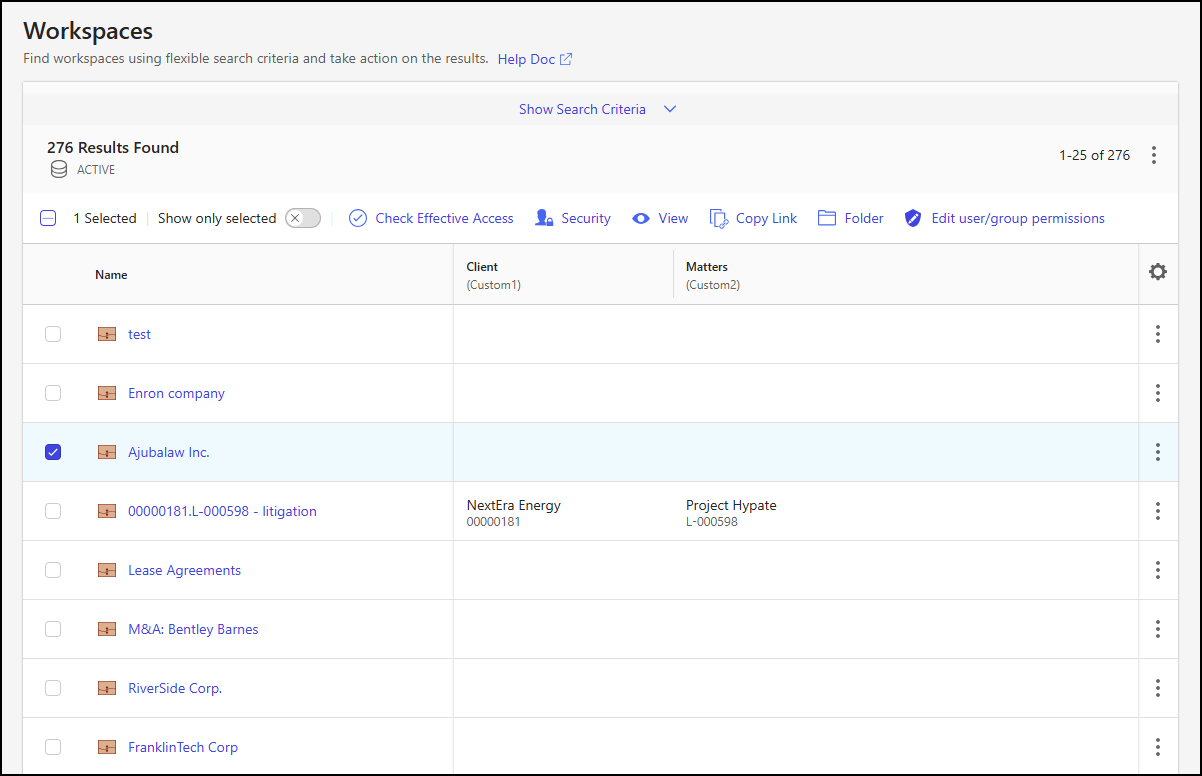
For a single workspace, the Edit user/group permissions option lets you:
Add single or multiple users or groups, and define their access level to the workspace.
Change the access level of existing users or groups who already have access to the workspace, to another level of access.
Update the default security settings.
Update the security of the contents of the workspace, including folders and documents.
Update the security of documents referenced in multiple folders.
Update the security of all versions of documents, to which you have full access.
Follow these steps to add users or groups to workspaces and set their security access level:
On the Workspaces page, select a workspace from the search results list.
On the right-click context menu, kebab, or toolbar menu, select Edit user/group permissions.
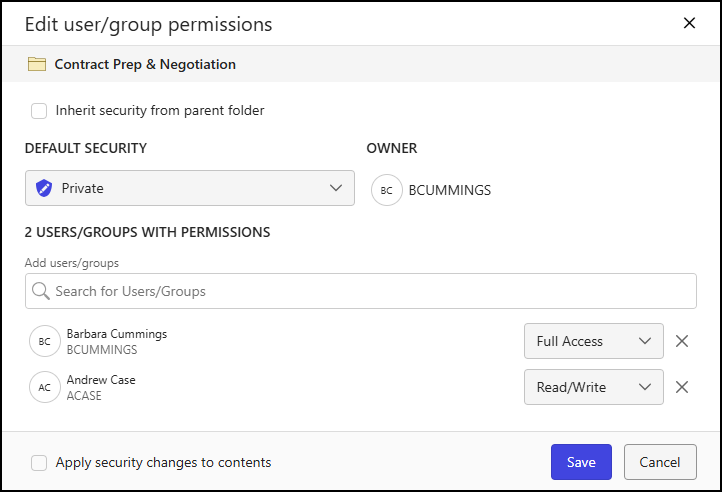
Figure: Edit user/group permissions dialog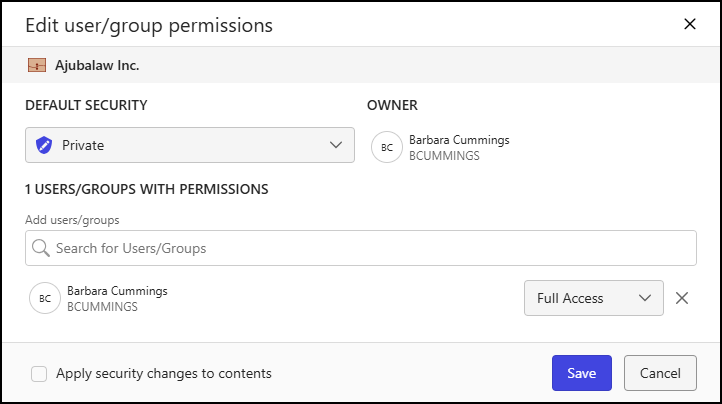
In the Edit user/group permissions dialog, to update the default security of the workspace, select one of the following options from the Default Security drop-down list:
Public: All users have read/write access to the workspace.
Private: Only the owner and those who are specifically granted permission can access the workspace.
View: All users can access the workspace, but aren’t allowed to edit the content.
To add a user or group, enter the name of the user(s) or group(s) in the search box.
After adding user(s) or group(s), define their access level using the access level drop-down list. Choose from:
Full Access
Read/Write
Read Only
No Access
To remove a user group group, select the X next to the access level drop-down list.
Perform one of the following actions:
If you want to apply the security and access level changes to just the workspace, select Save. Success or failure of the security update is shown in a pop-up dialog.
If you want to apply the security and access level changes to the workspace and its contents, select Apply security changes to contents, then select Save. Continue with the next step.
The Apply security changes to contents dialog opens and displays a summary of the security changes and provides options for applying the changes to subfolders, private items, document versions, and document locations.
Figure: Apply security changes to contents dialog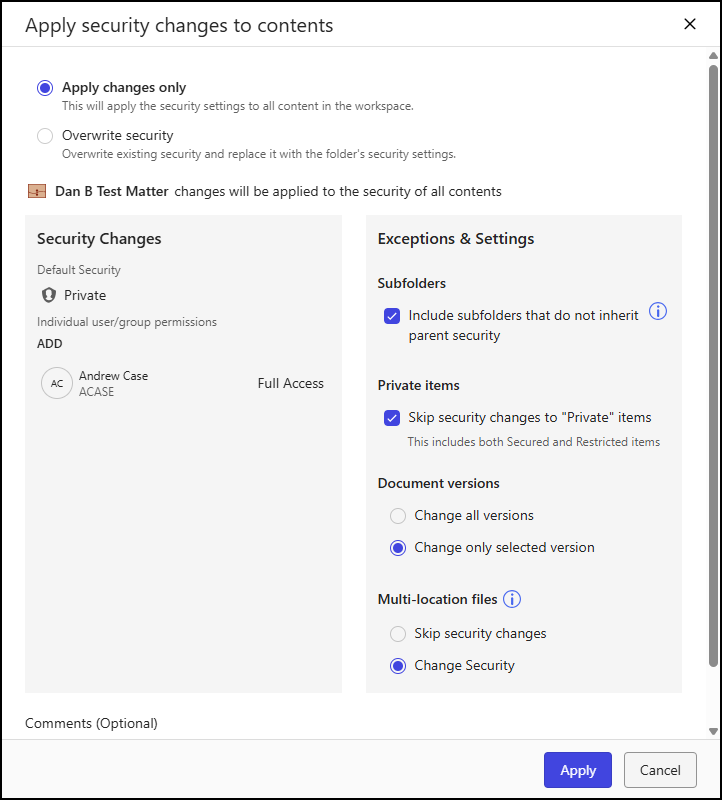
Select one of the following security options:
Apply changes only: This applies the changes made to the security profile of the workspace to all the content within the workspace.
Overwrite security: This overwrites the existing security profile of all the content within the workspace, including default security, users, and groups, with the security profile of the workspace.
In the read-only Security Changes panel, review the default security setting and user/group access level assignments.
In the Exceptions & Settings panel, specify how the security changes will be applied to subfolders, private items, document versions, and multi-location files. Refer to Workspace and folder security options for a description of each option.
Select Apply.
The status of the Apply security changes to contents action is available in the Notifications panel, accessible through the bell icon.
Figure: Notifications panel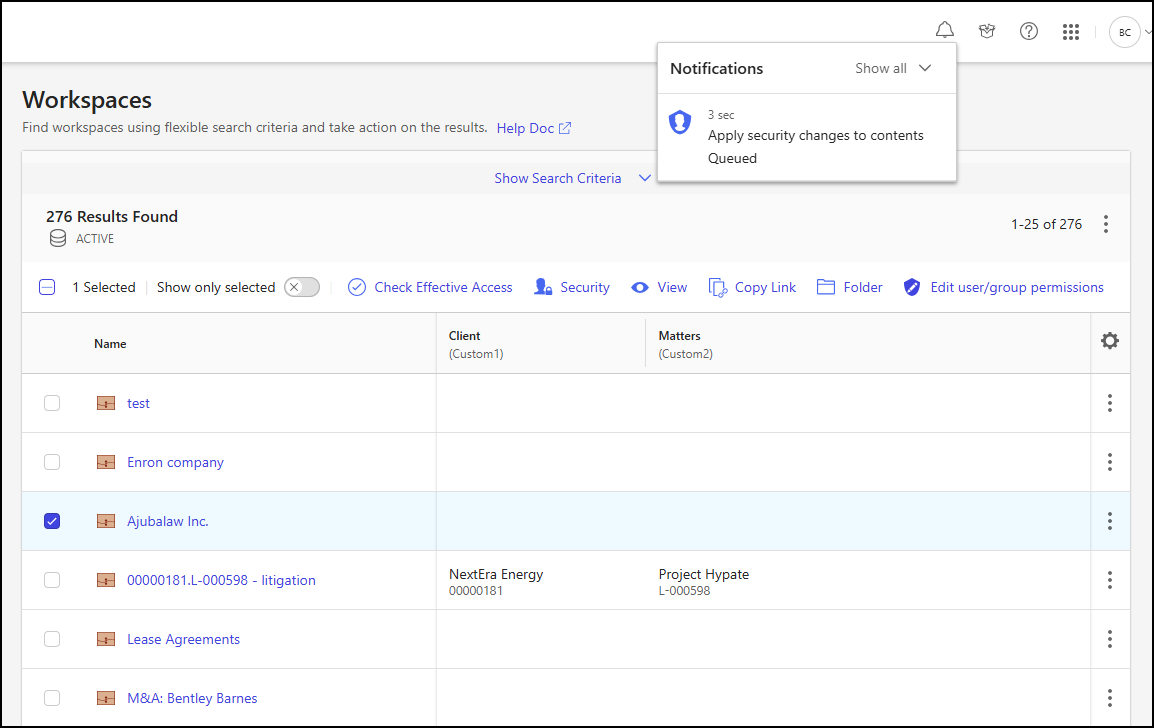
(Optional) To view the details of the Apply security changes to contents action, select the job in the Notifications panel to open the Report: Apply security changes to contents dialog. Action outcomes are described in Outcomes of bulk security update actions.
Figure: Report apply security changes to contents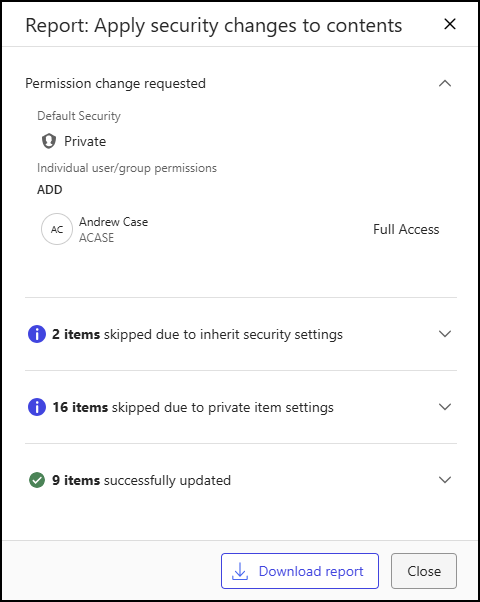
(Optional) To download a report containing the details of each item updated as part of an Apply security changes to contents action in .csv format, select Download Report. Permission changes requested as part of the action are also listed in the beginning of the report. You can also view the properties of updated items by selecting the document number in the Report: Apply security changes to contents dialog.
An example of the Apply security changes to contents report is shown below.Figure: Apply security changes to contents report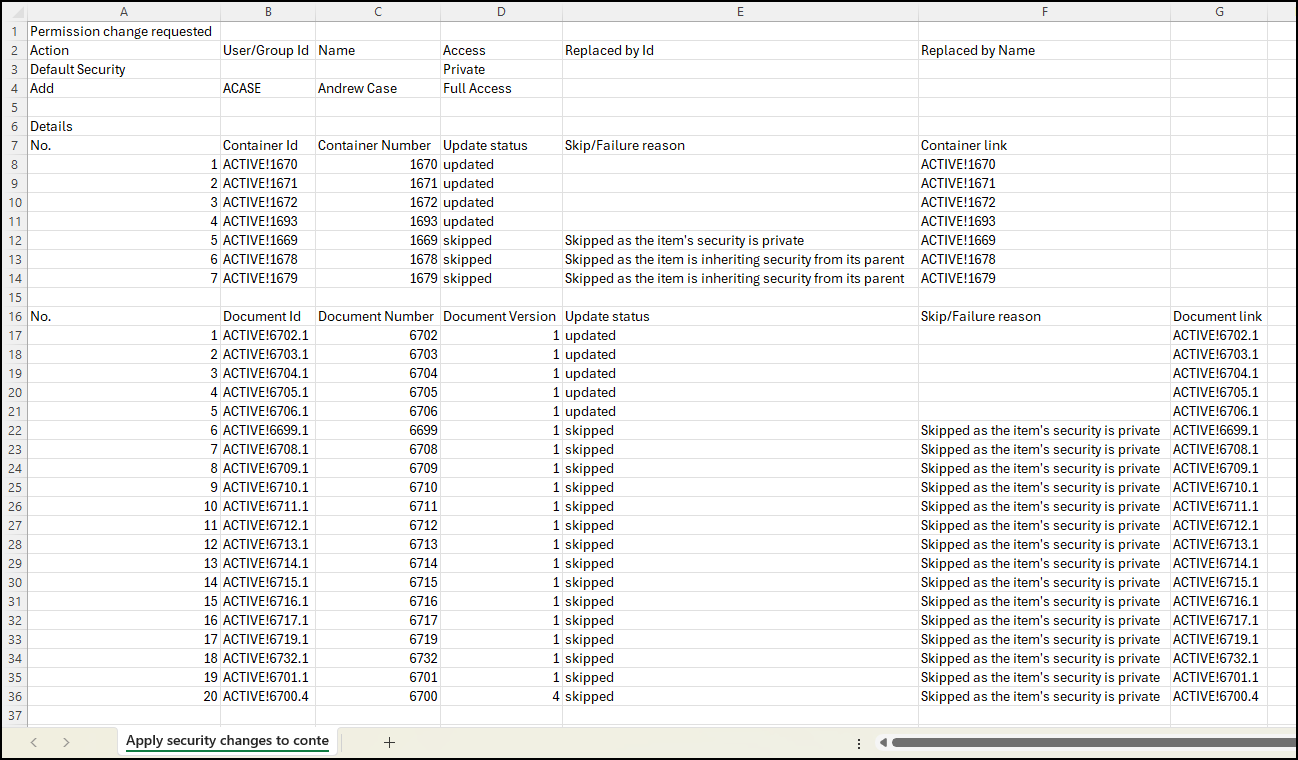
View and update Workspace folder security
In the workspace search results list, you can select a workspace to view its folder structure and the security details for each folder. Additionally, you can edit the default security settings of a folder and define access levels for users and groups.
This section includes the following topics:
View folder security
To view workspace folder details, select Folder on the right-click context menu, kebab, or toolbar menu of the Workspaces page.
The Folder tab on the workspace details page shows the folder structure of the workspace in the left pane. You can view subfolders by expanding the parent folder.
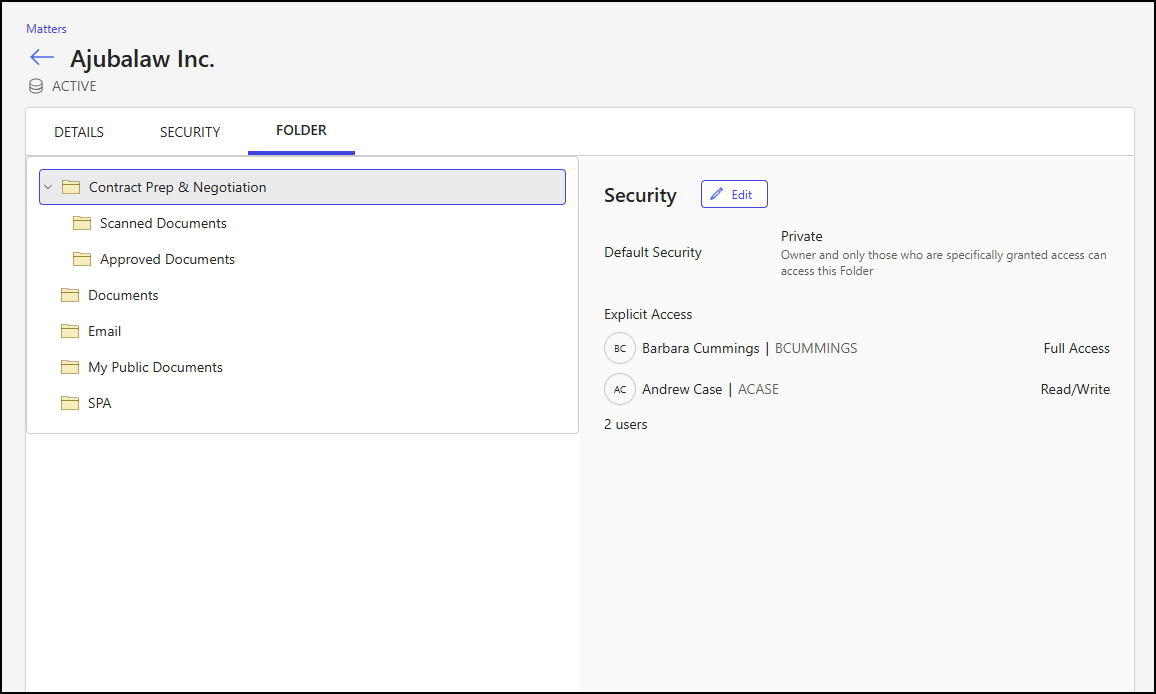
For a selected folder, the right pane of the Folder tab shows:
The default security setting applied to the folder.
The users and groups who have explicit access to the folder, along with their assigned access levels.
Update folder security
Follow these steps to change the security settings of a folder:
Select Folder on the right-click context menu, kebab, or toolbar menu of the Workspaces page.
On the Workspace details page, select Edit in the Security section of the Folder tab.
Figure: Workspace details page - Folder tab
The Edit user/group permissions dialog opens.
(Optional) To inherit security from the parent folder, select Inherit security from parent folder.
NOTE: When Inherit security from parent folder is selected, the following fields are read-only and can’t be changed through the Edit user/group permissions dialog:
Default Security
Users/Groups with Permissions
To update the default security of the folder, select one of the following options from the Default Security drop-down list:
Public: All users have read/write access to the folder.
Private: Only the owner and those who are specifically granted permission can access the folder.
View: All users can access the folder, but can’t edit the content.
To add a user or group, enter the name of the user(s) or group(s) in the search box.
After adding user(s) or group(s), define their access level using the access level drop-down list. Choose from:
Full Access
Read/Write
Read Only
No Access
To remove a user group group, select the X next to the access level drop-down list.
Perform one of the following actions:
(Optional) To apply the security and access level changes to just the folder, select Save. Success or failure of the security update is shown in a pop-up dialog.
(Optional) To apply the security and access level changes to the folder and its contents, select Apply security changes to contents, then select Save. Continue with the next step.
The Apply security changes to contents dialog opens and displays a summary of the security changes and options for applying the changes to subfolders, private items, document versions, and document locations.
Figure: Apply security changes to contents dialog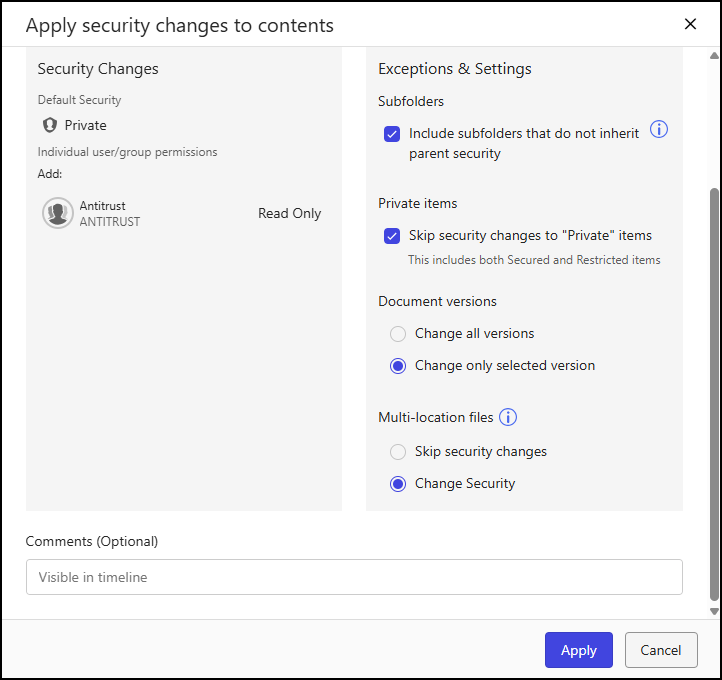
Select one of the following security options:
Apply changes only: This applies the changes made to the security profile of the workspace to all the content in the workspace.
Overwrite security: This overwrites the existing security profile of all the content in the workspace, including default security, users, and groups, with the security profile of the workspace.
In the read-only Security Changes panel, review the default security setting and user/group access level assignments.
In the Exceptions & Settings panel, specify how the security changes will be applied to subfolders, private items, document versions, and multi-location files. Refer to Workspace and folder security options for a description of each option.
Select Apply.
The status of the Apply security changes to contents action is available in the Notifications panel, accessible through the bell icon.
Figure: Notifications panel
(Optional) To view details about the action, select the job in the Notifications panel to open the Report: Apply security changes to contents dialog. Action outcomes are described in Outcomes of bulk security update actions.
Figure: Report apply security changes to contents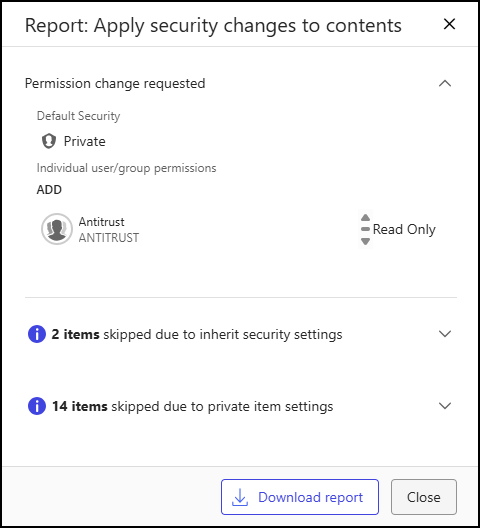
(Optional) To download a report containing the details of each item updated as part of an Apply security changes to contents action in .csv format, select Download Report. Permission changes requested as part of the action are also listed in the beginning of the report. You can also view the properties of the updated items by selecting the document number in the Report: Apply security changes to contents dialog.
An example of the Apply security changes to contents report is shown below.Figure: Apply security changes to contents report
Workspace and folder security options
Each option in the Exceptions & Settings section in the Apply security changes to contents dialog is explained in the table below.
Table: Workspace content security change options
Security tier | Options | Action |
|---|---|---|
Subfolders | Include subfolders that do not inherit parent security | Updates the security of subfolders and their contents that don't inherit security from the parent folder. |
Private items | Skip security changes to Private items | Selecting this option won't change the security settings of items whose default security is Private, whether they are secured or restricted. |
Document versions | Change all versions | Selecting this option updates the security of all versions of the documents to which you have Full Access rights. |
Change only selected version | Selecting this option updates the security of only the selected/specific version of the documents. | |
Multi-location files | Skip security changes | Selecting this option doesn't update the security of documents referenced in multiple locations. |
Change security | Selecting this option updates the security of documents referenced in multiple locations. |
Outcomes of bulk security update actions
When performing a bulk update action, the outcome of an individual item is described in the table below.
Table: Bulk update action outcomes
Status | Reason | Description |
|---|---|---|
Succeeded | Security changes requested | All security changes requested were successful for the workspace. |
Skipped | Nothing to update | Security changes requested are already present in the workspace. |
No record found |
| |
In use by other users | The document is in use by another user. | |
Insufficient permissions | You don't have permissions to change the security (Full access required). | |
Due to multiple locations settings | Documents referenced in multiple folders are skipped because Skip security changes is selected under Multi-location files. | |
Due to private item settings | Private documents are skipped because a skip option is selected under Private items. | |
Failed | Exception | Didn't update security due to an exception. |