This page describes how to configure iManage Work for Outlook app for the first time. After you complete this procedure, proceed to deploy the iManage Work for Outlook app to enable the app for your users. For details refer to Deploy the iManage Work for Outlook app.
NOTE: To ensure users can preview EML files in Work Web, all libraries must have the App Extension for the EML Alias set to EML in the iManage Control Center. Verify and change if necessary.
To enroll iManage Work for Outlook in iManage Control Center, follow these steps:
In iManage Control Center, browse to Extensions > Email. The Enrollment assistant dialog is displayed the first time you access this page after the iManage - Email Admin Center application is enabled.
Figure: Enrollment assistant dialog - Azure details tab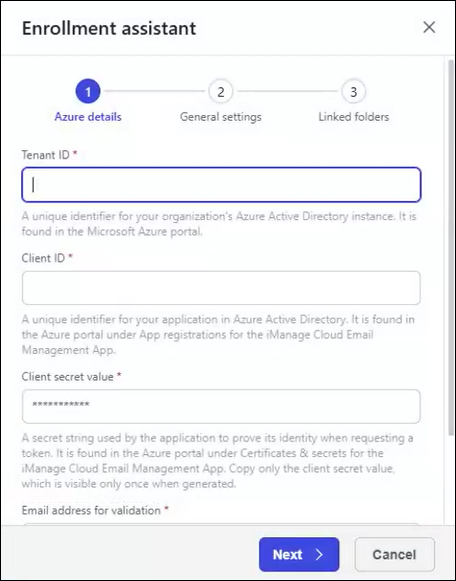
On the Azure details tab of the Enrollment assistant dialog:
Provide the following details:
Tenant ID: This setting specifies the unique identifier for your organization’s Microsoft Azure instance. Enter the Directory (tenant) ID value recorded in the Register the iManage Work for Outlook app section.
Client ID: This setting specifies the unique identifier for your organization’s iManage Work for Outlook app in Microsoft Entra ID. Enter the Application (client) ID value recorded in the Register the iManage Work for Outlook app section.
Client secret value: This setting specifies the secret string used by iManage Work for Outlook to prove its identity when requesting a token. Enter the Client Secret value recorded in the Create a client secret section.
Email address for validation: This setting specifies the email account used by the iManage Work for Outlook app to confirm that it has access to the email address tenant. Enter the email address of a member added to the mail-enabled security group in the Create a mail-enabled security group section.
Select Next.
In the General settings tab of the Enrollment assistant dialog:
Figure: Enrollment assistant dialog - General settings tab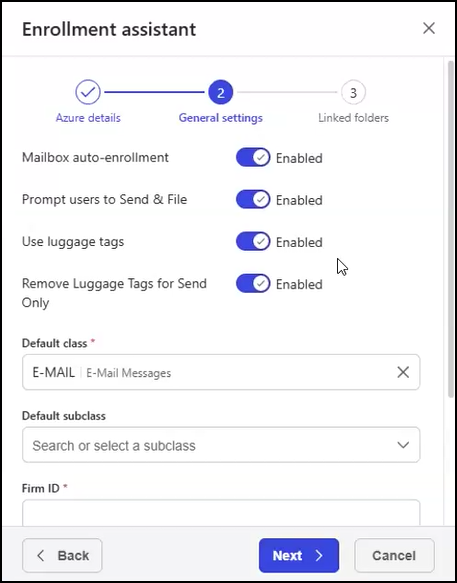
Provide the following details:
Mailbox auto-enrollment: This setting determines whether you’ll allow user mailboxes to be auto-enrolled for iManage Work for Outlook email filing when users authenticate with the iManage Work for Outlook app. Shared mailboxes are excluded from auto-enrollment because a mailbox owner needs to be selected before enrollment can occur. Even if auto-enrollment is enabled, administrators can still manually enroll and manage mailboxes in the Mailbox Management tab of the Control Center Email page.
NOTES:Auto-enrollment is designed to eliminate the need for administrators to enroll each mailbox individually.
Auto-enrollment only functions for mailboxes that iManage has been granted access to through the mail-enabled security group in Microsoft Azure.
Prompt users to Send & File: This setting controls whether the “Send & File” prompt is presented to users when sending an email message.
NOTE: The Send & File capability is supported in all cases except on mobile devices (because of a Microsoft limitation).Use luggage tags: This setting determines whether luggage tags (also known as filing instructions) are added to the subject line of an email during the “Send & File” process.
Remove Luggage Tags for Send Only: This setting controls whether the luggage tag is removed from the subject line when using the “Send only” option. Removing the luggage tag means the email will be sent without being filed.
Default class: This setting specifies the default email class when saving emails to cloudimanage.com as new documents or new versions. For more information about classes, refer to Classes/Subclasses.
NOTES:In most cases, it’s acceptable to leave the Default class field set to the default value (E-MAIL).
The default class value must be applied to all of your cloudimanage.com iManage Work libraries.
Default subclass: This setting specifies the default email subclass when saving emails to cloudimanage.com as new documents or new versions. For more information about subclasses, refer to Classes/Subclasses.
NOTE: The default subclass value must be applied to all of your cloudimanage.com iManage Work libraries.Firm ID: This setting specifies the organization’s ID used when building luggage tags. If you're upgrading from a previous version of iManage Work Desktop for Windows or Mac and you don’t know your firm ID, refer to the Retrieve values from the imEMM.config file section for guidance. If you're a new customer, and you know a firm ID has been created, contact support@imanage.com. The name must follow these rules:
Length: 1–10 characters
Alphanumeric: a–z, A–Z, 0–9
Special characters allowed: No
NOTES:Firm ID must be unique to your organization. Enrollment will be rejected if another customer has already taken a given firm ID.
After you add a Firm ID, it is locked for 24 hours before you can edit or change the Firm ID.
Legacy firm IDs: This setting specifies the legacy firm IDs, enabling iManage Cloud email management to file emails in user inboxes using previously generated luggage tags.
Select Next.
On the Linked folders tab of the Enrollment assistant dialog:
Figure: Enrollment assistant dialog - Linked folders tab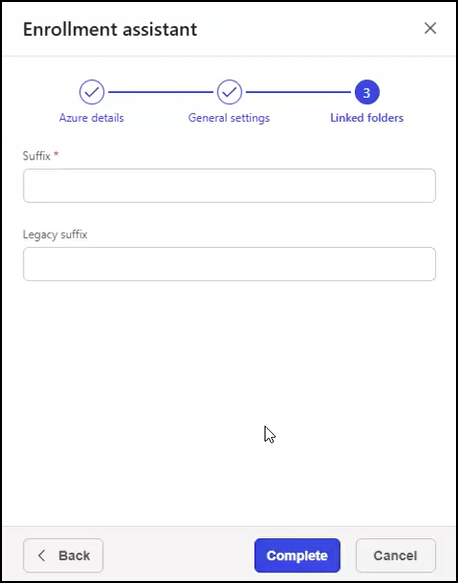
Provide the following details:
Suffix: This setting specifies the suffix to be added to the linked folder name when creating linked folders in Microsoft Outlook. If you're upgrading from iManage Work Desktop for Windows, and don’t know your suffix, refer to the Retrieve values from the imEMM.config file section for guidance. If you’re a new customer, create a suffix.
NOTE: We recommend that you set Suffix to Work.Legacy suffix: This setting specifies the legacy linked folder suffixes, allowing iManage Cloud email management to replace these old values with the new linked folder suffix in folders linked to cloud email filing.
Select Complete.
After the tenant is successfully enrolled, the Email page displays the Authentication tab, showing Microsoft Azure details for the tenant. An example of this tab on the Email page following enrollment is shown in the figure below.

TIP: If you’re editing the Azure details to provide a new Client ID and Client secret because you're swapping in a new App from Azure, verify email filing in iManage Work for Outlook works as expected, then delete that old app in Azure after saving these changes in Control Center as a best practice. There will be no impact to the user during this transition.