NOTE:
You must have a valid subscription to iManage Tracker. Contact your iManage account representative to ensure that you have subscribed to iManage Tracker.
TIP:
If you have configured a custom subdomain, such as company.cloudimanage.com, please open a support request with your Partner or iManage Support. iManage Tracker requires iManage to update the redirect URL to support this custom subdomain.
Once this work is completed, the <subdomain> variable in the imEMM.config file must be updated with your custom subdomain:
{ "_Comment":"URL for iManage Tracker service.", "TrackerUrl":https://<subdomain>.cloudimanage.com/tracker,}
Stage 1: Adding the iManage Tracker application in iManage Control Center
Perform the following steps to add iManage Tracker as an application in iManage Control Center. This ensures that iManage Tracker can communicate with iManage Work Server and is available in iManage Work.
NOTE:
To perform operations on the Applications page, the user signed in to iManage Control Center must be assigned to a Global Management role, which has the App Management privilege. For more information, refer to the Roles > Global privilege descriptions section in iManage Control Center Help.
Sign in to iManage Control Center.
In the left navigation pane under Settings, select Applications.
Select Add application.
Find the iManage Tracker application and select Authenticate.
Figure: Finding the application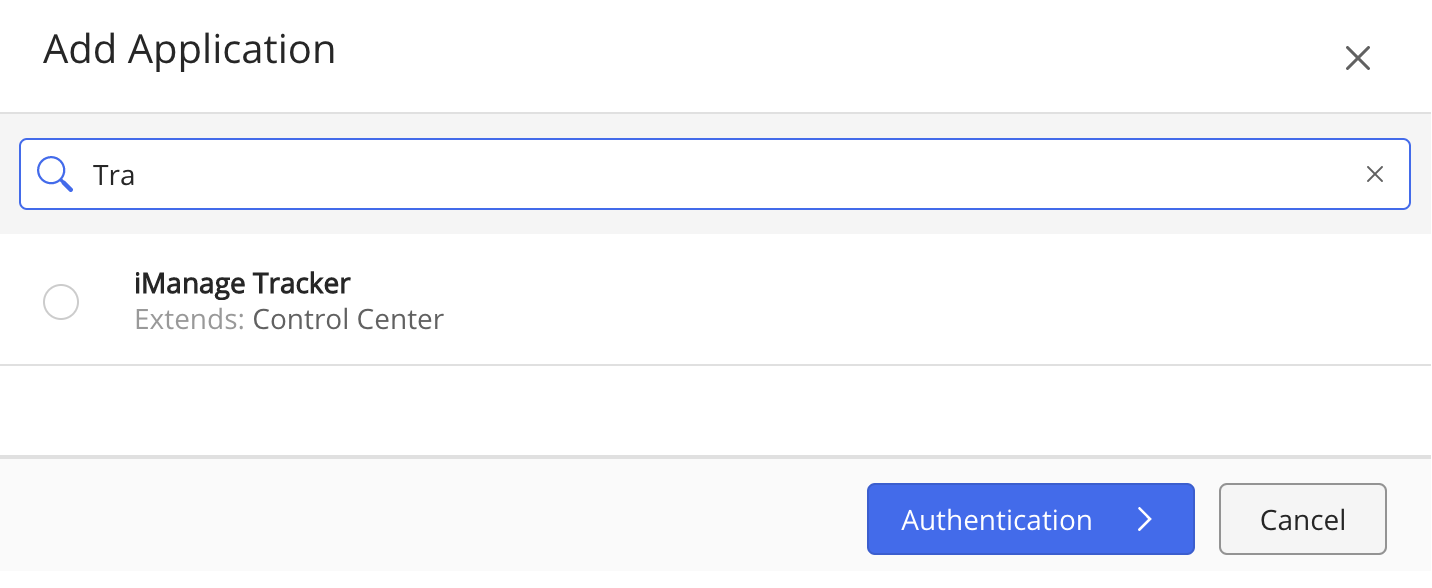
Select Access and then select Review.
Figure: Review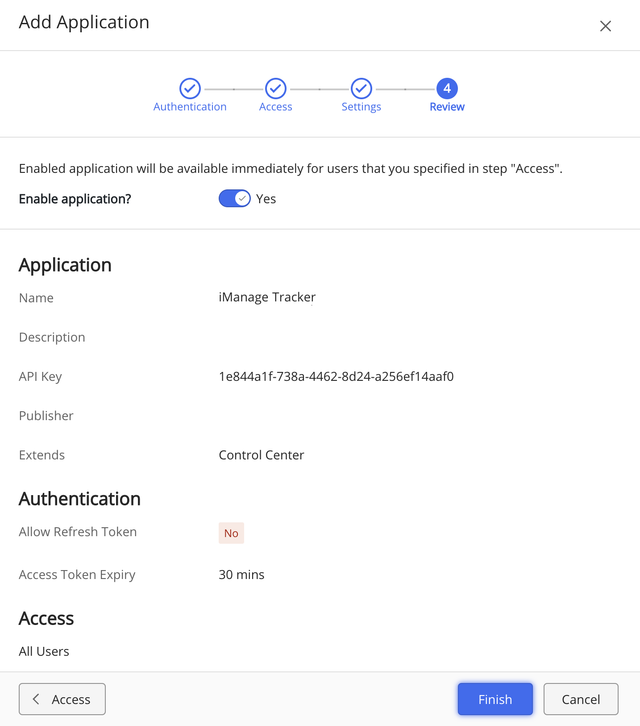
Review the details and select Finish. The application is successfully added and displayed in the Applications list in iManage Control Center.
Users in your organization can now access iManage Tracker in iManage Work. For more information, refer to iManage Tracker Help.
Stage 2: Enabling refresh token
To ensure that iManage Tracker displays the latest data from iManage Work, refresh tokens should be enabled.
When enabled, the application is automatically synced in the background and iManage Tracker users need not perform a manual sync by selecting  whenever they want to view the latest information.
NOTE:
Complete Steps 8 and 9 below so that SPM policies are applied to iManage Tracker and the relevant libraries are authorized for the activation of Tracker/SPM agent.
Sign in to iManage Control Center as an NRTADMIN.
In the left navigation pane under Settings, select Applications.
Select Add application.
Find the iManage Tracker CC configuration application, select the application in the search results, and then select Authentication.
On the Authentication screen:
Turn on the Allow Token Refresh option.
(Optional) Change the Refresh Token Expiry and Access Token Expiry intervals as required.
Figure: Allow refresh token
Select Access > Review, and then select Finish.
A success message appears informing you that the application is added.Refresh the iManage Control Center page.
iManage Tracker CC configuration is listed under Extensions in iManage Control Center.Select iManage Tracker CC configuration and then select Open tracker configuration.
The Tracker background service authorization page opens. It lists the libraries on the server for which you have NRTADMIN access with their status displayed as Unauthorized.
NOTE:
Library authorization is mandatory, as any policy changes might not be up-to-date without authorization. Email digests also require library authorization.
Select Authorize for each library, enter your email ID, and then select Use my credentials & authorize.
Your user name is displayed for each library. This indicates that iManage Tracker uses your refresh token when fetching data from iManage Work.
After completing these tasks, perform all the tasks mentioned in Configuring the UI elements.
Then, install iManage Work Desktop for Windows to access the iManage Tracker pane in Microsoft Outlook. This lets users access the iManage Tracker panel in Microsoft Outlook.