You can add tasks and subtasks using the following methods:
From within a checklist in iManage Work
Add tasks to a checklist using any of the following options:
In the top right corner of any checklist, select
 .
. Hover your pointer over an existing task and select the
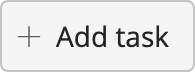
 button. Figure: Add button
Add text in the Tasks (required) and other fields, and then select Confirm.
The following success message is displayed:

To view the task in the checklist, select See the task.
NOTE:
While adding tasks using the Add task button, a default assignee automatically appears in the Add task dialog box depending on the task filter applied. For example, with the filter set to My tasks by matter or My tasks by due date, your name appears in the Assignee field. With the Other's tasks filter applied, the default assignee is the person whose tasks you're currently viewing.
If you select Add task while viewing Tasks assigned by me, the default assignee is the same as the assignee of the currently selected task, or the Assignee field appears blank if the currently selected task has no assignee. You can change or add an assignee as required.
While adding tasks using the Add task button, the task must contain text. A task can't be created or saved without a task name or title.
Insert task above, Insert task below, and Insert subtask options: Right-click a task row or select More options
 and select an insert option to add a task or sub-task next to the current row.
NOTE:
To avoid disrupting task hierarchies, the Insert task below option is unavailable for tasks that have subtasks.
Return/Enter shortcut key: With the Tasks field in edit mode, press the Return/Enter key to create a task below the current task at the same level.
After the task is added, enter the data for the desired columns and assign the task.
Files in iManage Work
Using the file right-click menu, you can select one or more files in iManage Work and add them as tasks to the checklist for the matter in which the files reside.
Use a browser to sign in to iManage Work and browse to one or more files that you want to add as tasks.
Select the file(s).
Right-click the file selection and select Add as task(s) in Tracker. Alternatively, select
 from the top-right corner in the toolbar.
A preview of the tasks to be added is displayed.(Optional) To view the checklist for the matter, select view this matter tracker. The checklist opens in a separate browser tab.
(Optional) To assign the task later, clear the Assign to myself check box.
Select Add tasks. A message is displayed informing you that the tasks are added.
(Optional) Select View in Tracker. Scroll to the end of the checklist to see that the tasks are added.
Alternatively, select Close if you don't want to view the tasks.Figure: Adding a task using the right-click option
File preview in iManage Work
You can add a file in iManage Work as a task to the checklist for the matter in which the files reside using the option in the preview.
Sign in to iManage Work and browse to the file that you want to add as a task.
Select the file to preview it and then select
 Add as task in Tracker.
 (Optional) To view the checklist for the matter, select view this matter tracker. The checklist opens in a separate browser tab.
(Optional) To assign the task later, clear the Assign to myself check box.
Select Add task. A message is displayed informing you that the task is added.
Select View in Tracker. Scroll to the end of the checklist to see that the tasks are added.
Alternatively, select Close if you don't want to view the tasks.Figure: Adding a task from Preview
iManage Tracker panel in Microsoft Outlook
You can add tasks using the iManage Tracker panel in Microsoft Outlook by:
dragging emails into the panel. For more information about creating tasks from emails, refer to Creating tasks from emails.
selecting the
 button displayed on the Tasks tab for each of the matters listed. Enter a name for the task and click somewhere in the panel to create it. Select the task to enter its details.