The Resolve External users step of the Enable - Public content access privilege page is available when one or more external users are assigned roles that aren't compatible with their user type. In this case, the affected users have been assigned internal roles. Before you activate the Public content access privilege for the library, you must update these role assignments. Resolving these mismatches helps ensure that external users don't receive unintended access to public content when the privilege is enabled.
NOTE: The Resolve External users step is displayed in the rollout process for a library only if that library has external users assigned to an internal role.
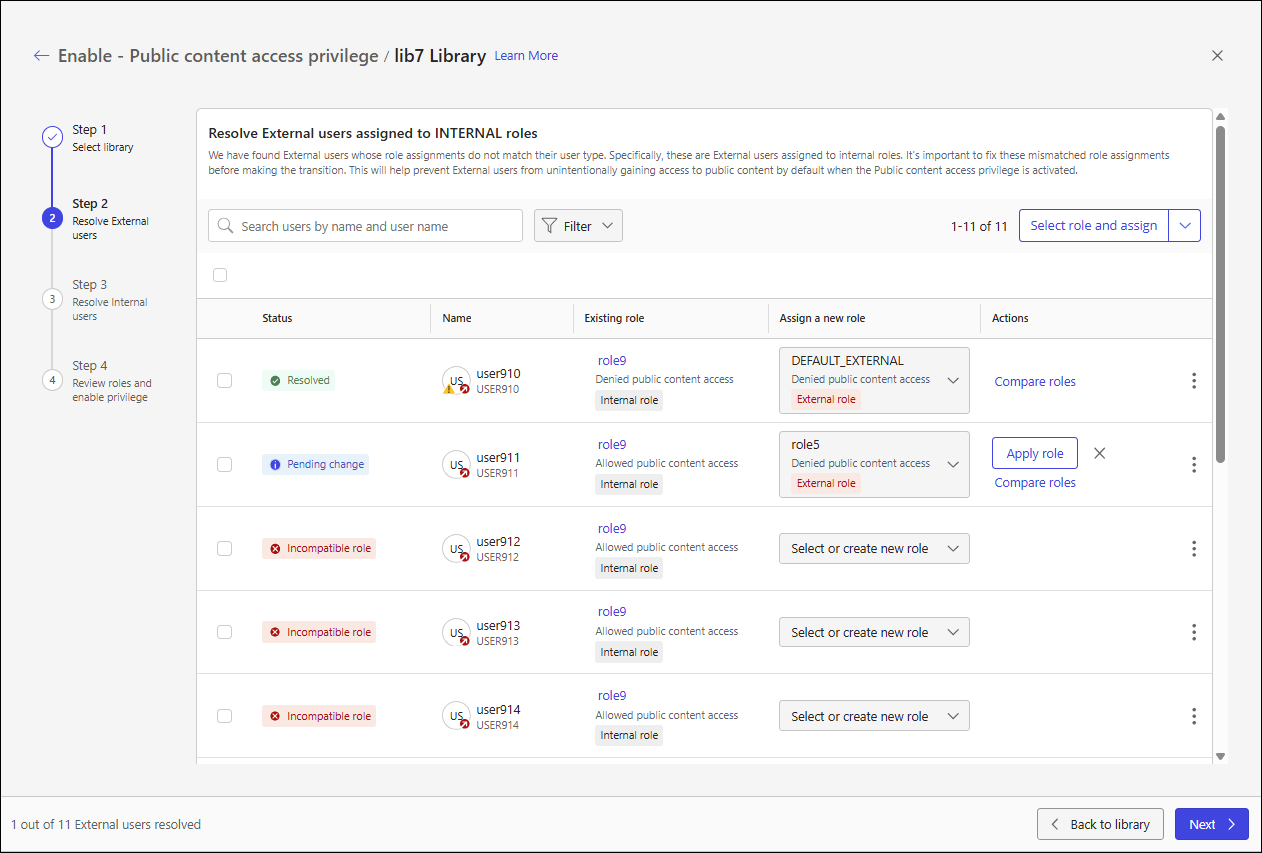
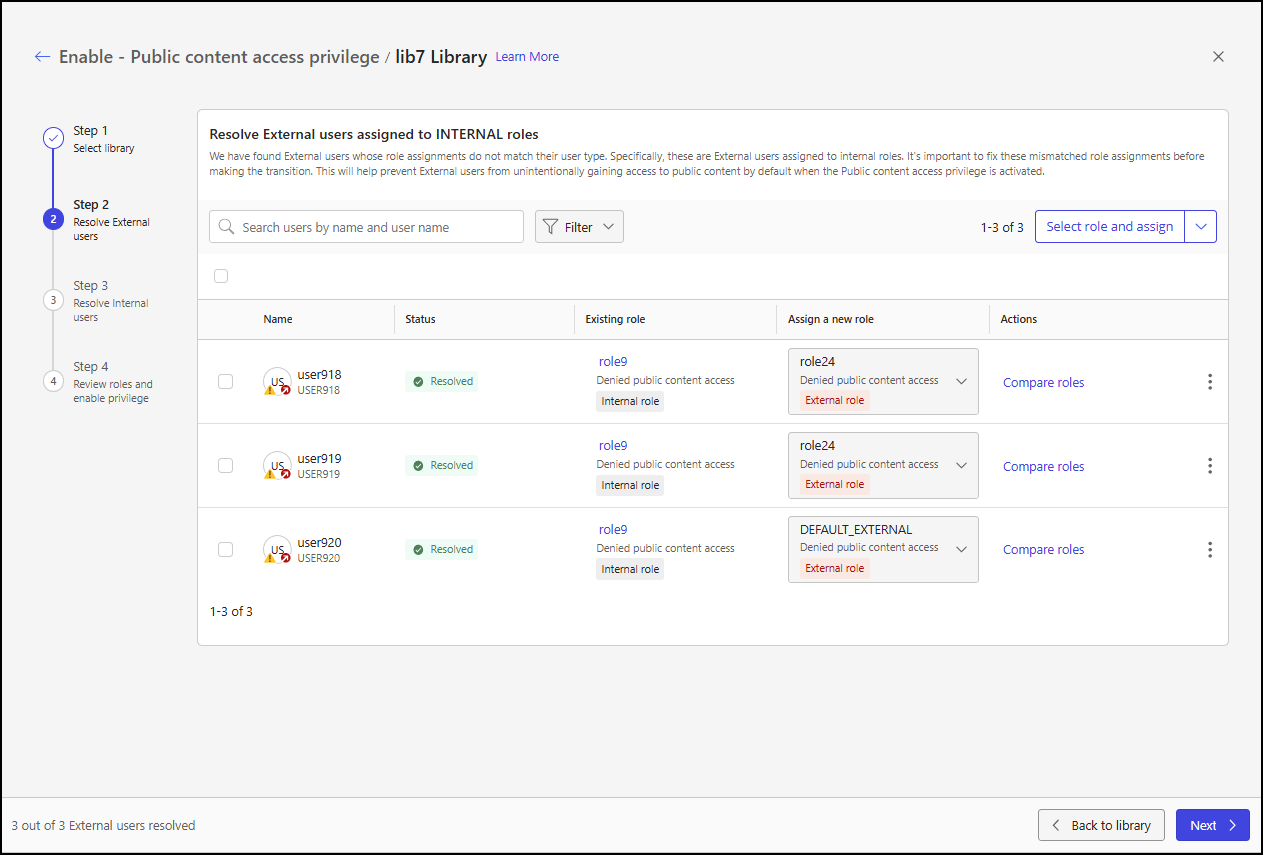
This step displays a table of external users who are currently assigned incompatible internal roles. For each user, the table includes the following columns:
Status: Indicates the current state of the user’s role reassignment.
Incompatible role: The external user is assigned to an internal role.
Pending change: A compatible external role has been selected for the user, but the change has not yet been applied.
Resolved: A compatible external role has been successfully assigned to the user.
Name: Displays the user’s name.
Existing role: Displays the incompatible internal role currently assigned to the external user.
Assign new role: Provides a drop-down list for selecting a compatible external role for the user or for creating a new role that can be assigned to an external user.
Actions: This column is blank until you select a new role. It then displays the actions that are available for the current reassignment state.
After you select a new role but before you apply it:
Apply role: Assigns the selected role to the user.
Compare roles: Opens a dialog that compares the privileges of the existing role and the selected role.
X: Removes the pending role assignment.
After a new role is assigned:
Compare roles: Opens a dialog that compares the privileges of the existing role and the newly assigned role.
An example of the Resolve External users step is shown in the following figure. This example illustrates all the possible statuses.
Page actions for the Resolve External users step
At the Resolve External users step, you can perform the following actions:
Perform basic page operations:
Search for users: Use the search function to find users by name or user name, which filters the results in the users table.
Filter table output: Apply filters to the users table based on their sign-in status.
Rearrange table columns: Change the order of the columns in the users table.
Select users: Choose specific users and take actions on them.
Resolve incompatible role assignments: For external users assigned to incompatible roles, you can:
Assign them to existing external roles.
Assign them to the DEFAULT_EXTERNAL role.
Create and assign them to new external roles.
Proceed to the next step: After resolving all incompatible role assignments, proceed to the next step in the rollout process.
Perform basic page operations
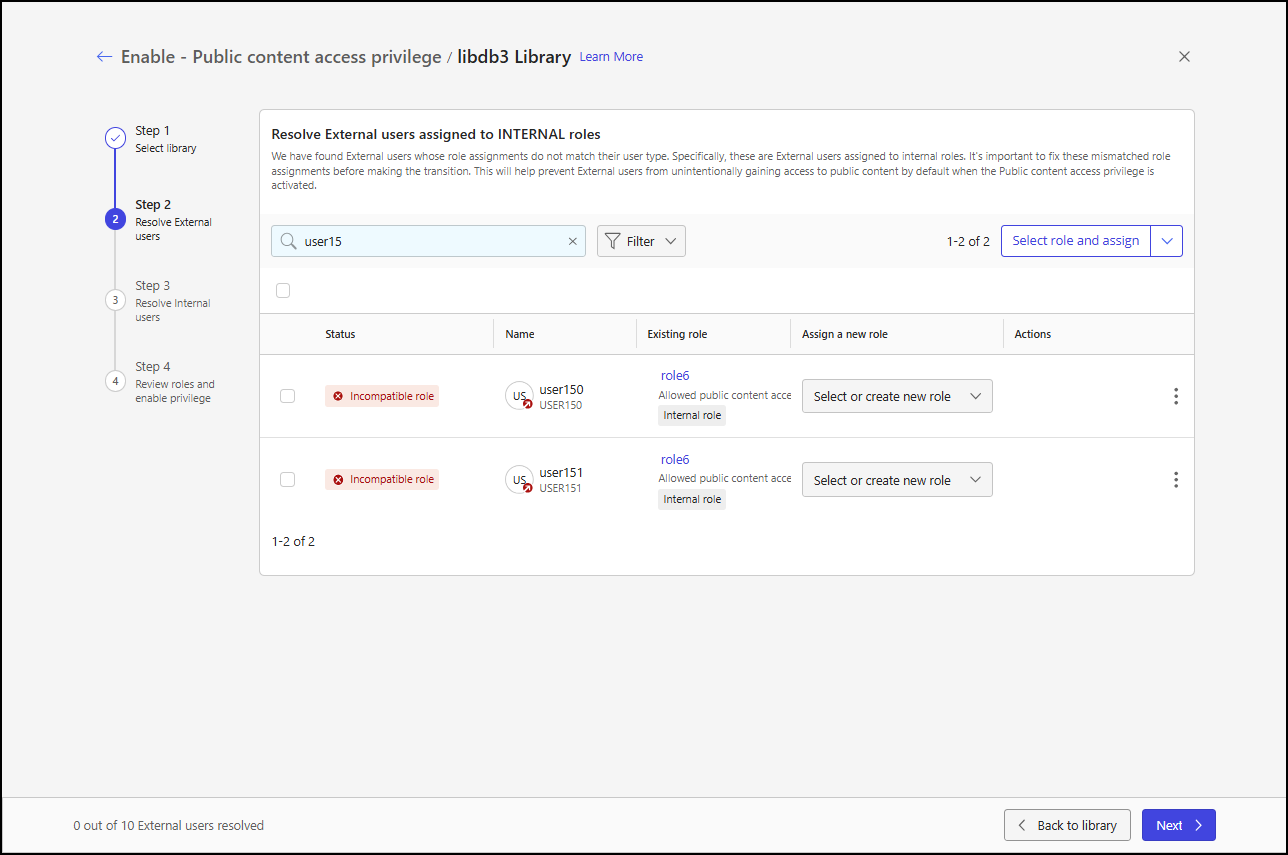
Search for users
To search the users table, enter a search string in the Search users by name or user name field.
Filter table output
Filter the users table output based on user sign-in status.
Select Filter > Sign in Status to display the status options, and then choose an option.
Figure: Sign in Status options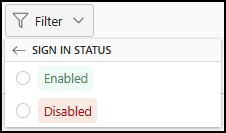
An example of the users table filtered by sign-in status is shown in the following figure.
Figure: Users table - Sign in Status filter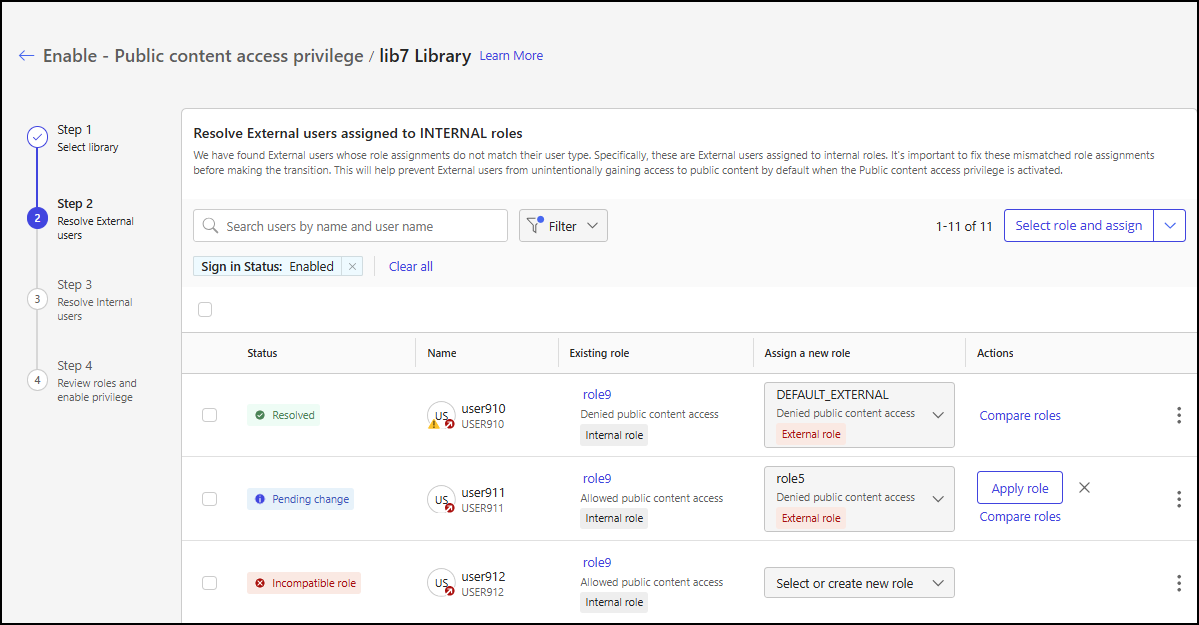
To remove Sign in Status filtering:
Select X next to the Sign in Status filter display.
Select Clear all.
Rearrange table columns
You can rearrange the users table columns by following these steps; in this example, the Status column is moved from the left of the Name column to the right of it:
Hover over a column heading: Move your pointer over the column heading. The pointer changes to a move pointer.
Figure: Hover over a column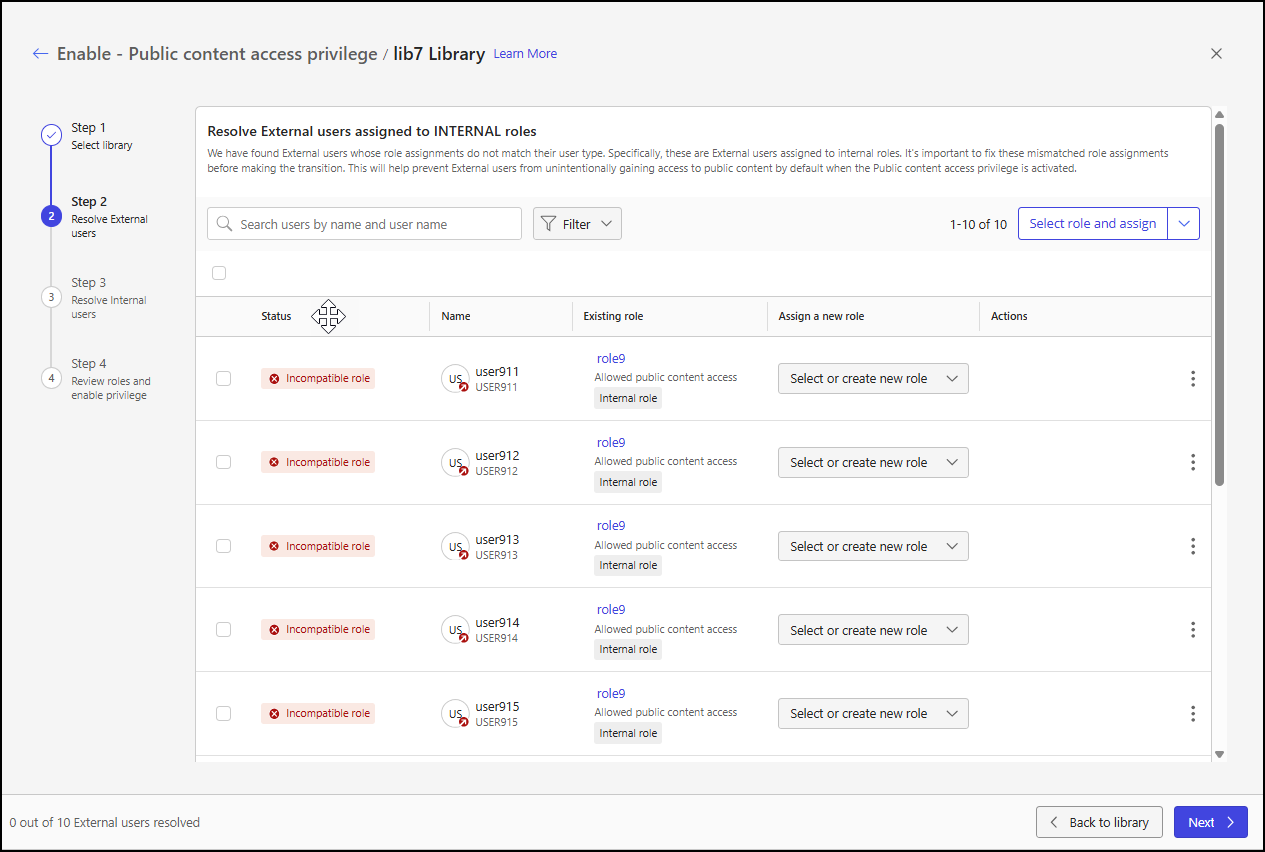
Select and drag the column: Select and drag the column to its new location.
Figure: Select and drag the column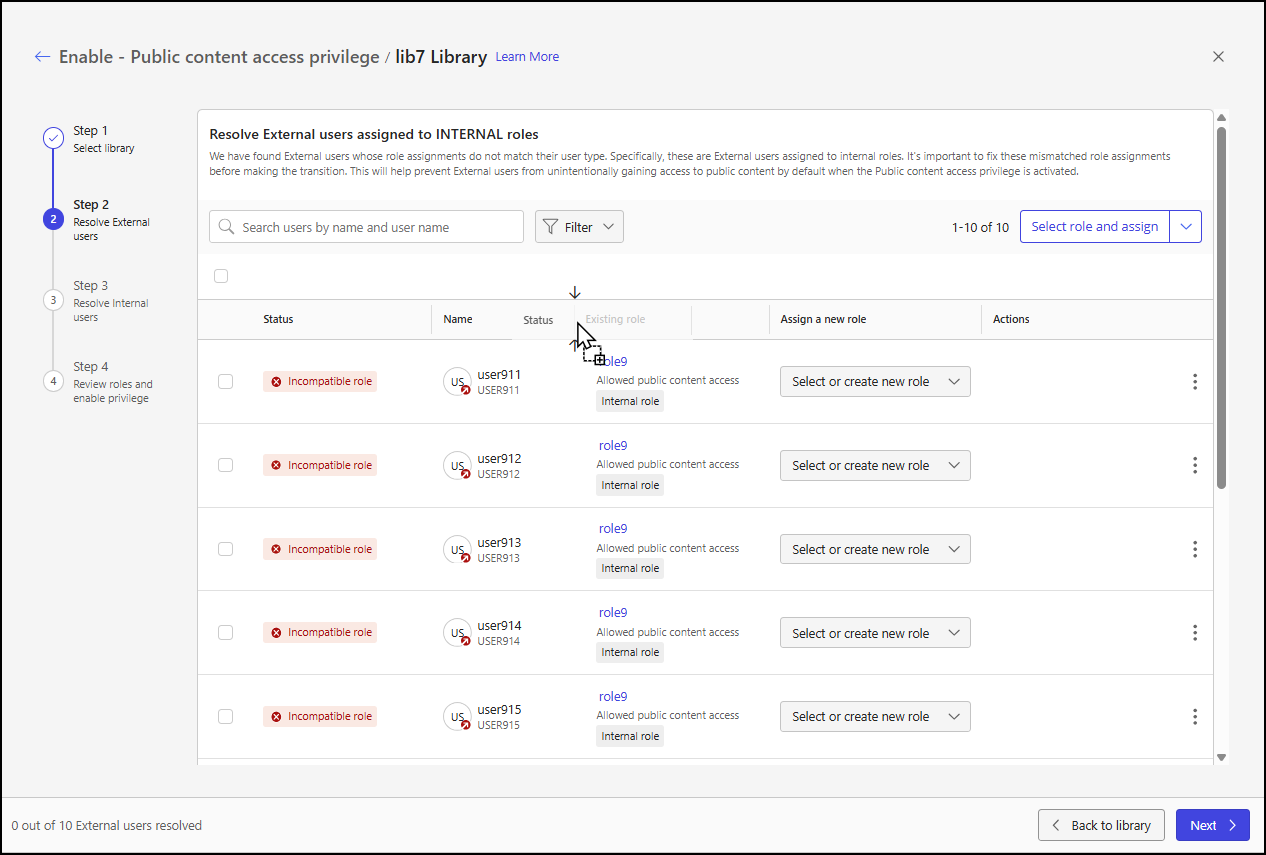
Release the column: Let go of the column to place it in the new position.
Figure: Release the column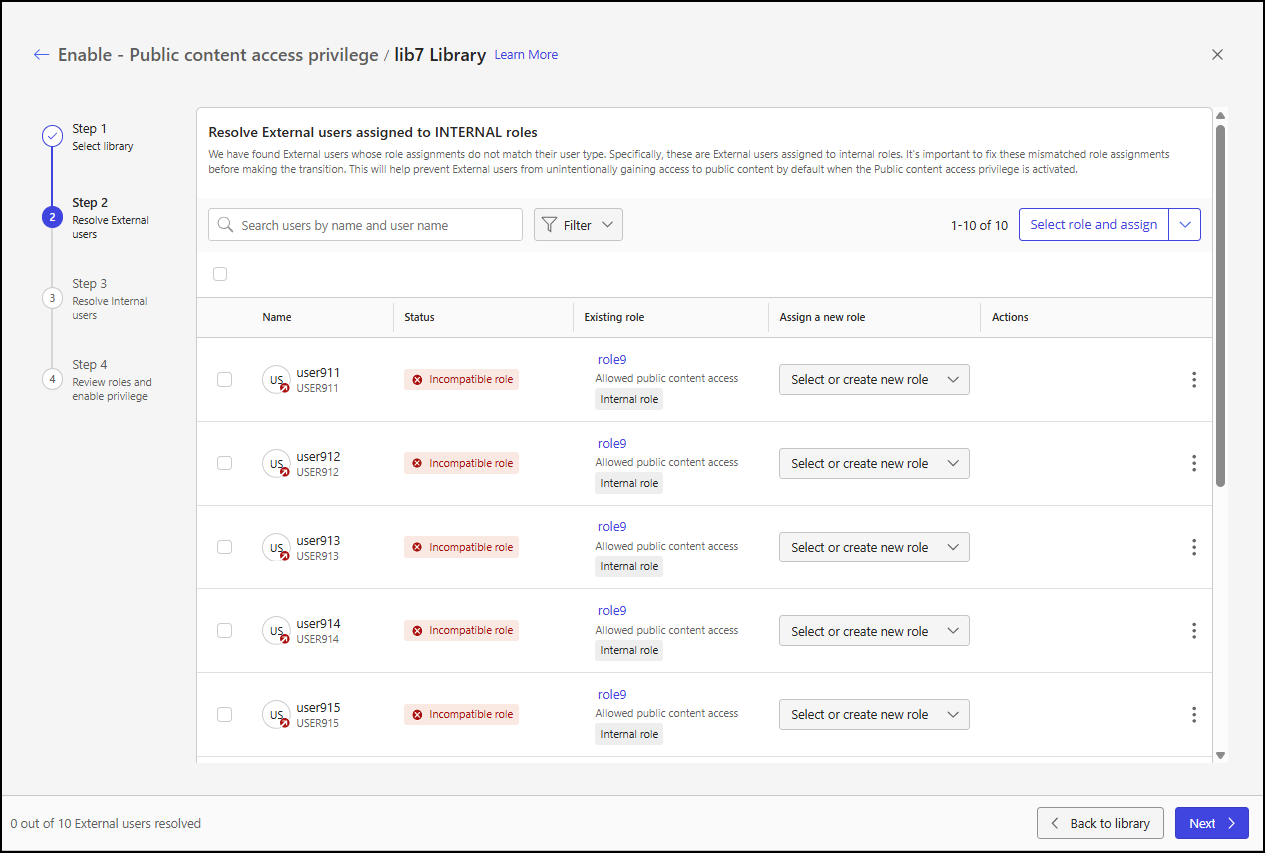
Select users
In the users table, you can select one, multiple, or all users to filter or change their role assignments.
To select all users: Select the check box above the table.
To select one of more users: Select the check box for each user within the table.
When one or more users are selected, actions become available in the toolbar menu, as shown in the following figure.
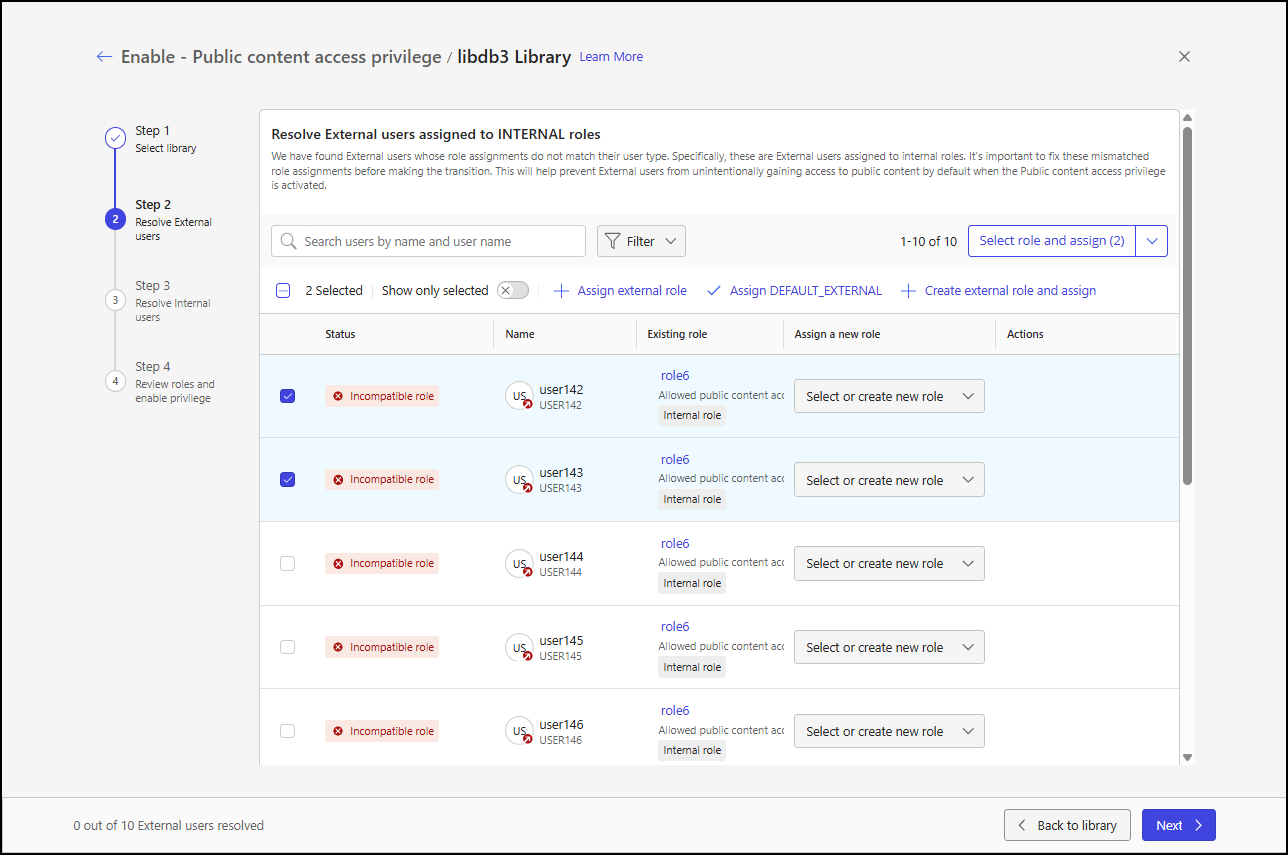
When one or more users are selected, the following toolbar menu actions are displayed:
Show only selected: Displays only the selected users.
Assign external role: Opens the Assign external role to selected dialog, letting you assign the selected users to an existing role that denies public content access. For more information, refer to Assign an external role.
Assign DEFAULT_EXTERNAL: Assigns the DEFAULT_EXTERNAL role to the selected users. For more information, refer to Assign the DEFAULT_EXTERNAL role.
Create external role and assign: Opens a new tab for the Roles page and opens the Create Role dialog. For more information, refer to Create and assign a new external role.
NOTES:
The Assign external role, Assign DEFAULT_EXTERNAL, and Create external role and assign actions are also available for individual users by:
Right-clicking a user row.
Selecting the three dots menu in a user row.
When one or more users are selected, the Select role and assign drop-down list name changes to show the number of users selected. For more information, refer to Select and assign a role.
Resolve incompatible role assignments
On the Resolve External users step of the Enable - Public content access privilege page, you have the following options to resolve incompatible role assignments for external users:
Select or create a new role: For an individual user, you can either choose an existing role that's compatible with external users or create and assign a new role. To do this, select an option from the Select or create new role drop-down list in the user's row within the users table.
Assign an external role: For one or more users, you can choose an existing role that's compatible with external users. To do this, select the check box next to each user and then select the Assign external role action from the toolbar menu. Or, for an individual user, you can right-click the user’s row or select the user’s three dots menu, and then select Assign external role.
Assign the DEFAULT_EXTERNAL role: For one or more users, you can assign the DEFAULT_EXTERNAL role to external users. To do this, select the check box next to each user and then select the Assign DEFAULT_EXTERNAL action from the toolbar menu. Or, for an individual user, you can right-click the user’s row or select the user’s three dots menu, and then select Assign DEFAULT_EXTERNAL.
Create and assign a new external role: For one or more users, you can create a new external role and assign external users to it. To do this, select the check box next to each user and then select the Create external role and assign action from the toolbar menu. Or, for an individual user, you can right-click the user’s row or select the user’s three dots menu, and then select Create external role and assign.
Select and assign a role: For one or more users, you can use the Select role and assign selection item or drop-down list to:
Select users and assign them to an existing role that’s compatible with external users.
Assign the DEFAULT_EXTERNAL role to the selected users or all users.
Create a new external role and assign it to the selected users or all users.
Select or create a new role
For an individual user, you can either choose an existing role that's compatible with external users or create and assign a new role:
On the Resolve External users step of the Enable - Public content access privilege page, choose a user from the users table and select the Select or create new role drop-down list.
Figure: Select or create new role drop-down list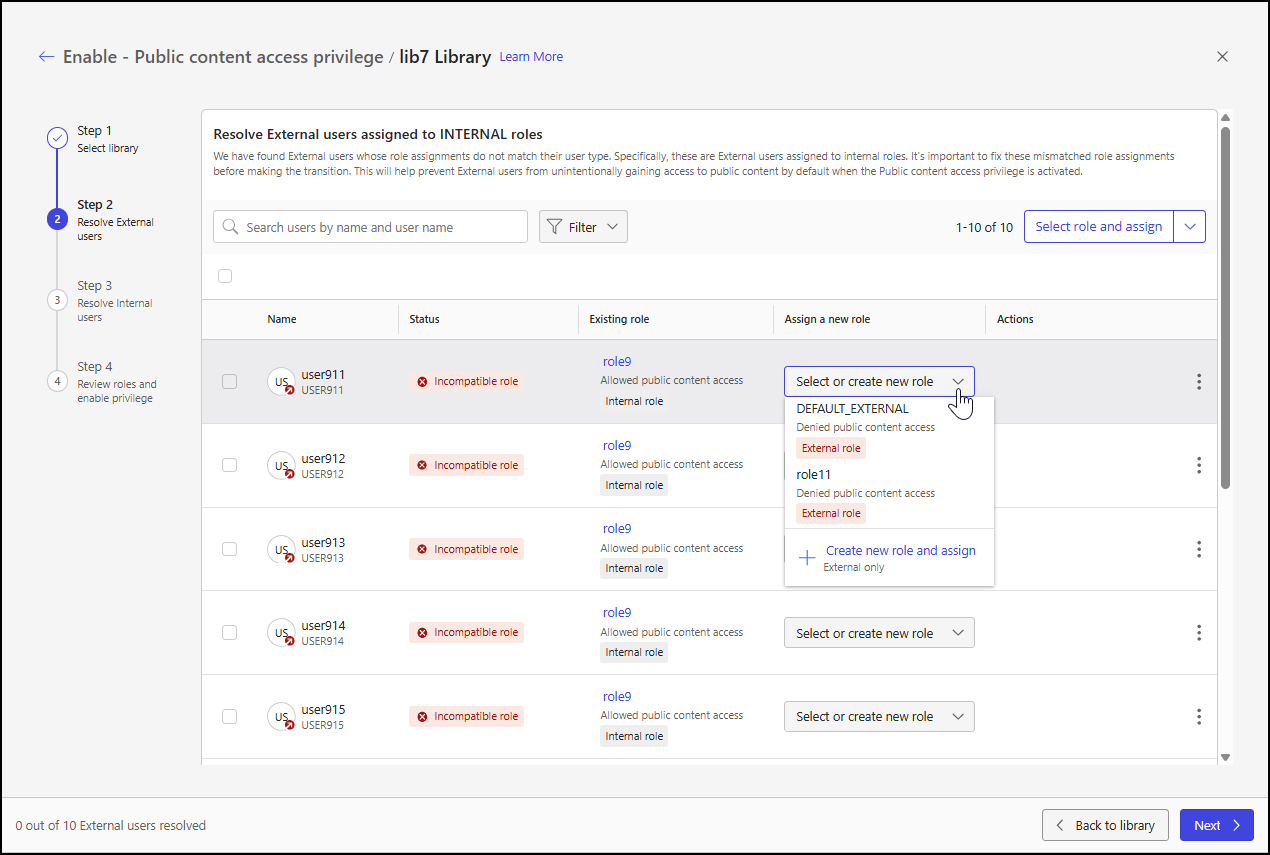
To assign an existing role to the user, select the role from the drop-down list options.
To create a new role and assign it to the user, select Create new role and assign.
The Roles page will open in a new tab, and the Create Role dialog will appear. To configure the new role, follow the guidance in the Roles section of Control Center help, and then select Create.
NOTE: When creating a new external role through the Resolve External users step, the External role setting is enabled and can’t be changed. Additionally, the Allow public content access setting is disabled and can’t be changed. These settings are configured this way to optimize the process of assigning external users to external roles. After the rollout is complete, you can modify these settings.
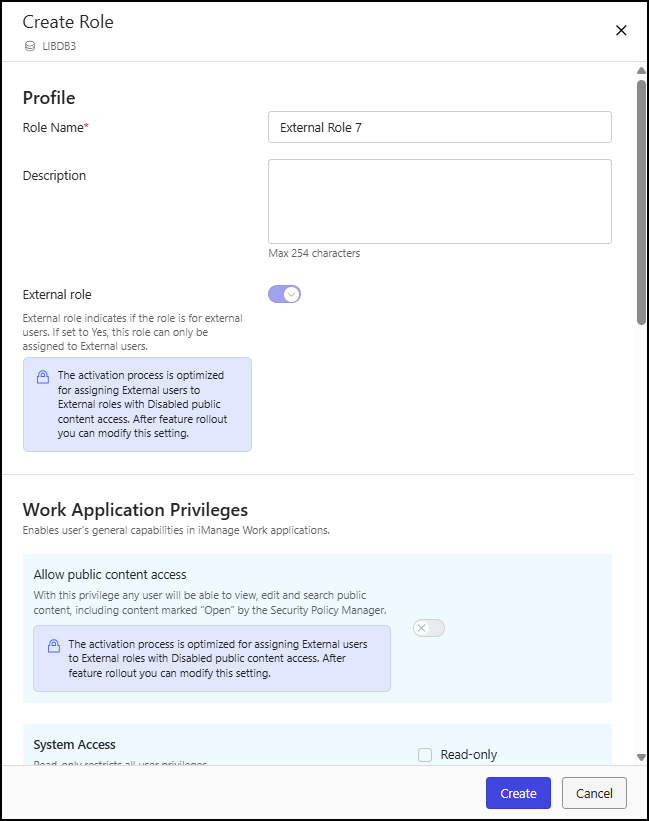
The existing or new role is assigned to the user and the user row changes to display new options. For details about the row changes and options, refer to User row changes for new role assignments.
Figure: Pending change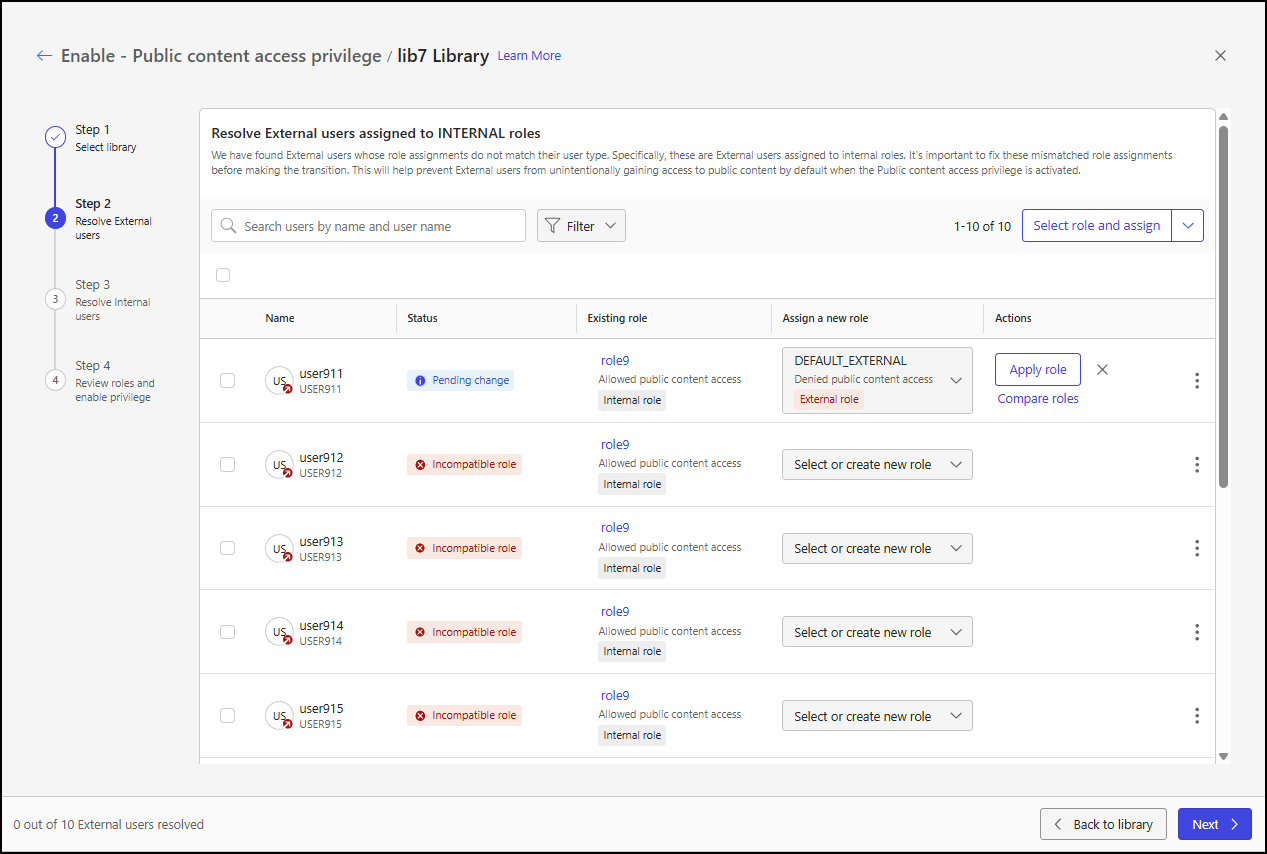
Select Apply role to apply the new role assignment to the user.
Assign an external role
For one or more users, you can choose an existing role that's compatible with external users using the Assign external role action in the toolbar menu. Alternatively, for an individual user, you can right-click the user’s row or select the user’s three dots menu, and then choose the Assign external role action.
To use the toolbar menu action:
On the Resolve External users step of the Enable - Public content access privilege page, select one or more user check boxes and then select Assign external role from the toolbar menu.
Figure: Toolbar menuIn the Assign external role to selected dialog, choose a role from the Role drop-down list, and then select Assign role.
Figure: Assign external role to selected dialog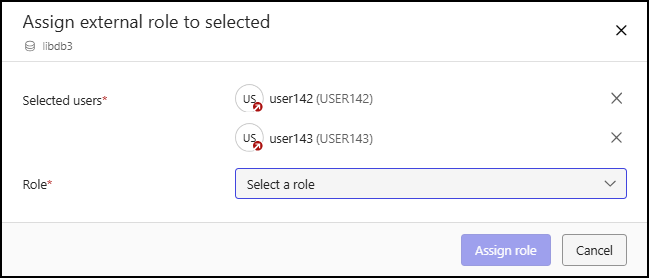
The role is assigned to the users and the user rows change to display new options. For details about the row changes and options, refer to User row changes for new role assignments.
Figure: Pending change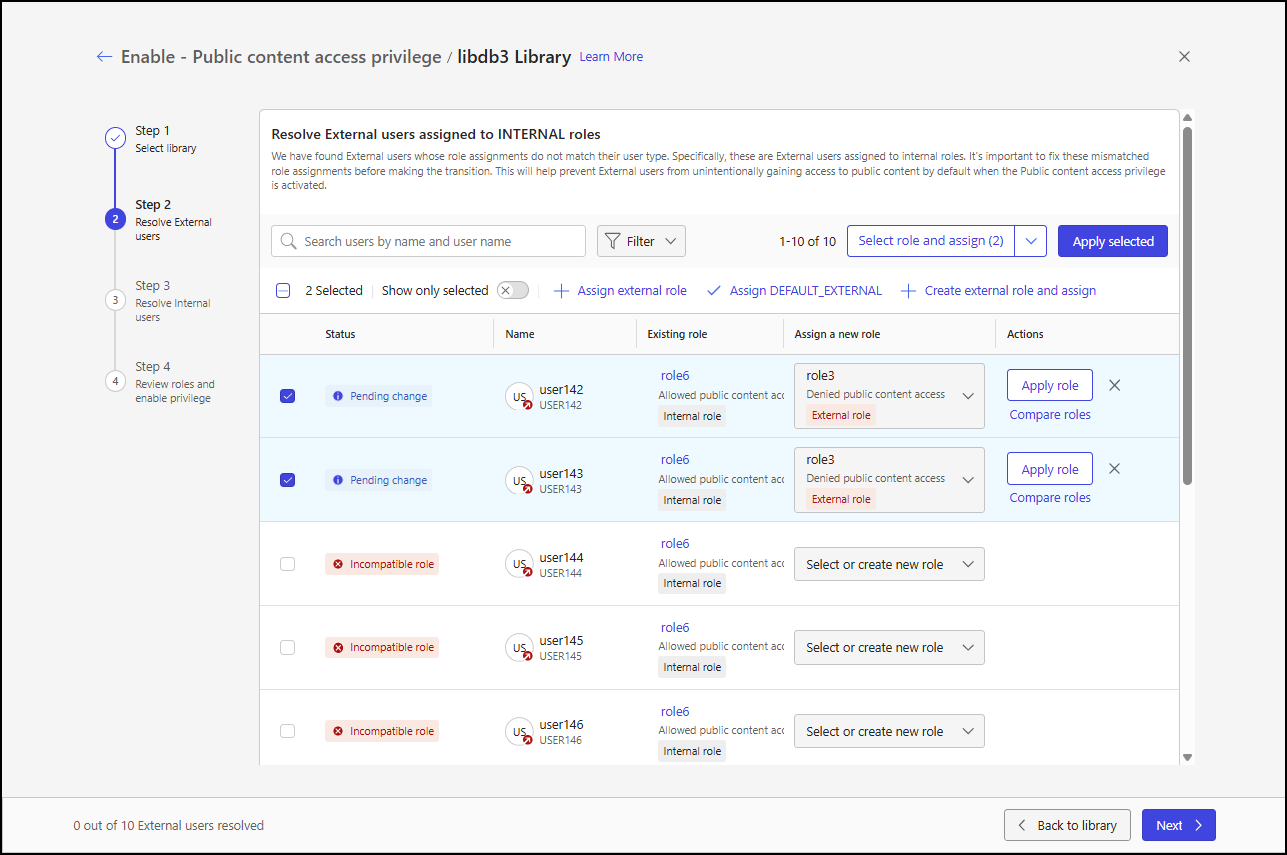
Select Apply selected to apply the new role assignment to all selected users, or select Apply role for each user to apply the new role assignment to each user individually.
Assign the DEFAULT_EXTERNAL role
For one or more users, you can assign the DEFAULT_EXTERNAL role using the Assign DEFAULT_EXTERNAL action in the toolbar menu. Alternatively, for an individual user, you can right-click the user’s row or select the user’s three dots menu, and then choose the Assign DEFAULT_EXTERNAL action.
To use the toolbar menu action:
On the Resolve External users step of the Enable - Public content access privilege page, select one or more user check boxes and then select Assign DEFAULT_EXTERNAL from the toolbar menu.
Figure: Toolbar menu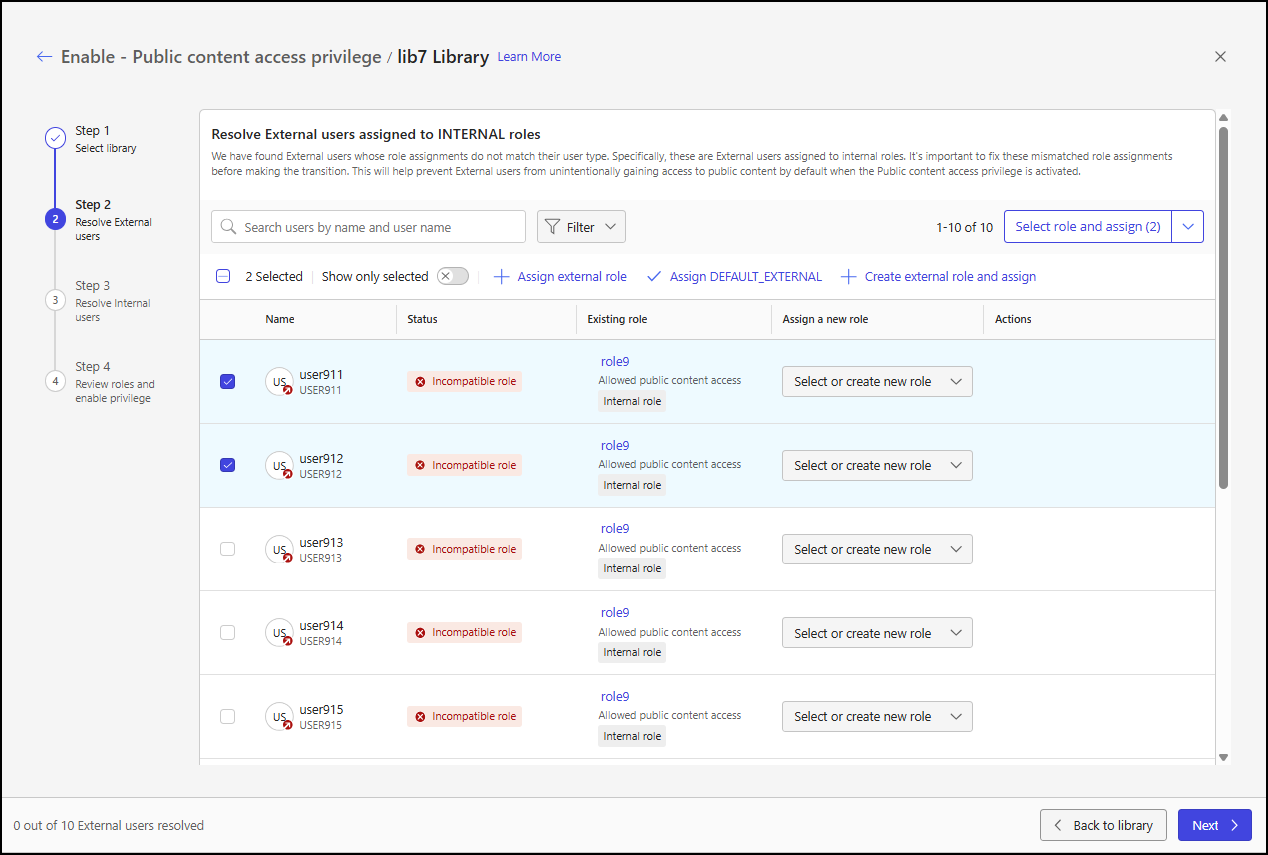
The DEFAULT_EXTERNAL role is assigned to the users and the user rows change to display new options. For details about the row changes and options, refer to User row changes for new role assignments.
Figure: Pending change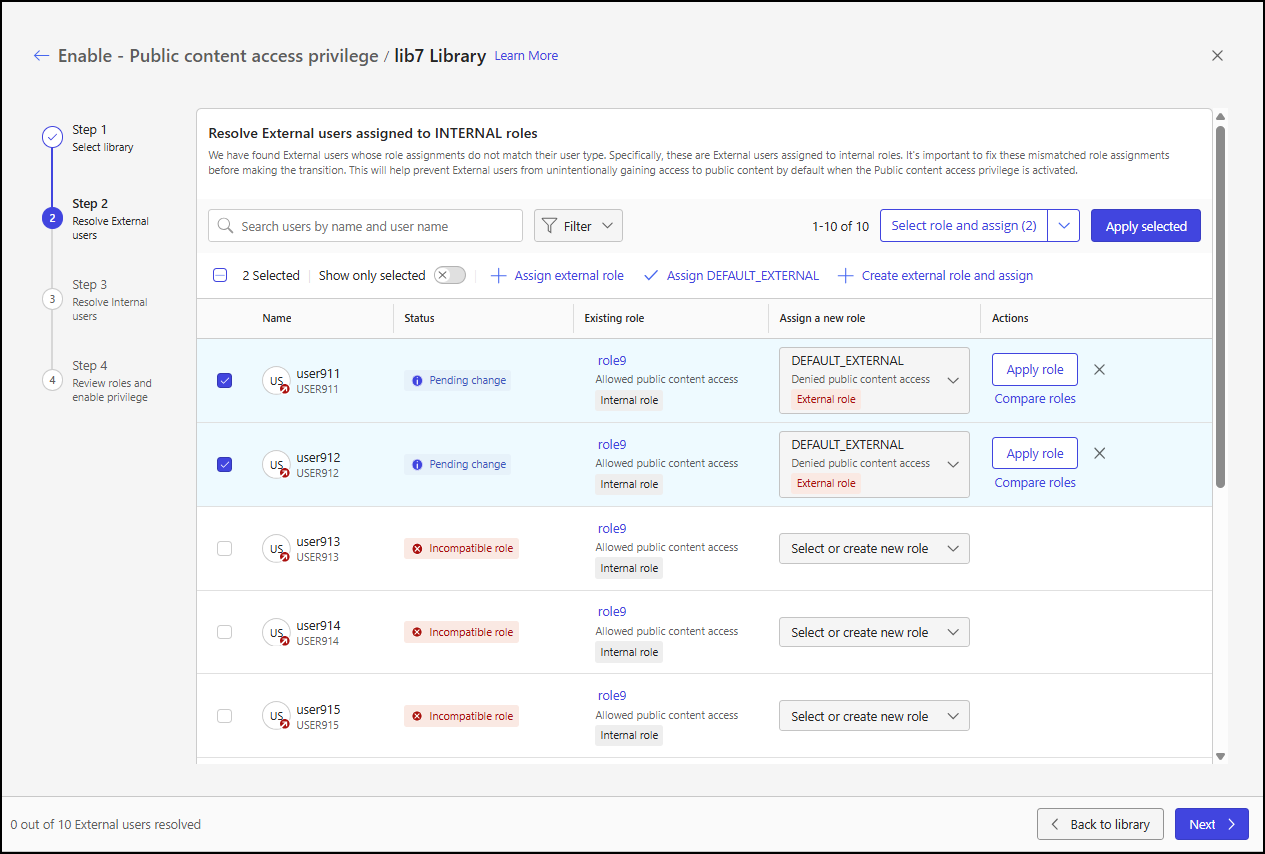
Select Apply selected to apply the new role assignment to all selected users, or select Apply role for each user to apply the new role assignment to each user individually.
Create and assign a new external role
For one or more users, you can create a new external role and assign external users to it using the Create external role and assign action in the toolbar menu. Alternatively, for an individual user, you can right-click the user’s row or select the user’s three dots menu, and then choose the Create external role and assign action.
To use the toolbar menu action:
On the Resolve External users step of the Enable - Public content access privilege page, select one or more user check boxes and then select Create external role and assign from the toolbar menu.
Figure: Toolbar menu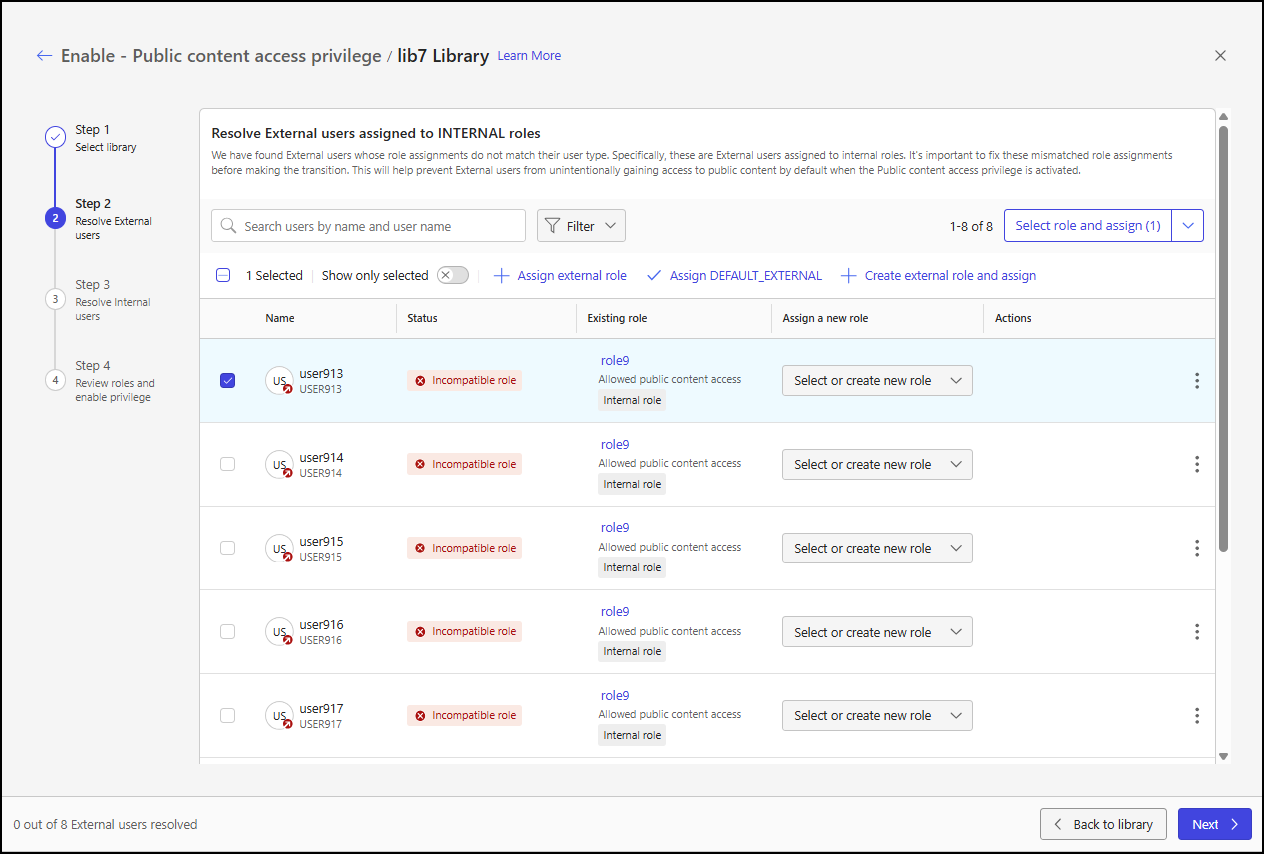
The Roles page will open in a new tab, and the Create Role dialog will appear. To configure the new role, follow the guidance in the Roles section of Control Center help, and then select Create.
NOTE: When creating a new external role through the Resolve External users step, the External role setting is enabled and can’t be changed. Additionally, the Allow public content access setting is disabled and can’t be changed. These settings are configured this way to optimize the process of assigning external users to external roles. After the rollout is complete, you can modify these settings.
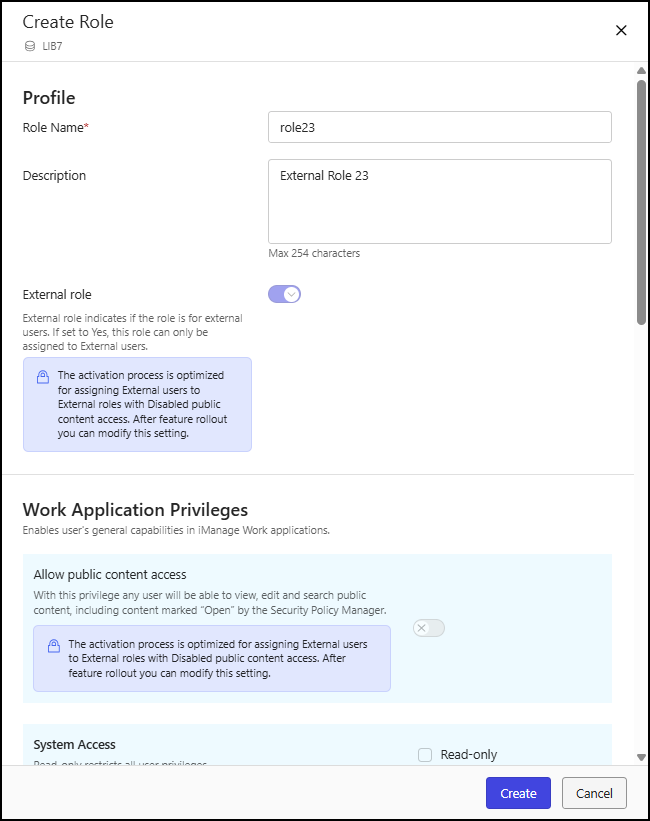
The new role is assigned to the users and the user rows change to display new options. For details about the row changes and options, refer to User row changes for new role assignments.
Figure: Pending change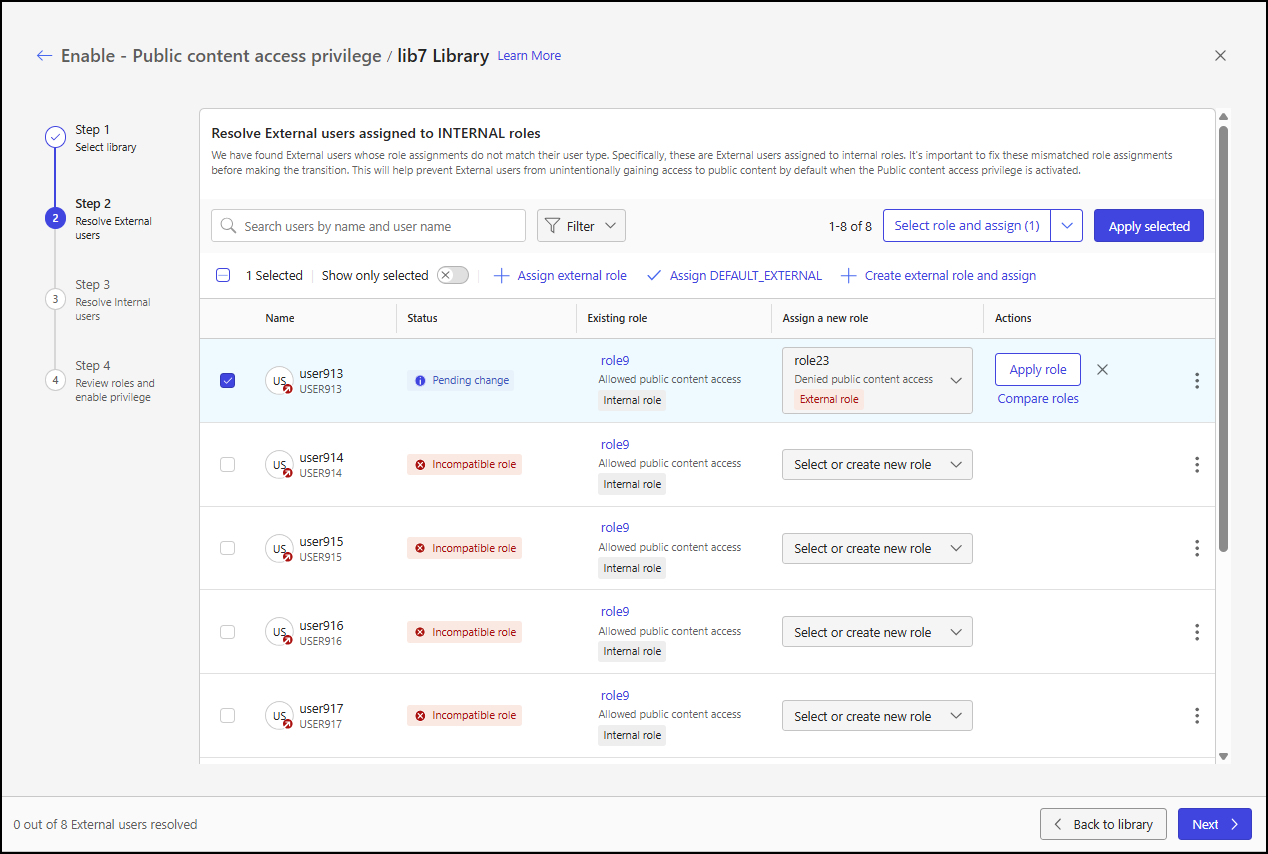
Select Apply selected to apply the new role assignment to all selected users, or select Apply role for each user to apply the new role assignment to each user individually.
Select and assign a role
For one or more users, you can use the Select role and assign selection item or drop-down list to:
Select users and assign a role: Select users and assign them to an existing role that’s compatible with external users.
Assign the DEFAULT_EXTERNAL role: Assign the DEFAULT_EXTERNAL role to the selected users or all users.
Create and assign a role: Create a new external role and assign it to the selected users or all users.
Select users and assign a role
You can assign one or more users to an existing role that’s compatible with external users using the Select role and assign selection item.
On the Resolve External users step of the Enable - Public content access privilege page, select one or more user check boxes and then select Select role and assign.
Figure: Select role and assign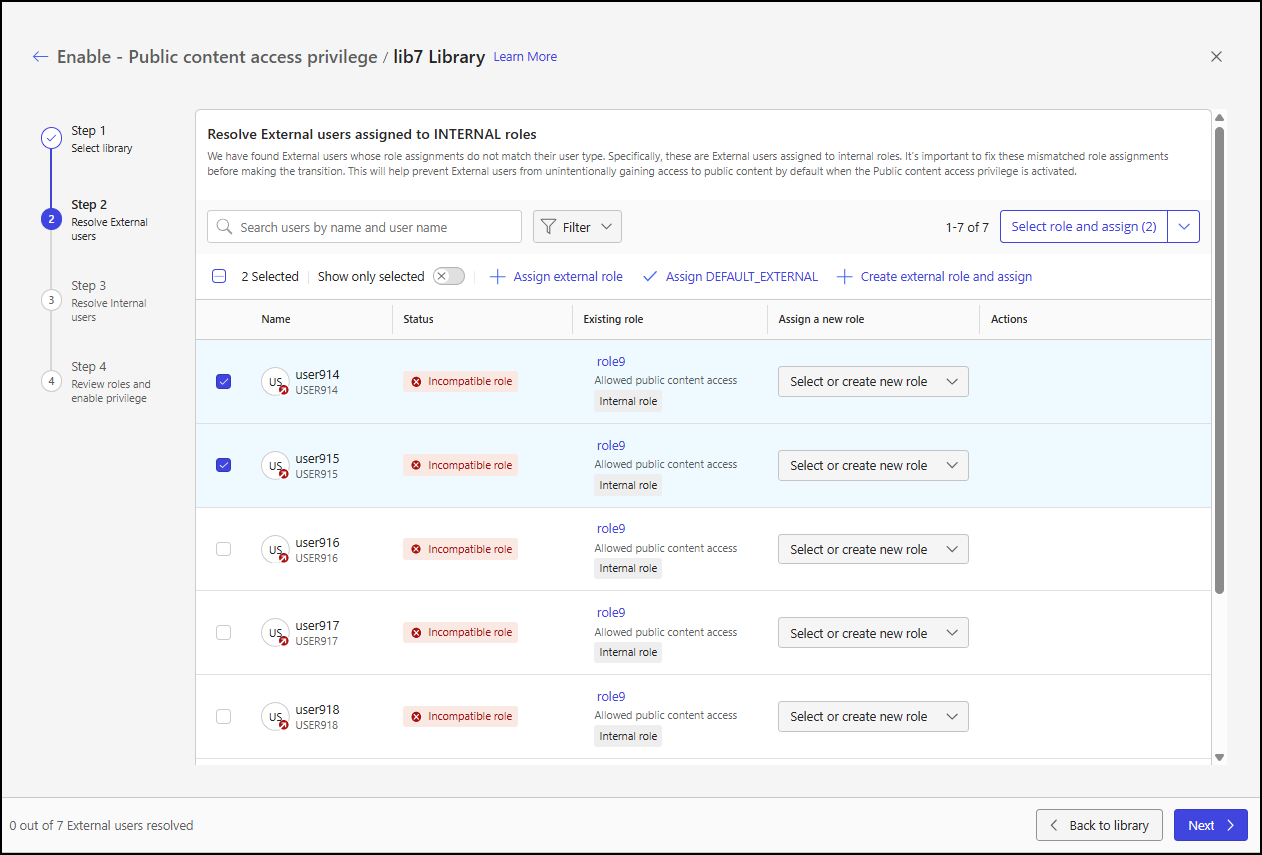
In the Assign external role to selected dialog, the users selected in Step 1 are shown.
Figure: Assign external role to selected dialog with some users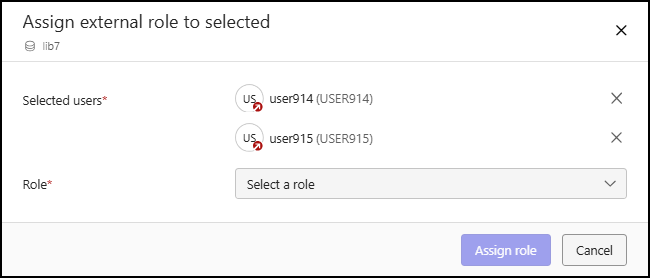
If no users were selected in Step 1, the Assign external role to selected dialog will show all external users with incompatible roles, as illustrated in the figure below. Select the X for each user you want to remove from the list before assigning a role.Figure: Assign external role to selected dialog with all users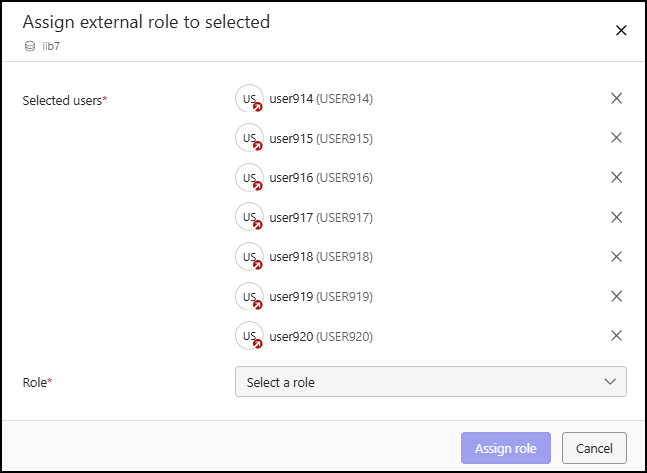
Choose an existing role from the Role drop-down list and select Assign role.
The role is assigned to the users and the user rows change to display new options. For details about the row changes and options, refer to User row changes for new role assignments.
Figure: Pending change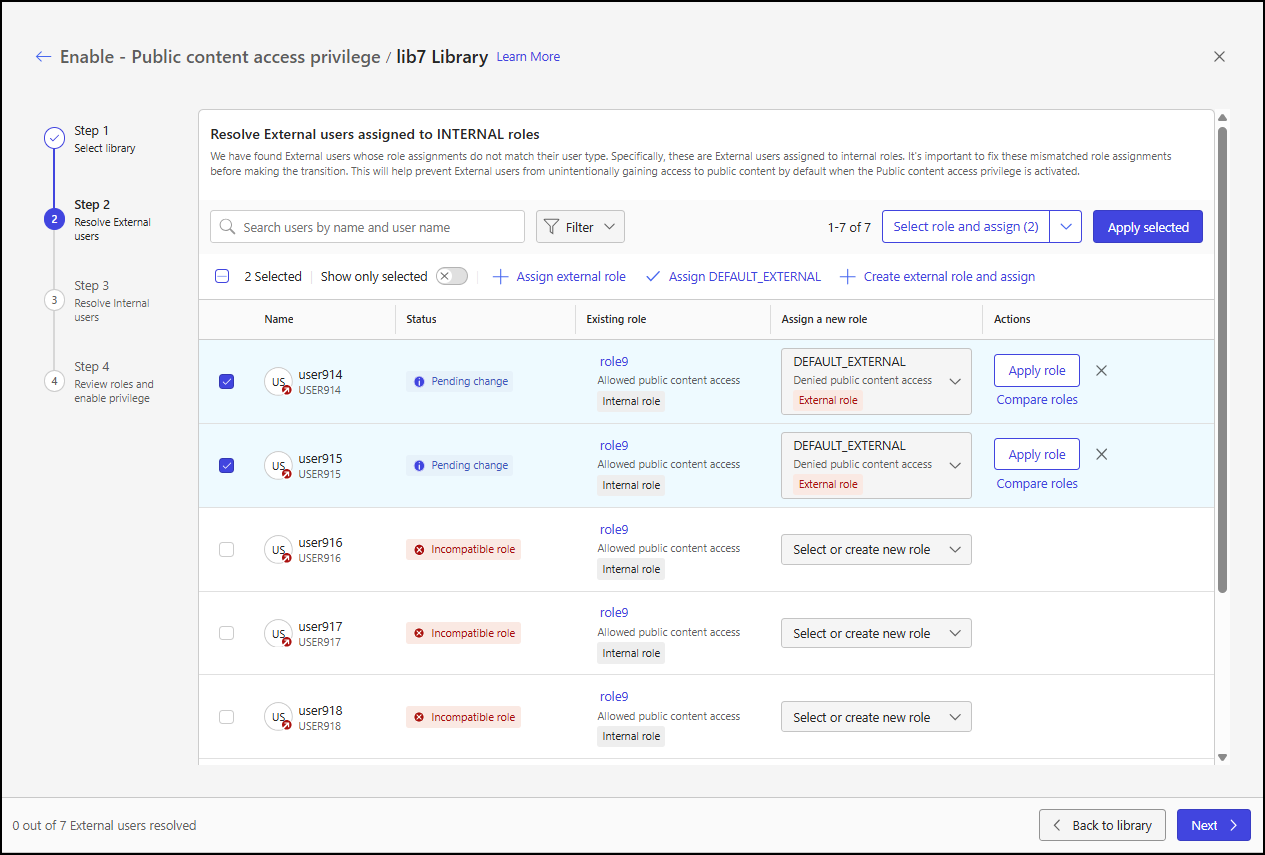
Select Apply selected to apply the new role assignment to all selected users, or select Apply role for each user to apply the new role assignment to each user individually.
Assign the DEFAULT_EXTERNAL role
For one or more users, you can assign the DEFAULT_EXTERNAL role using the drop-down list for the Select role and assign selection item.
NOTE: If you don’t select users before choosing this option, the DEFAULT_EXTERNAL role is assigned to all external users with incompatible roles.
On the Resolve External users step of the Enable - Public content access privilege page, select one or more user check boxes and then select Assign DEFAULT_EXTERNAL from the Select role and assign selection list.
Figure: Assign DEFAULT_EXTERNAL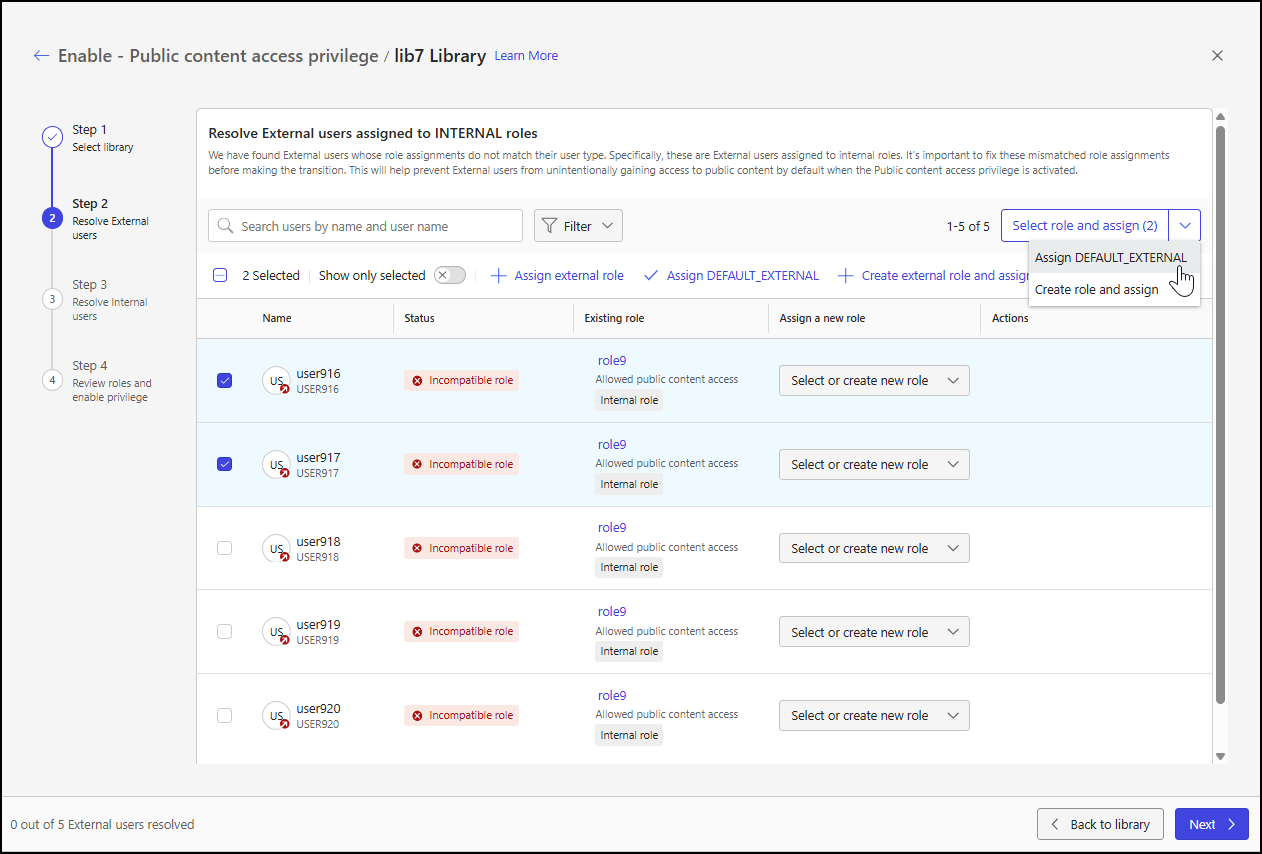
The DEFAULT_EXTERNAL role is assigned to the users and the user rows change to display new options. For details about the row changes and options, refer to User row changes for new role assignments.
Figure: Pending change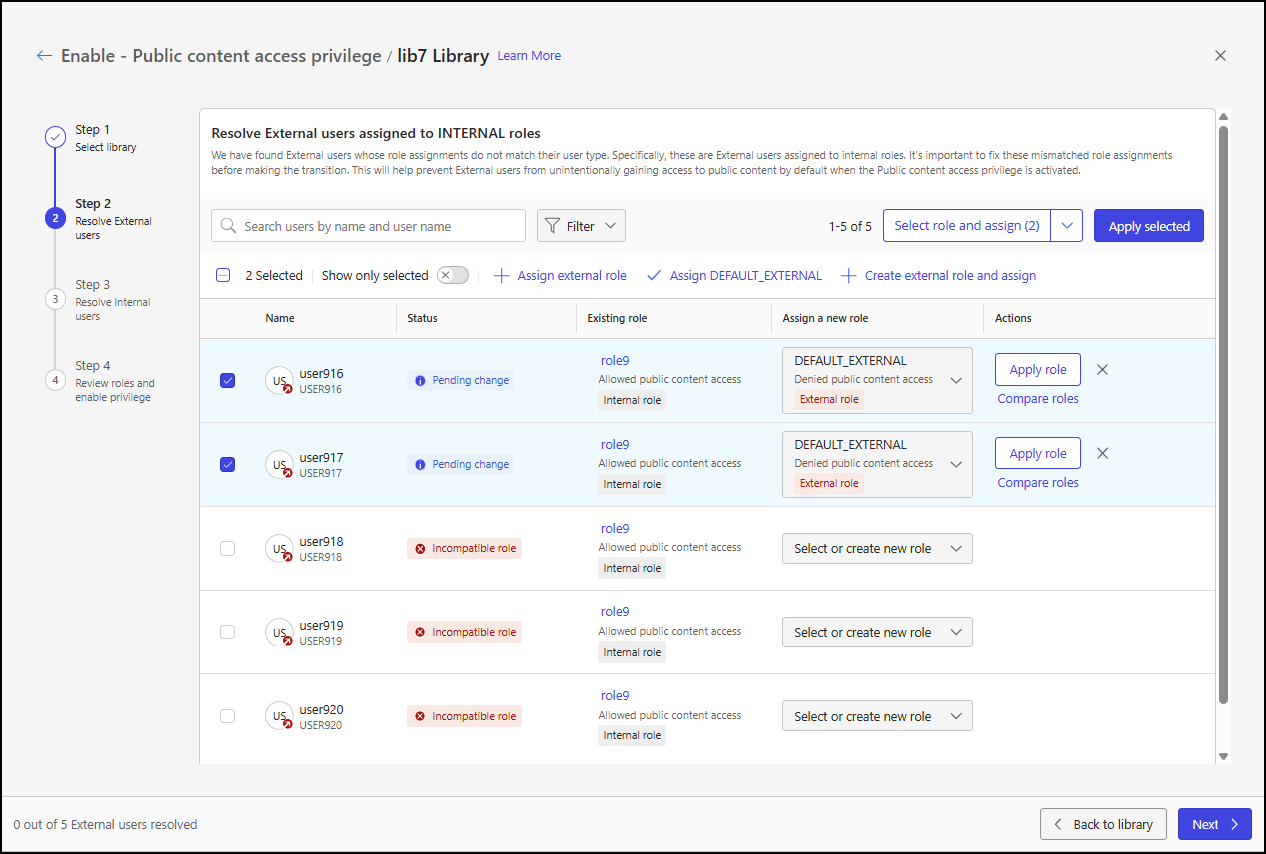
Select Apply selected to apply the new role assignment to all selected users, or select Apply role for each user to apply the new role assignment to each user individually.
Create and assign a role
For one or more users, you can create a new external role and assign external users to it using the drop-down list for the Select role and assign selection item.
NOTE: If you don’t select users before choosing this option, the new role is assigned to all external users with incompatible roles.
On the Resolve External users step of the Enable - Public content access privilege page, select one or more user check boxes and then select Create role and assign from the Select role and assign selection list.
Figure: Create role and assign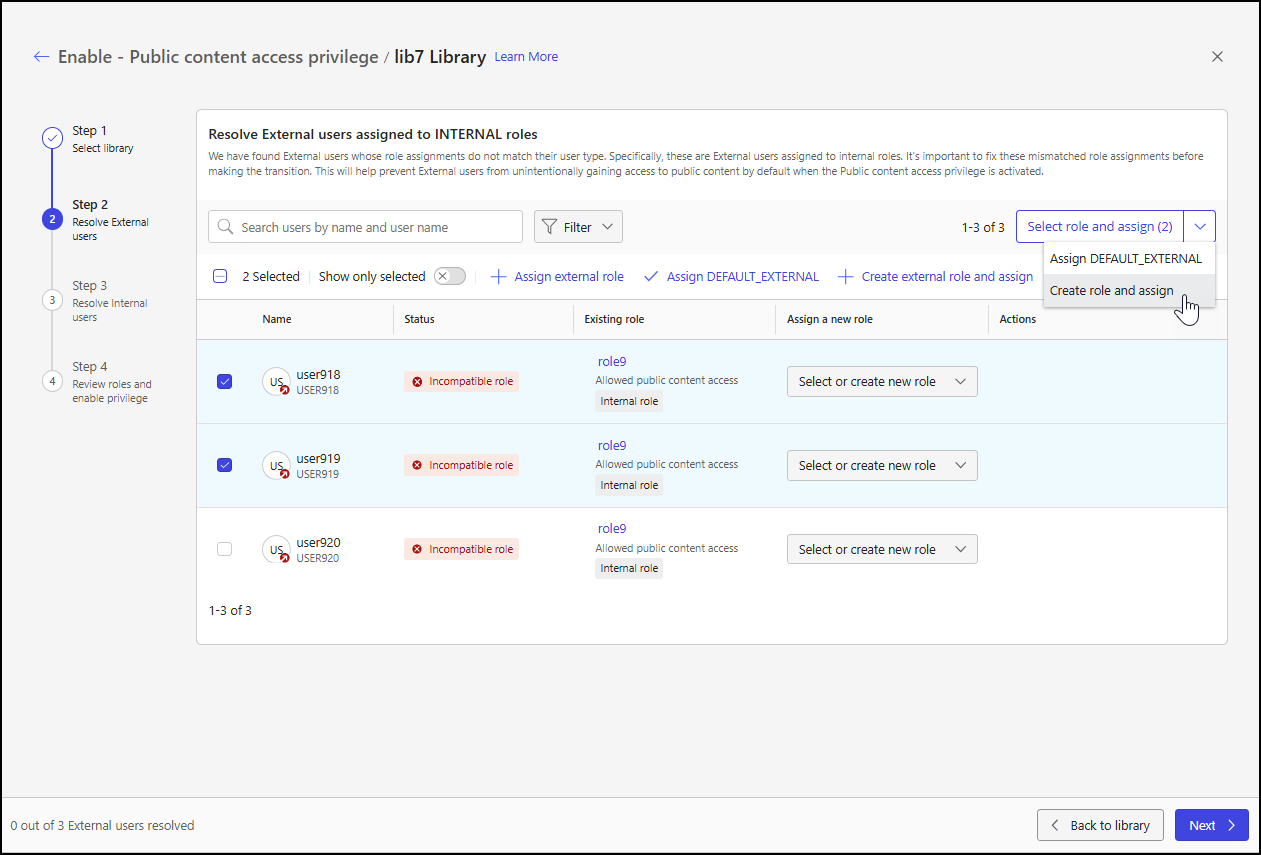
The Roles page will open in a new tab, and the Create Role dialog will appear. To configure the new role, follow the guidance in the Roles section of Control Center help, and then select Create.
NOTE: When creating a new external role through the Resolve External users step, the External role setting is enabled and can’t be changed. Additionally, the Allow public content access setting is disabled and can’t be changed. These settings are configured this way to optimize the process of assigning external users to external roles. After the rollout is complete, you can modify these settings.
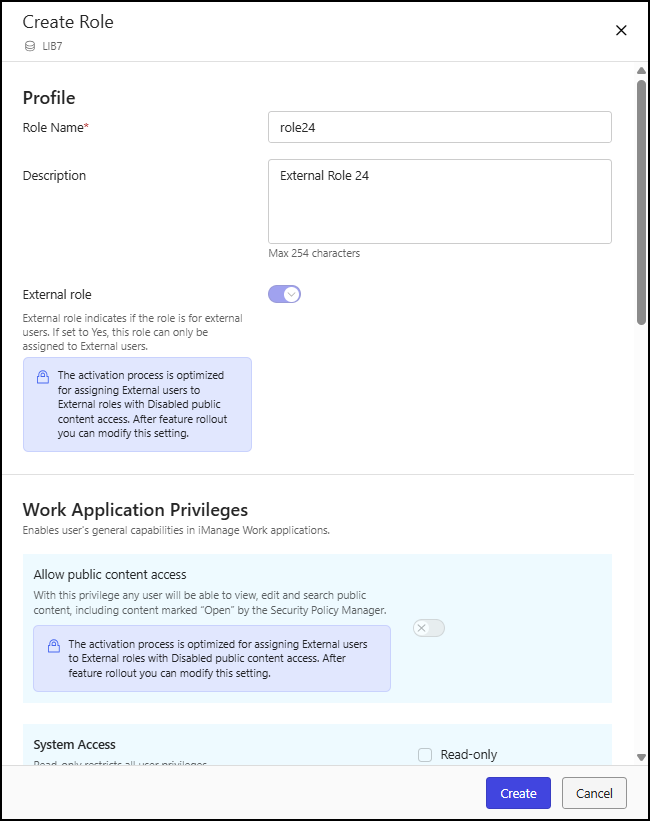
The new role is assigned to the users and the user rows change to display new options. For details about the row changes and options, refer to User row changes for new role assignments.
Figure: Pending change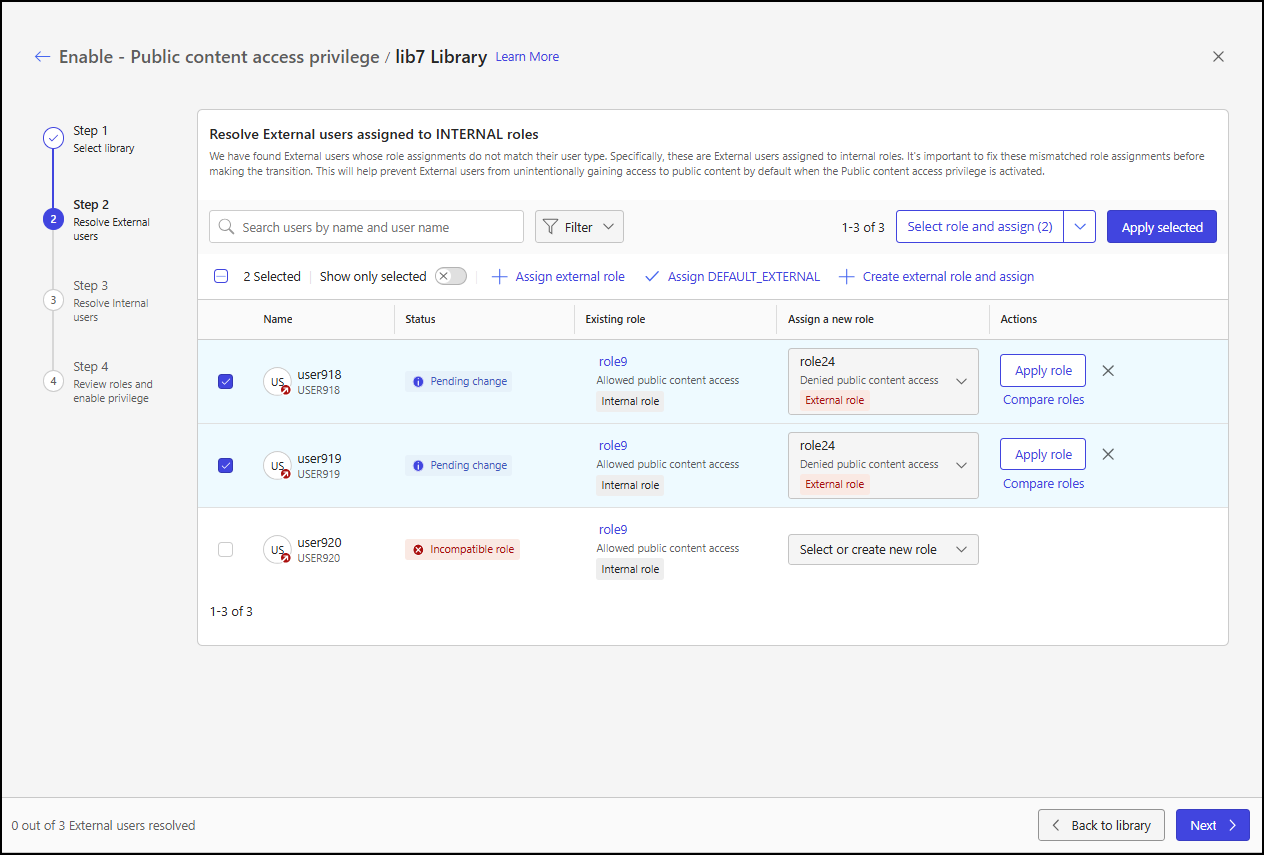
Select Apply selected to apply the new role assignment to all selected users, or select Apply role for each user to apply the new role assignment to each user individually.
User row changes for new role assignments
When a new or existing role is assigned to a user, the user row changes as follows:
The Status column changes to Pending change.
The Actions column displays the following options:
Apply role: Select this option to apply the new role assignment to the user. When this option is selected, the Status column changes to Resolved.
Compare roles: Select this option to open the Compare X and Y role dialog. This dialog provides a grid that shows how each privilege is set for the user’s existing role and new role. In this dialog, you can search for a specific privilege or category or filter the output by category. Use this dialog to ensure that the pending role assignment meets your needs for the user.
Figure: Compare X and Y role dialog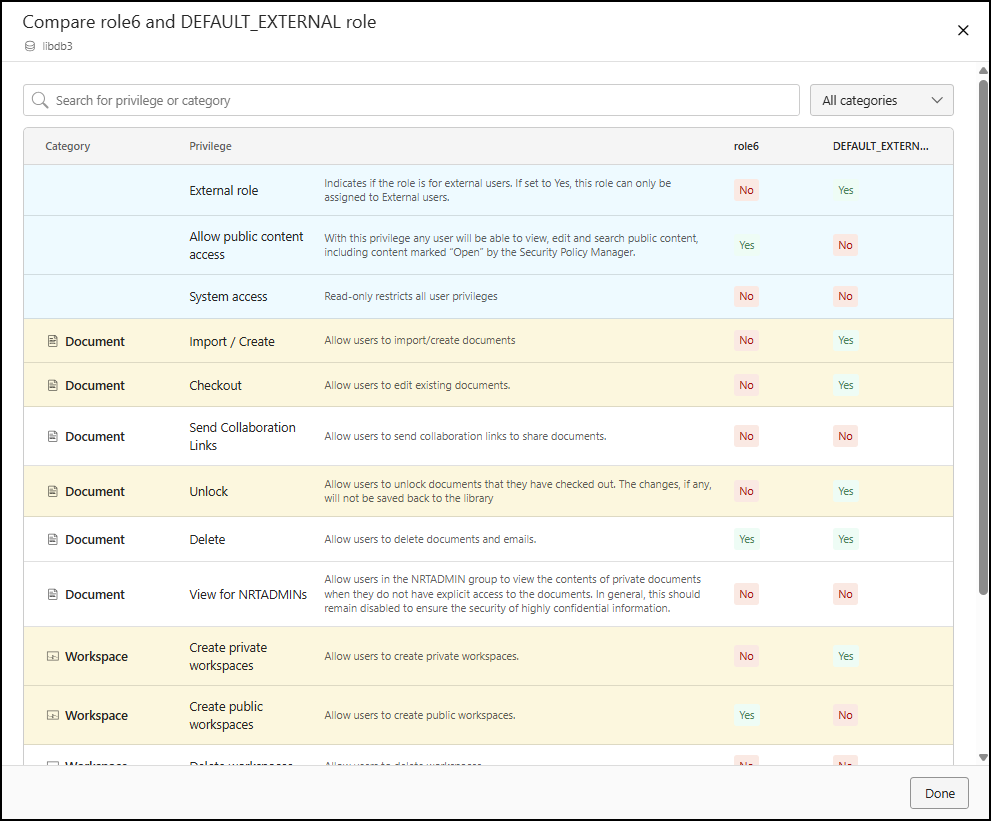
X: Select this option to remove the pending role assignment for the user. When this option is selected, the Status column changes back to Incompatible role.
NOTES:
After the status of a user’s role assignment changes to Resolved, it can be set back to Pending change by assigning a different new or existing external role. However, the status can’t be reset back to Incompatible role because an external user can only be assigned to an external role.
When a user’s role assignment status is set to Resolved:
The only action available in the toolbar menu is Compare roles.
The only option available in the Actions column is Compare roles.
Proceed to the next step
After all incompatible role assignments have been resolved, select Next to proceed to the next step in the Public Content Access Privilege rollout for the library.
The next step will either be:
Resolve Internal users: This step comes next if the library has internal users assigned to an external role.
Review roles and enable privilege: This step comes next if the library doesn't have any internal users assigned to an external role.