Adding an application package
Based on the type of application to add, use the appropriate method to add the application in iManage Control Center:
Adding an application package: T hird-party application developers or internal developers provide an application as a zip file package. This application package extends or customizes iManage Work and must contain the following:
A manifest file manifest.yaml that contains the information about the client application to be uploaded to iManage Work. For more information about the format and contents of the manifest file, refer to Extensions in iManage Work Web SDK Guide.
The collection of all files needed to run the application or web page.
Adding an application manually: The application developer provides the information for registering an application to the iManage Control Center administrator. This application only accesses data from iManage Work and does not have a package to upload.
An application that only accesses data from iManage Work and does not have a package to upload must also be registered on iManage Work before it is available to the users. The information to register such applications is provided by the application developer to the iManage Control Center administrator through an email or any other communication mode.
Adding an application package
Navigate to Settings > Applications to view the list of applications currently registered.
Select + Add Application to upload a new application. The Add Application dialog appears.
Figure: Add Application
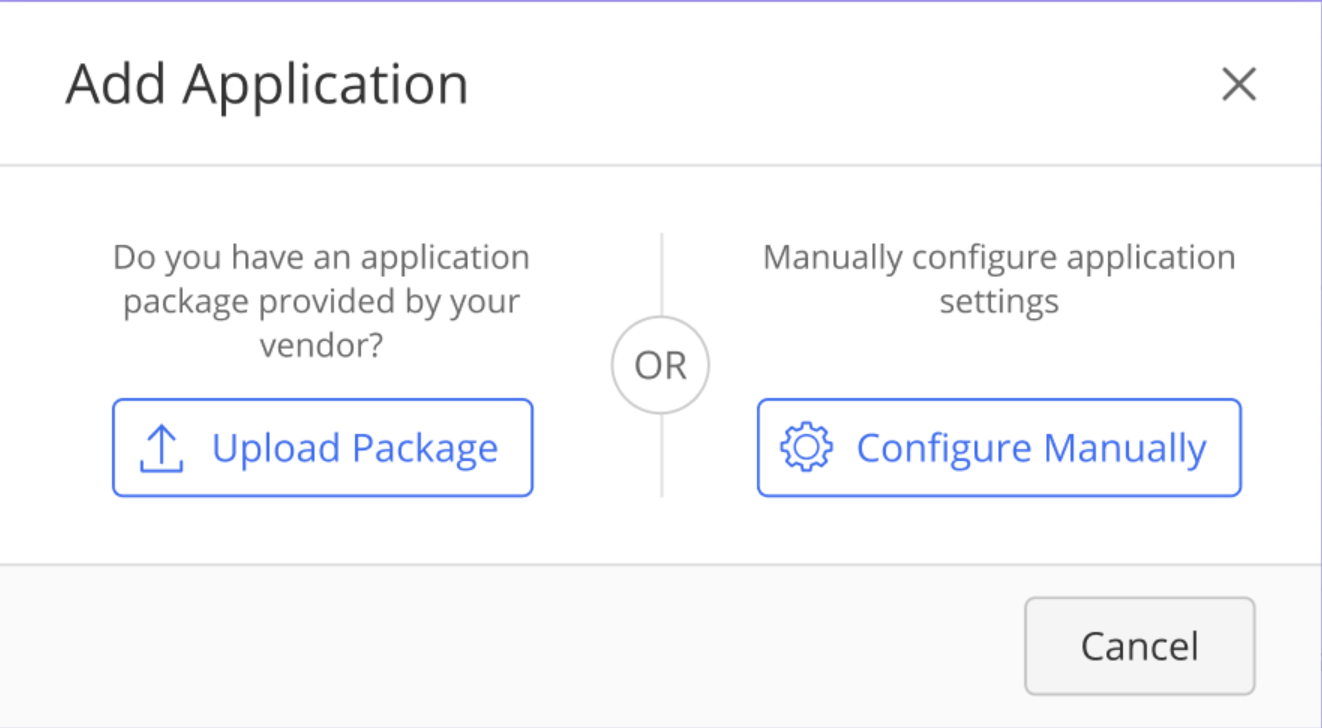
Select Upload Package, browse to the local directory, and select the package. The Add Application wizard appears.
The following example shows the Add Application wizard for iManage Threat Manager.Figure: Add Application wizard

The information on the Configuration step is retrieved automatically from the application package provided by the application developer. If required, you can edit the Name and Description. All the other properties are read-only and cannot be edited.
Table: Configuration details
Field
Description
Name
Application name.
Description
Additional information about the application.
API Key
Application key.
API Secret
Secret key for an API. Select Auto-Generate to generate the key.
Publisher
Name of the organization publishing the application.
Website
Web address of the publisher.
Type
Type of connectivity
Select Authentication to open the Authentication page which contains the information required for authorizing the application.
Figure: Authentication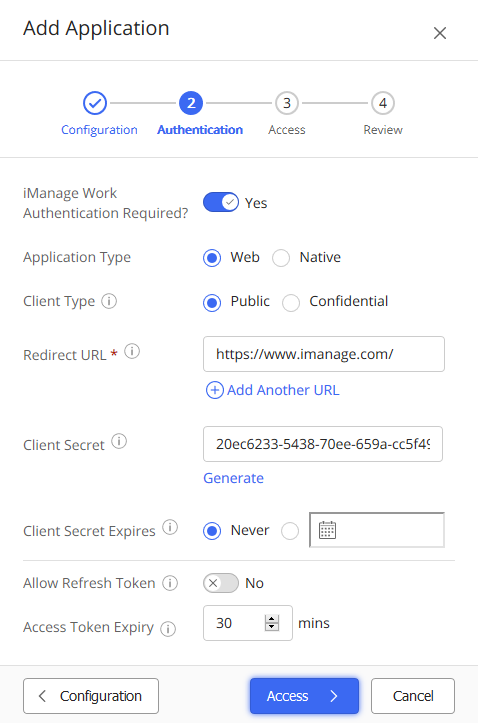
If the application requires the user to authenticate to iManage Work, set iManage Work Authentication Required? to Yes.
The following information is retrieved automatically from the package provided by the application developer.CAUTION:
Change the editable properties in Authentication details only if instructed by the application developer or iManage support team.
Table: Authentication details
Field
Description
Application Type
Native: Application installed and accessed on a user’s computer or device.
Web - Application running on a web server and accessed through a website.
Client Type
Public: Application NOT capable of protecting its client secret. For example, a desktop or mobile phone application that cannot securely store the client secret.
Confidential: Application capable of protecting its client secret from users and performing secured authentication on iManage Work Server. For example, a web application that has the client ID and secret stored on its own web server.
Redirect URL
URL to redirect the user to the client application after iManage Work Server successfully authorizes the application. You can add multiple redirect URLs by selecting +. For more information, see OAuth 2.0 authentication.
Client Secret
Secret key generated during the application registration process to authenticate with iManage Work Server.
Click Generate to auto-generate a secret the first time for registering the application.Client Secret Expires
Enter a date when the client secret will expire.
Select Never Expires if you want no expiry date for the secret.
If the client secret expires during a session, the current session continues. New authentication attempts will fail after the secret has expired. To resolve an expired client secret, either the application developer should provide a new client secret or update its date of expiry.Allow Refresh Token
When set to Yes, allows the application to obtain a new access token when the existing access token expires, without prompting the user for authentication.
When Allow Refresh Token = No, if the user has been inactive in the application (for example, Work 10 Web) for the Access Token Expiry duration (default = 30 minutes), the user will be signed out by the system, and forced to sign in again to continue to use the system.
When Allow Refresh Token = Yes, if the user has been inactive for the Access Token Expiry duration, the system automatically issues a refresh token. The user is able to continue to use the system without re-authenticating even after being inactive for 30 mins.
Also when Allow Refresh Token = Yes, the user will be forced to re-authenticate after the Refresh Token Expiry (default = 365 days).
Default: No
NOTE: Individual applications, such as Work Desktop for Windows 10.2.5 and higher, may have the capability to cache the refresh tokens locally. In this case, a user is not prompted to sign in again to iManage Work even if the user closes the application, signs out of Microsoft Windows, or restarts the local computer. For more information about this setting in iManage Work Desktop for Windows, see Persisting the oAuth2 refresh token.
Refresh Token Expiry
Duration in days for which a refresh token remains valid.
NOTE: To configure this field, you must enable the Allow Refresh Token option.
Default: 365 days
Access Token Expiry
Duration of inactivity allowed in minutes before invalidating an access token of a user.
Default: 30 minutes.Select Access to configure the access privileges.
You can secure an application to selected users in the organization. This is helpful when you have a pilot group who is testing a new functionality or if you have an application that is specifically meant for a certain users. For example, an application for tracking patent deadlines that only an IP group uses.
Figure: Access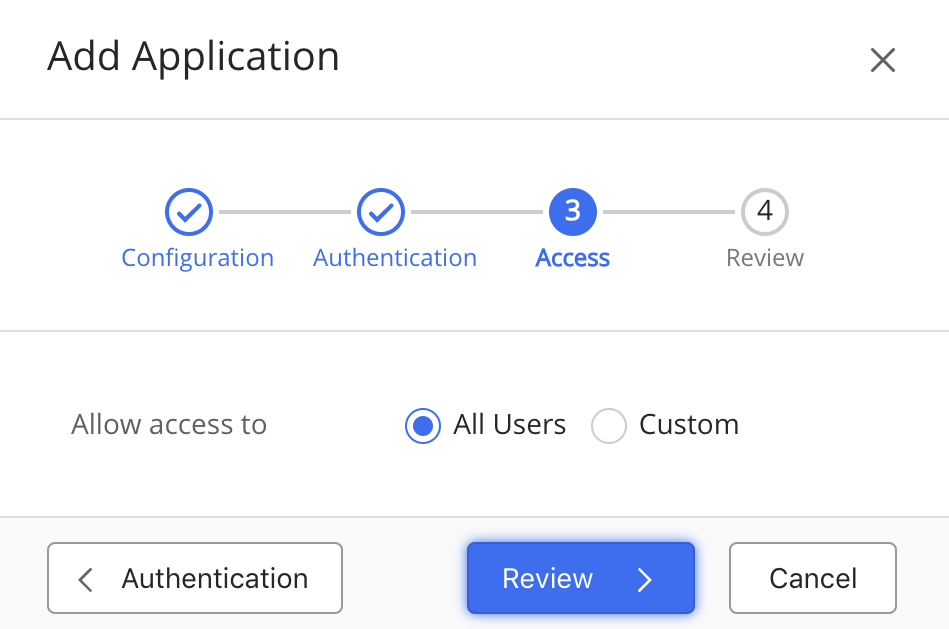
Select one of the following application access options:
All users: Select this option to provide access to all the available users.
Custom: Search and add the specific users and groups to provide the access.
Select Review to review the configurations for application package.
Select Finish to complete the application upload.
Adding a package manually
Navigate to Settings > Applications page; the list of applications already added to iManage Work appears.
Select +Add Application to add a new application. The Add Application dialog appears.
Select Configure Manually to configure the application settings.
Enter the configuration details provided by the application developer. For more information, see Configuration Details.
Select Authentication and enter the information on this page per the application developer's instructions.
If the application requires to be authenticated to iManage Work Server, select Yes and refer the table Authentication Details and enter the information.Select Access to configure access privileges for the users.
Select one of the following application access option.
All users - To provide access to all the available users.
Custom - T o search and add the specific users and groups.
Select Review to review the configurations for application package.
Select Finish to complete registration of the application.