PingFederate
Download the SSO settings for your iManage environment
Before you begin, download the settings in XML format for your iManage environment. These settings are used to configure PingFederate for your iManage environment.
In iManage Control Center, navigate to Network & Security > Authentication & SSO, then select Download XML.
Figure: Download XML option in iManage Control Center

Configure SSO in PingFederate
Complete the following steps in PingFederate to configure single sign-on for iManage users:
Sign in to the PingFederate administrator console.
Navigate to SP Configuration.
To create a new SP Connection, select Create Connection.
On the Connection Template tab, select Do not use a template for this connection, and then select Next.
On the Connection Type tab, select Browser SSO Profiles, specify SAML 2.0, and then select Next.
On the Connection Options tab, select Next.
On the Import Metadata tab, select File.
Select Choose File.
Select the XML file you downloaded from iManage Control Center.
Select Open, and then select Next.
On the Metadata Summary tab, the information from the XML file is displayed. Confirm the information, and then select Next.
On the General Info tab, confirm the information displayed, and then select Next.
On the Browser SSO tab, select Configure Browser SSO.
For both Single Sign-on Profiles and Single Logout Profiles, select SP-initiated SSO, and then select Next.
On the Assertion Lifetime tab, and then select Next.
On the Assertion Creation tab, and then select Configure Assertion Creation.
On the Identity Mapping tab, select Standard, and then select Next.
On the Attribute Contract tab, under Extend the Contract, select or enter the following:
Attribute Contract: http://schemas.xmlsoap.org/ws/2005/05/identity/claims/name
Attribute Name Format: urn:oasis:names:tc:SAML:2.0:attrname-format:unspecified
Figure: SP Connections | SP Connection | Browser SSO | Assertion Creation
Select Add.
Select Next.
On the Authentication Source Mapping tab, select Map New Adapter Instance.
On the Adapter Instance tab, select the adapter that you have previously configured in PingFederate. To create a new adapter, select Manage Adapter Instances. For instructions about configuring an adapter, see the PingFederate documentation.
Select Next.
On the Mapping Method tab, select Use only the adapter contract values in the SAML assertion, and then select Next.
On the Attribute Contract Fulfillment tab, set the following values:
Source: Adapter
Value: username
Figure: SP Connection | SP Connection | Browser SSO | Assertion Creation | IdP Adapter Mapping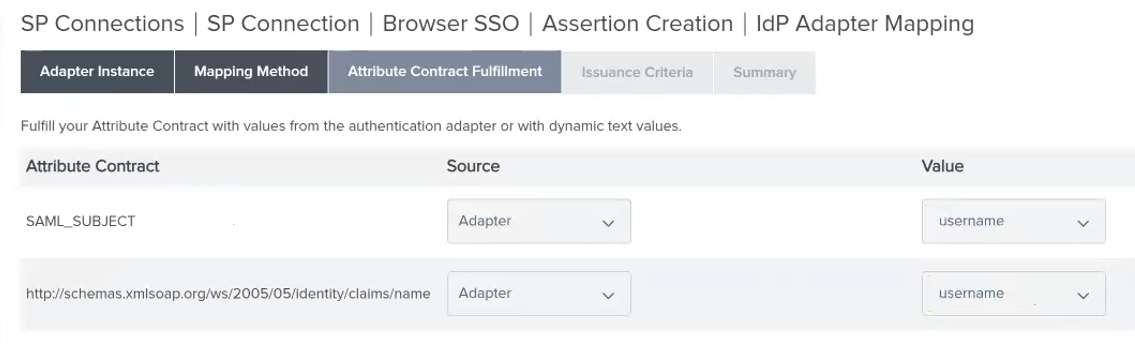
Select Next.
On the Issuance Criteria tab, select Next.
Select Done to return to the Assertion Creation section.
Select Next to view the Assertion Creation Summary tab.
Select Done to return to the Browser SSO section.
Select Next to view the Browser SSO > Protocol Settings tab.
Select Configure Protocol Settings.
On the Assertion Consumer Service URL tab, select Next.
On the SLO Service URLs tab, select Next.
On the Allowable SAML Bindings tab, deselect ARTIFACT and SOAP. Only select POST and REDIRECT.
Select Next.
On the Signature Policy tab, select Sign response as required. All three options on this page should be selected.
Select Next.
On the Encryption Policy tab, select Next.
On the Summary tab, select Done.
On the Browser SSO > Summary tab, select Done.
Select Next.
On the Credentials tab, select Configure Credentials.
On the Digital Signature Settings tab, set Signing Certificate to the certificate available.
Select Include the certificate in the signature <keyinfo> element.
Select Include the raw key in the signature <keyinfo> element.
Set Signing algorithm to RSA SHA256 (or whatever algorithm your certificate uses).
If necessary, select Manage Certificates to add a manage your certificates.
Select Done.
On the Credentials tab, select Configure Credentials.
On the Digital Signature Settings tab, select Next.
On the Signature Verification Settings tab, select Manage Signature Verification Settings.
On the Trust Model tab, select Next.
On the Signature Verification Certificate, confirm that the certificate is added. This certificate is used to decode messages from iManage.
Select Done.
On the Credentials > Summary tab, select Next.
On the Activation & Summary tab, select Save.
To export the federated metadata XML file for the SP Connection, select Export Metadata, as shown:
Figure: Select Action > Export metadata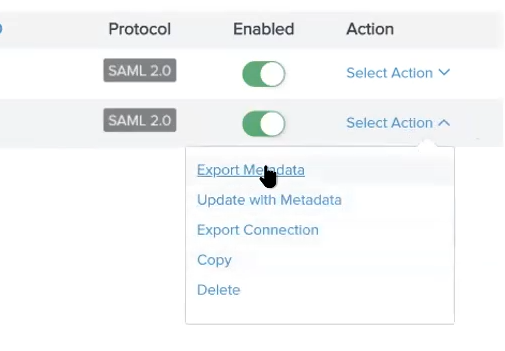
Select Next. You do not need to sign the metadata file.
On the Export & Summary tab, select Export. The metadata file is downloaded to your browser.
Done.
Import the Federated Metadata XML file into iManage Control Center by returning to iManage Control Center and completing the steps in Authentication & SSO.