Microsoft AD FS
The following steps describe how to configure SAML SSO in Active Directory Federation Services (AD FS).
Download the SSO settings for your iManage environment
Before you begin, download the settings in XML format for your iManage environment. These settings are used to configure the Microsoft Active Directory Federation Server (AD FS) SSO settings for your iManage environment.
In iManage Control Center, navigate to Network & Security > Authentication & SSO, then select Download XML.
Figure: Download XML option in iManage Control Center

Configure SSO in Microsoft AD FS
Complete the following steps in Microsoft AD FS to configure single sign-on for iManage users.
For more information, see the following Microsoft article: Create a Relying Party Trust.
In Server Manager, select Tools, and then select AD FS Management.
Under Actions, select Add Relying Party Trust.
Complete the steps in the To create a claims aware Relying Party Trust manually section using the following selections:
On the Welcome page, select Claims aware and select Start.
On the Select Data Source page, select Import Data about the replying party from a file.
Select Browse, then locate and select the XML file you downloaded from iManage Control Center.
Select Next.
On the Specify Display Name page, enter a descriptive name in the Display name field—for example, iManage, and then select Next.
On the Choose Access Control Policy page, select the access control policy required for your configuration, such as Permit Everyone, and then select Next.
On the Ready to Add Trust page, review your relying trust configuration settings, and then select Next.
On the Finish page, select Configure claims issuance policy for this application, and then select Close.
The Edit Claim Issuance Policy for <server> window opens.On the Edit Claims Issuance Policy for iManage page, select Add Rule.
Choose Send LDAP attributes as claims, and select Next. The Add Transform Claim Rule Wizard appears.
Figure: Add Transform Claim Rule Wizard
In the Add Transform Claim Rule Wizard, select Next.
In the Configure Claim Rule step, enter or select the following information:
In Claim rule name, enter Name.
In Attribute Store, select Active Directory.
In the Mapping section, select:
LDAP Attribute: SAM-Account-Name
This value must match the format of your iManage user IDs in iManage Control Center.Outgoing Claim Type: Name ID
Figure: Configure Claim Rule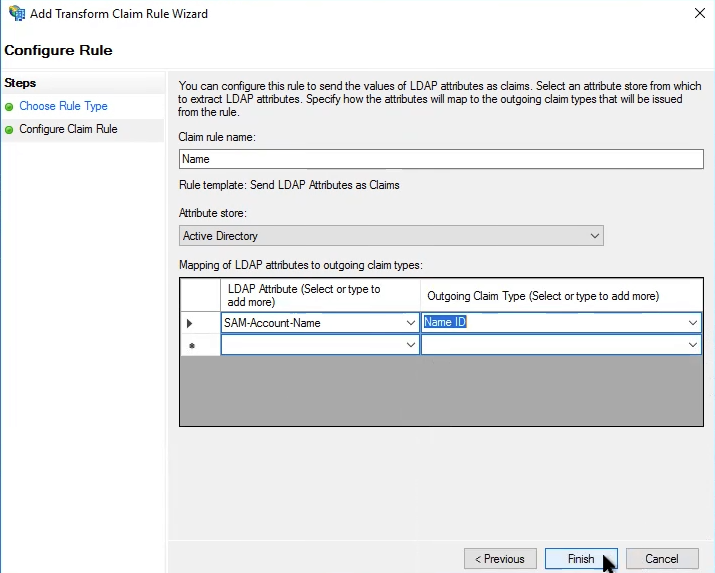
Select Finish.
Select Save and then select Apply.
Navigate to AD FS > Service > Endpoints.
Locate and select the entry for the Federated metadata.
Figure: Federated Metadata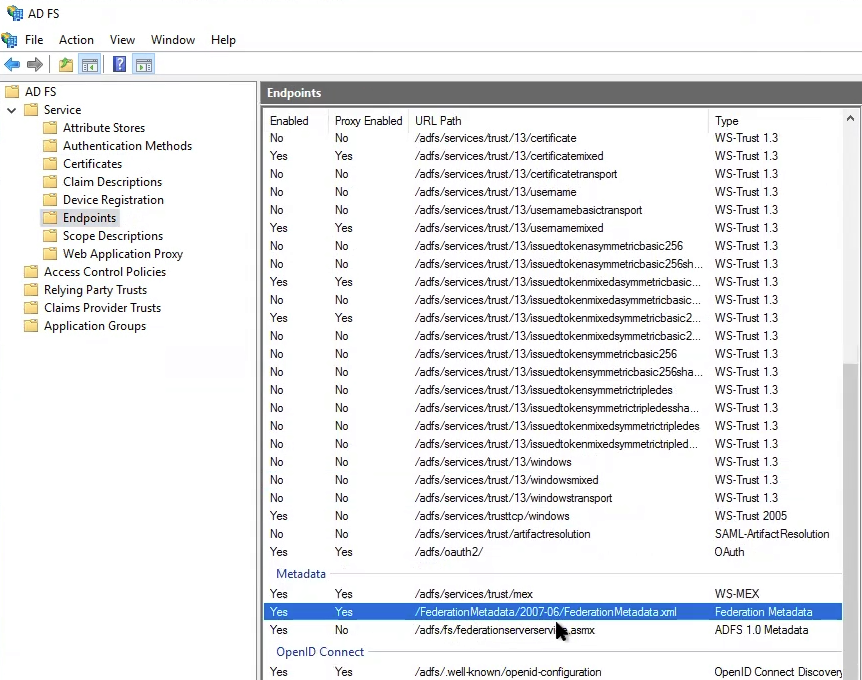
In a browser, enter the URL for your Windows Server followed by the path shown for the federated metadata—for example:
https://<server_name>/federationmetadata/2007-06/FederationMetadata.xml
The XML file is displayed in your browser.To save the displayed XML as a file, right-click in your browser, and select Save As.
Enter a file name and select Save.
Import the Federated Metadata XML file into iManage Control Center by returning to iManage Control Center and completing the steps in Authentication & SSO.
Note that any users who were actively signed in to iManage Work when this configuration change occurs will receive an error message "SAML Login Error - logout_not_success" if they attempt to sign out of iManage. This is expected behavior for this one time only. After launching a new browser, signing in or out of iManage will not trigger this error message.
Configure AD FS to sign the SAML response and assertion
To configure AD FS to sign both the SAML response and assertion:
Open Powershell.
Run the following command, and replace <relaying party display name> with the display name you configured in step 3.e in Configure SSO in Microsoft AD FS.
Set-ADFSRelyingPartyTrust -TargetName <relaying party display name> -SamlResponseSignature “MessageAndAssertion”
For example:
Set-ADFSRelyingPartyTrust -TargetName iManage -SamlResponseSignature “MessageAndAssertion”
Run the following command, and replace <relaying party display name> with the display name you configured in step 3.e in Configure SSO in Microsoft AD FS.
Set-ADFSRelyingPartyTrust -TargetName <relaying party display name> -SigningCertificateRevocationCheck None
For example:
Set-ADFSRelyingPartyTrust -TargetName iManage -SigningCertificateRevocationCheck None
Troubleshooting
If single sign-on is not performing as expected, review the AD FS logs for errors.
Open Event Viewer and navigate to Applications and Services Logs > AD FS > Admin.