Custom Fields
Overview
Custom fields are categories that list aliases. A custom field is a type of a profile field. Specifically, they are the profile fields custom1 through custom12, custom29, and custom30. Each of these custom fields contain items, each called an alias, that forms a list for that category. For example, custom3 may be captioned Jurisdiction, and contains any number of aliases such as Texas, Illinois, Orange County, or The Fifth Circuit Court of Appeals. When a document, email, or container is required to have a value for Jurisdiction, that choice must be one of those aliases.
Custom fields and aliases are used for identifying and categorizing documents, emails, and containers. For example, the custom1 profile field may be captioned as Clients, custom2 as Matters, and custom3 as Jurisdiction. Applying aliases from a series of custom fields to a document can precisely identify the document and its use. For example, a user can search for a document by specifying the Client as Microsoft, the Matter as Microsoft v Enron, and the Jurisdiction as Texas. For more information about captions, see Key Concepts: Metadata.
The following applies to all custom fields and aliases:
Aliases can be added as needed but can only be deleted when the field is no longer assigned to any workspaces or documents.
An alias must be defined for each custom field.
There is no limit to the number of aliases that can be created.
There may be duplicate aliases from different custom fields. Each custom field is independent from other custom fields.
Custom1/custom2 and custom29/custom30 represent special cases and have a parent/child relationship. In each case, custom2 and custom30 aliases are subsets of aliases in custom1 and custom29 respectively. That means each alias in custom1 and custom29 has its own set of aliases in custom2 and custom30 as if each of those were its own custom field. For instance, if custom1 is captioned as Client, it many have any number of aliases, representing the organization's clients. Client may have aliases for Microsoft, Enron, and others. Custom2 may be captioned as Matters. For each Client alias, there can be any number or Matter aliases. Continuing the example, the Client alias Microsoft may have a number of Matter aliases such as Acquisitions, Mergers, Microsoft v Apple, and Apple v Microsoft. To accurately represent these relationships, many client applications update selection lists for the child values based on which parent alias was selected. For example, if a user selected Client Microsoft, the Matters selection list displays only those matters associated with Microsoft. If the user selected Client Enron, the Matters list only displays those matters associated with Enron.
All custom fields aliases are validated. That means, an alias attempting to be assigned to document's, email's, or container's custom field must be already present in that custom field. If an alias is not present or if it is not enabled, it may not be selected. Many client applications present only valid custom fields aliases in a selection list, so that selecting an invalid alias will not be possible. If that alias is later deleted or changed, items already with the previous value are not affected.
The following figures display a sample progression of how the fields are used and presented.
|
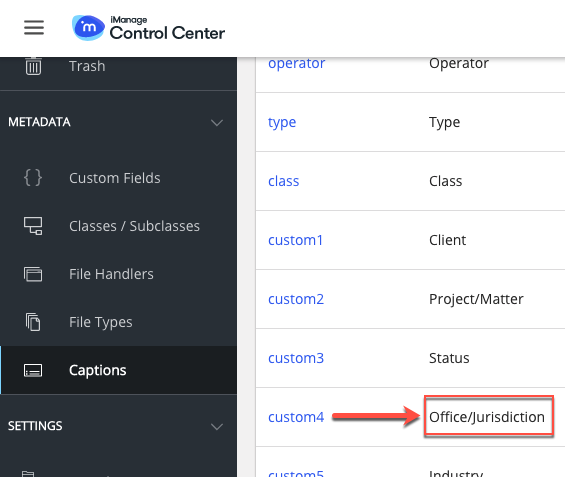
Figure: The captions listing
The profile field is internally named custom4. This name will never change. However, it is captioned as Office/Jurisdiction, which is the name that appears in the client application to the users. |
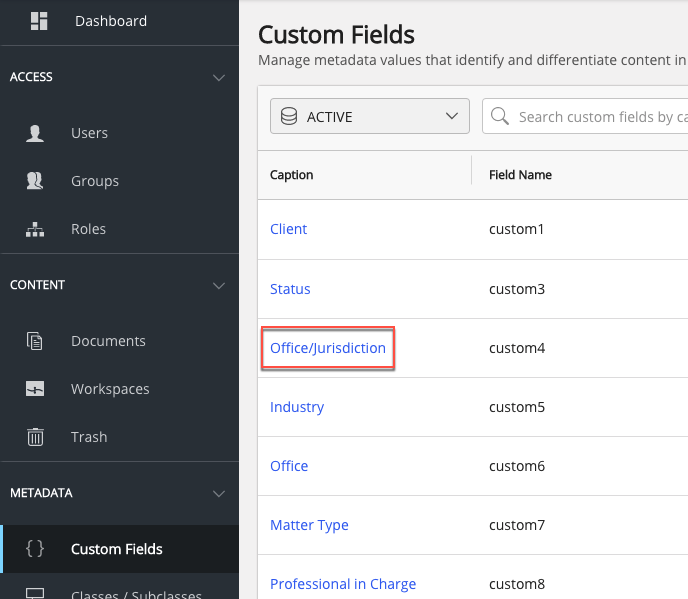
Figure: The custom fields listing
The custom fields panel lists all the available custom fields, or categories. Office/Jurisdiction is one of the categories. |
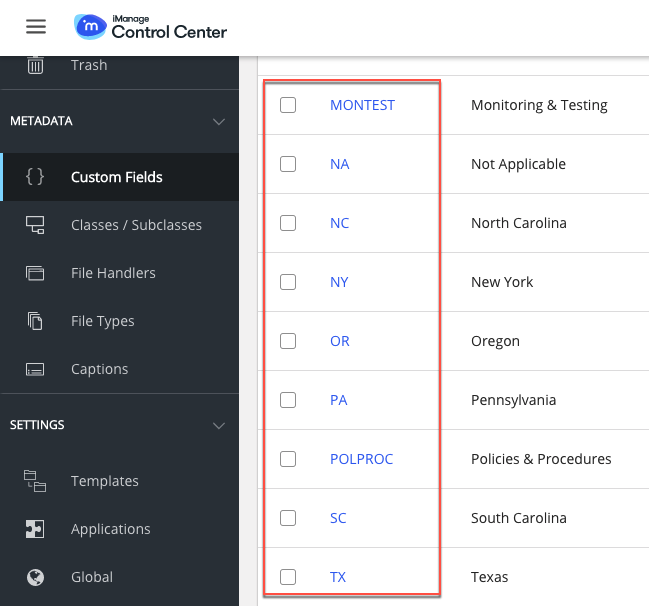
Figure: Aliases listing from custom fields
Selecting Office/Jurisdiction displays all the aliases, as seen here. |
|
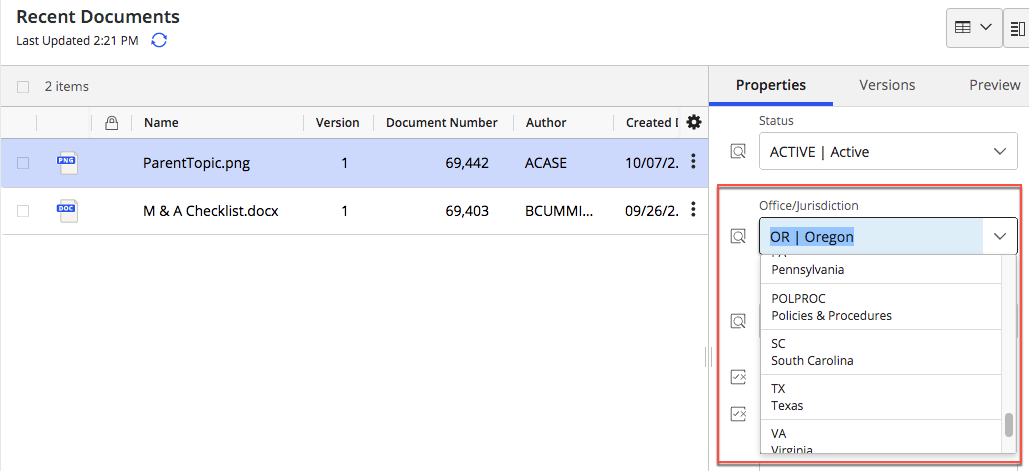
Figure: Applying an alias to a document property
In the client application, a selection list presents all the available options for the Office/Jurisdiction property. Only aliases presented in the list can be chosen. |
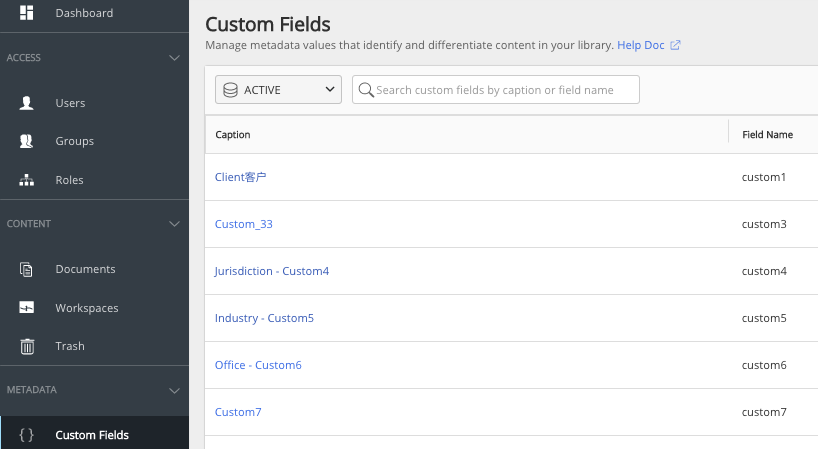
Viewing custom fields list
To view a list of all the available custom fields, select Custom Fields in the left control pane. The custom fields screen displays the available captions fields. Selecting an item from the Caption column allows that item to be edited.
Searching for custom fields
This option is available on the ribbon bar. Use this feature to search by Caption and Field Name.
Figure: Search Field

Creating custom fields aliases
This option is available on the:
Kebab menu: Select the

icon adjacent to each custom field to see this option.
Context menu: Right-click a custom field to see this option.
Clickable link: in the Alias column, select custom field.
The following steps are explained using one of the above
On the Custom Fields page, right-click the custom field to which you want to add an alias and choose Add <Custom Field>. The Create <Custom Field> dialog box displays.
Enter the following details:
Table: Create custom field dialog box
Field
Description
Alias
Specifies the name of the entry for this custom field.
NOTE: After creating a custom field, its alias cannot be modified.
This is a description, or meaningful, name for this custom field, which enables users to identify the purpose for creating it. This helps users manage documents effectively across projects in your organization. For example, it may be the location, department, company, or client name.
Minimum length: 1
Alphanumeric: a-z, A-Z, 0-9
Spaces allowed: No
Maximum length: 32
Standard special characters allowed: *().&-_[]`~|@$%^?:{}!',\#+<>;"=
Unicode allowed: Yes
Description
Specifies an optional description for the custom field.
This explains or is a reminder what the custom field is meant for. For example, if you provide the alias of the custom field as "Admin block", you would enter its description as "This custom field can be associated to documents pertaining to administration activities".
Minimum length: 0
Alphanumeric: a-z, A-Z, 0-9
Spaces allowed: Yes
Maximum length: 254
Standard special characters allowed: *().&-_[]`~|@$%^?:{}!',\#+<>;"=
Unicode allowed: Yes
Enable
Specifies to enable the custom field.
If set to Yes, this custom field is enabled.
If set to No, this custom field is disabled. This is the default value.
An enabled custom field can be selected from a list for use in that custom field. A disabled custom field cannot be selected for the custom field. However, custom fields already using that value will not be affected and will continue to use that value.
HIPAA Compliant
Specifies to encrypt documents or emails of this alias.
If set to Yes, the document or email will be encrypted.
If set to No, the document or email will not be encrypted. This is the default value. However, even if this is set to No, the document may still be encrypted from other sources. See below for additional information.

Select Create.
Editing a caption
This option is available on the:
Kebab menu: Select the
icon adjacent to each custom field to see this option.
Context menu: Right-click a custom field to see this option.
The following steps are explained using one of the preceding options:
Right-click custom field for which you want to edit and choose Edit Caption.
Edit the caption. The following naming restrictions apply:
Maximum length: 1
Alphanumeric: a-z, A-Z, 0-9
Spaces allowed: No
Maximum length: 254
Standard special characters allowed: Yes
Unicode allowed: Yes
Select Save.
Viewing custom field details
This option is available on the:
Ribbon bar: Select a custom field to see this option on the ribbon bar.
Kebab menu: Select the
icon adjacent to each custom field to see this option.
Context menu: Right-click a custom field to see this option.
Clickable link: In the Alias column, select custom field.
Use one of the preceding options to select View.
NOTE:
Using
 button, you can edit the custom field details.
As explained earlier (in the first paragraph of this page), there are two parent-child relational tables (subtables) are provided: Custom2 and Custom30 are subtables of Custom1 and Custom 29 respectively. When you right-click to view the details of Custom 1 and Custom 29, you see two tabs: DETAILS and <Subtable-name> .
For example,
if you right-click on Custom 1, you see two tabs, DETAILS and <Custom 2-name> .
if you right click on Custom 29, you see two tabs, DETAILS and <Custom 30-name> .
Enabling/disabling HIPAA Encryption
This option specifies to encrypt the document. This encryption is compliant to HIPAA and other American statutes protecting sensitive personal information from accidental or wrongful intentional disclosure.
Single custom field
This option is available on the:
Ribbon bar: Select a custom field to see this option on the ribbon bar.
Kebab menu: Select the
icon adjacent to each custom field to see this option.
Context menu: Right-click a custom field to see this option.
For example, use the context menu option to enable the HIPAA compliant option.
Scenario: A custom field value's HIPAA compliant option is currently disabled (value is set to No)
Solution: Right-click custom field, and select Set HIPAA Compliant to Yes. The HIPAA Compliant option for the custom field is now enabled.
Multiple custom field
This option is available on the ribbon bar; select custom fields to see this option on the ribbon bar.
Select the checkboxes beside the desired custom fields, then select the HIPAA Compliant option or drop-down on the ribbon bar.
Select the required option. A confirmation message appears.
Enabling/disabling custom fields
Enabling or disabling a custom field controls whether it is visible in iManage Work client applications.
Single custom field
This option is available on the:
Ribbon bar: Select a custom field to see this option on the ribbon bar.
Kebab menu: Select the
icon adjacent to each custom field to see this option.
Context menu: Right-click a custom field to see this option.
Use one of the preceding options and select Enable or Disable depending on the value previously set for the particular custom field. A confirmation message box appears only when you want to disable a custom field. For example, if the custom field status is enabled and you want to disable it, a confirmation message box appears. Confirm the action to continue or abort.
Multiple custom fields
This option is available on the ribbon bar. Select the checkboxes beside multiple custom fields and then select Enable or Disable depending on the value previously set. A confirmation message box appears only when you want to disable a custom field. For example, if the custom field's status is enabled and if you want to disable it, a confirmation message box appears. Confirm the action to continue or abort.
Editing a custom field
The Edit option is available on the:
Ribbon bar: Select a custom field to see this option on the ribbon bar.
Kebab menu: Select the
icon adjacent to each custom field to see this option.
Context menu: Right-click a custom field to see this option.
The following steps are explained using one of the preceding options:
Select the custom field whose value you want to edit.
Right-click and select Edit. Update the required details. For information about the fields, see Table: Add custom field dialog box.
Select Save.
Deleting custom fields
Single custom field
The Delete option is available on the:
Ribbon bar: Select a custom field to see this option on the ribbon bar.
Kebab menu: Select the
icon adjacent to each custom field to see this option.
Context menu: Right-click a custom field to see this option.
Use one of the preceding options to delete the required custom field.
Multiple custom field
The Delete option is available on the ribbon bar. Select custom fields and select Delete. The Delete confirmation box appears. Confirm the action to Delete or Cancel.